前言
- HTML / CSS 这部分不是重点,了解即可,必学
- JavaScript 这部分是重点,尤其是 ES6 以后的一些新语法,不理解这些,前端代码根本看不懂,必学
- Vue2,Vue3,React 这三章是三选一的关系,根据公司使用的前端技术不同,有针对地学习
- 后三章会涵盖 TypeScript、VueCli、Vuex、VueRouter、ElementUI、Vite、CreateReactApp、React、Redux、ReactRouter 等库和工具的使用
- jquery 一些公司确实会用到,也作为一个可选章节进行学习
第一章 HTML&CSS
HTML 是什么:即 HyperText Markup language 超文本标记语言,咱们熟知的网页就是用它编写的,HTML 的作用是定义网页的内容和结构。
- HyperText 是指用超链接的方式组织网页,把网页联系起来
- Markup 是指用
<标签>的方式赋予内容不同的功能和含义
CSS 是什么:即 Cascading Style Sheets 级联(层叠)样式表,它描述了网页的表现与展示效果
HTML 元素
HTML 由一系列元素 elements 组成,例如
<p>Hello, world!</p>
- 整体称之为元素
<p>和</p>分别称为起始和结束标签-
标签包围起来的 Hello, world 称之为内容
- p 是预先定义好的 html 标签,作用是将内容作为一个单独的段落
元素还可以有属性,如
<p id="p1">Hello, world!</p>
- 属性一般是预先定义好的,这里的 id 属性是给元素一个唯一的标识
元素之间可以嵌套,如
<p>HTML 是一门非常<b>强大</b>的语言</p>
错误嵌套写法:
<p>HTML 是一门非常<b>强大的语言</p></b>
不包含内容的元素称之为空元素,如
<img src="1.png">
<img src="1.png"/>
- img 作用是用来展示图片
- src 属性用来指明图片路径
HTML 页面
前面介绍的只是单独的 HTML 元素,它们可以充当一份完整的 HTML 页面的组成部分
<!DOCTYPE html>
<html>
  <head>
    <meta charset="utf-8">
    <title>测试页面</title>
  </head>
  <body>
    <p id="p1">Hello, world!</p>
    <img src="1.png">
  </body>
</html>
html元素囊括了页面中所有其它元素,整个页面只需一个,称为根元素head元素包含的是那些不用于展现内容的元素,如title,link,meta等body元素包含了对用户展现内容的元素,例如后面会学到的用于展示文本、图片、视频、音频的各种元素
常见元素
1) 文本
Heading
<h1>1号标题</h1>
<h2>2号标题</h2>
<h3>3号标题</h3>
<h4>4号标题</h4>
<h5>5号标题</h5>
<h6>6号标题</h6>
Paragraph
<p>段落</p>
List
无序列表 unordered list
<ul>
    <li>列表项1</li>
    <li>列表项2</li>
    <li>列表项3</li>
</ul>
有序列表
<ol>
    <li>列表项1</li>
    <li>列表项2</li>
    <li>列表项3</li>
</ol>
多级列表
<ul>
    <li>
    	北京市
        <ul>
            <li>海淀区</li>
            <li>朝阳区</li>
            <li>昌平区</li>
        </ul>
    </li>
    <li>
    	河北省
        <ul>
            <li>石家庄</li>
            <li>保定</li>
        </ul>
    </li>
</ul>
Anchor
锚,超链接
<a href="网页地址">超链接文本</a>
2) 多媒体
Image
<img src="文件路径">
src 格式有 3 种
-
文件地址
-
data URL,格式如下
data:媒体类型;base64,数据 -
object URL,需要配合 javascript 使用
Video
<video src="文件路径"></video>
Audio
<audio src="文件路径"></audio>
3) 表单
作用与语法
表单的作用:收集用户填入的数据,并将这些数据提交给服务器
表单的语法
<form action="服务器地址" method="请求方式" enctype="数据格式">
    <!-- 表单项 -->
    <input type="submit" value="提交按钮">
</form>
- method 请求方式有
- get (默认)提交时,数据跟在 URL 地址之后
- post 提交时,数据在请求体内
- enctype 在 post 请求时,指定请求体的数据格式
- application/x-www-form-urlencoded(默认)
- multipart/form-data
- 其中表单项提供多种收集数据的方式
- 有 name 属性的表单项数据,才会被发送给服务器
常见的表单项
文本框
<input type="text" name="uesrname">
密码框
<input type="password" name="password">
隐藏框
<input type="hidden" name="id">
日期框
<input type="date" name="birthday">
单选
<input type="radio" name="sex" value="男" checked>
<input type="radio" name="sex" value="女">
多选
<input type="checkbox" name="fav" value="唱歌">
<input type="checkbox" name="fav" value="逛街">
<input type="checkbox" name="fav" value="游戏">
文件上传
<input type="file" name="avatar">
HTTP 请求
1) 请求组成
请求由三部分组成
- 请求行
- 请求头
- 请求体
可以用 telnet 程序测试
2) 请求方式与数据格式
get 请求示例
GET /test2?name=%E5%BC%A0&age=20 HTTP/1.1
Host: localhost
- %E5%BC%A0 是【张】经过 URL 编码后的结果
post 请求示例
POST /test2 HTTP/1.1
Host: localhost
Content-Type: application/x-www-form-urlencoded
Content-Length: 21

name=%E5%BC%A0&age=18
application/x-www-form-urlencoed 格式细节:
- 参数分成名字和值,中间用 = 分隔
- 多个参数使用 & 进行分隔
- 【张】等特殊字符需要用 encodeURIComponent() 编码为 【%E5%BC%A0】后才能发送
json 请求示例
POST /test3 HTTP/1.1
Host: localhost
Content-Type: application/json
Content-Length: 25

{"name":"zhang","age":18}
json 对象格式
{"属性名":属性值}
其中属性值可以是
- 字符串 “”
- 数字
- true, false
- null
- 对象
- 数组
json 数组格式
[元素1, 元素2, ...]
multipart 请求示例
POST /test2 HTTP/1.1
Host: localhost
Content-Type: multipart/form-data; boundary=123
Content-Length: 125

--123
Content-Disposition: form-data; name="name"

lisi
--123
Content-Disposition: form-data; name="age"

30
--123--
- boundary=123 用来定义分隔符
- 起始分隔符是
--分隔符 - 结束分隔符是
--分隔符--
数据格式小结
客户端发送
- 编码
- application/x-www-form-urlencoded :url 编码
- application/json:utf-8 编码
- multipart/form-data:每部分编码可以不同
- 表单只支持以 application/x-www-form-urlencoded 和 multipart/form-data 格式发送数据
- 文件上传需要用 multipart/form-data 格式
- js 代码可以支持任意格式发送数据
服务端接收
- 对 application/x-www-form-urlencoded 和 multipart/form-data 格式的数据,Spring 接收方式是统一的,只需要用 Java bean 的属性名对应请求参数名即可
- 对于 applicaiton/json 格式的数据,Spring 接收需要使用 @RequestBody 注解 + Java bean 的方式
3) session 原理
Http 无状态,有会话
- 无状态是指,请求之间相互独立,第一次请求的数据,第二次请求不能重用
- 有会话是指,客户端和服务端都有相应的技术,可以暂存数据,让数据在请求间共享
服务端使用了 session 技术来暂存数据
存(服务器端接收到请求响应后将 session id 的值返回给客户端)
GET /s1?name=zhang HTTP/1.1
Host: localhost
取(客户端取需要访问 session 中的数据时携带 session id,表明要访问那个 session 中的数据,如果没携带,服务端认为这是一个新的客户端,为其创建 sessin 和 session id)
GET /s2 HTTP/1.1
Host: localhost
Cookie: JSESSIONID=560FA845D02AE09B176E1BC5D9816A5D
session 技术实现身份验证
sequenceDiagram
participant Client
participant L as LoginController
participant i as LoginInterceptor
participant Session
rect rgb(200, 223, 255)
Client ->> +L : 登录请求
L ->> L : 检查用户名,密码,验证通过
L ->> +Session : 存入用户名
Session -->> -L:
L -->> -Client: 登录成功
end
rect rgb(200, 190, 255)
Client ->> +i : 其它请求
i ->> +Session : 获取用户名
Session -->> -i :
i ->> i: 用户名存在,放行
i -->> -Client :
end
4) jwt 原理
jwt 技术实现身份验证
sequenceDiagram
participant Client
participant L as LoginController
participant i as LoginInterceptor

rect rgb(200, 223, 255)
Client ->> +L : 登录请求
L ->> L : 检查用户名,密码,验证通过
L -->> -Client : 登录成功,返回token
end

rect rgb(150, 190, 155)
Client ->> +i : 其它请求,携带token
i ->> i : 校验token,校验无误,放行
i -->> -Client :
end
生成 token
GET /j1?name=zhang&pass=123 HTTP/1.1
Host: localhost
校验 token
GET /j2 HTTP/1.1
Host: localhost
Authorization: eyJhbGciOiJIUzI1NiJ9.eyJzdWIiOiJhZG1pbiJ9._1-P_TLlzQPb1_lCyGwplMZaKQ8Mcw_plBbYPZ3OX28
CSS
即 Cascading Style Sheets,它描述了网页的表现与展示效果
1) 选择器
- type 选择器 - 根据标签名进行匹配(元素选择器)
-
class 选择器 - 根据元素的 class 属性进行匹配
- id 选择器 - 根据元素的 id 属性进行匹配
2) 属性和值
- background-color : red;
- …
- display
3) 布局
与布局相关的 html 元素
- div
- template
第二章 Javascript
它是一种脚本语言,可以用来更改页面内容,控制多媒体,制作图像、动画等等。(用 vscode 运行 js 可以用 node.exe 来执行 js 代码,比较方便。)
例子
- 修改页面内容
js 代码位置
<script>
	// js 代码
</script>
引入 js 脚本
<script src="js脚本路径"></script>
- 注意,到了框架之后,引入方式会有不同
1.变量与数据类型
声明变量
1) let :star:
let 变量名 = 值;
- let 声明的变量可以被多次赋值,例如
let a = 100;  // 初始值是 100
a = 200;	  // ok, 被重新赋值为 200
2) const :star:
- const 修饰的叫常量,只能赋值一次
const b = 300; // 初始值是 300
b = 400;	   // error, 不能再次赋值
- const 并不意味着它引用的内容不可修改,例如
const c = [1,2,3];
c[2] = 4; 	        // ok, 数组内容被修改成 [1,2,4]
c = [5,6];			// error, 不能再次赋值
3) var
var 声明的变量可以被多次赋值,例如
var f = 100;
f = 200;
基本类型
1,2) undefined 和 null
- 执行表达式或函数,没有返回结果,出现 undefined
- 访问数组不存在的元素,访问对象不存在的属性,出现 undefined
- 定义变量,没有初始化,出现 undefined
例
console.log(1);  	// 函数没有返回值, 结果是  undefined
let a = 10;		 	// 表达式没有返回值, 结果是 undefined
let b = [1,2,3];
console.log(b[10]); // 数组未定义元素是 undefined
let c = {"name":"张三"};
console.log(c.age); // 对象未定义属性是 undefined
let d;
console.log(d);		// 变量未初始化是 undefined
二者共同点
- 都没有属性、方法
- 二者合称 Nullish
二者区别
- undefined 由 js 产生
- null 由程序员提供
3) string :star:
js 字符串三种写法
let a = "hello";  // 双引号
let b = "world";  // 单引号
let c = `hello`;  // 反引号
html 代码如下,用 Java 和 js 中的字符串如何表示?
<a href="1.html">超链接</a>
Java 显得比较繁琐
String s1 = "<a href=\"1.html\">超链接</a>";

String s2 = """
    <a href="1.html">超链接</a>""";
js 就比较灵活
let s1 = '<a href="1.html">超链接</a>';

let s2 = `<a href="1.html">超链接</a>`;
模板字符串(Template strings)
需求:拼接 URI 的请求参数,如
/test?name=zhang&age=18
/test?name=li&age=20
传统方法拼接
let name = ; // zhang li ...
let age = ; // 18 20 ...

let uri = "/test?name=" + name + "&age=" + age;
模板字符串方式
let name = ; // zhang li ...
let age = ; // 18 20 ...

let uri = `/test?name=${name}&age=${age}`;
4) number:star:
number 类型标识的是双精度浮动小数,例如
10 / 3; // 结果 3.3333333333333335
既然是浮点小数,那么可以除零
10 / 0;	  // 结果 Infinity 正无穷大
-10 / 0;  // 结果 -Infinity 负无穷大
浮点小数都有运算精度问题,例如
2.0 - 1.1; // 结果 0.8999999999999999
字符串转数字
parseInt("10"); 	// 结果是数字 10
parseInt("10.5");	// 结果是数字 10, 去除了小数部分
parseInt("10") / 3; // 结果仍视为 number 浮点数, 因此结果为 3.3333333333333335

parseInt("abc");	// 转换失败,结果是特殊值 NaN (Not a Number)
5) bigint:star:
要表示真正的整数,需要用 bigint,数字的结尾用 n 表示它是一个 bigint 类型
10n / 3n; // 结果 3n, 按整数除法处理
6) boolean :star:
- Truthy
- Falsy
在 js 中,并不是 boolean 才能用于条件判断,你可以在 if 语句中使用【数字】、【字符串】… 作为判断条件
let b = 1;

if(b) { // true
    console.log("进入了");
}
这时就有一个规则,当需要条件判断时,这个值被当作 true 还是 false,当作 true 的值归类为 truthy,当作 false 的值归类为 falsy
下面值都是 falsy
falseNullish (null, undefined)0, 0n, NaN"" '' ``即长度为零的字符串
剩余的值绝大部分都是 truthy
有几个容易被当作 falsy 实际是 truthy 的
"false", "0"即字符串的 false 和字符串的零[]空数组{}空对象
7) symbol
- 很少使用
对象类型
1) Function :star::star:
函数,一等公民。相对于 OOP 语言中的对象。
定义函数
function 函数名(参数) {
    // 函数体
    return 结果;
}
例
function add(a, b) {
    return a + b;
}
调用函数
函数名(实参);
例
add(1, 2); // 返回 3
js 中的函数调用特点:对参数的类型和个数都没有限制,例如
add('a', 'b');  // 返回 ab
add(4, 5, 6);   // 返回 9, 第三个参数没有被用到, 不会报错
add(1);			// 返回 NaN, 这时 b 没有定义是 undefined, undefined 做数学运算结果就是 NaN
默认参数
Java 中(spring)要实现默认参数的效果得这么做:
@RestController
public class MyController {

    @RequestMapping("/page")
    @ResponseBody
    public void page(
        @RequestParam(defaultValue="1") int page,
        @RequestParam(defaultValue="10") int size
    ){
        // ...
    }
}
js
function pagination(page = 1, size = 10) {
    console.log(page, size);
}
匿名函数
语法
(function (参数) {
    // 函数体
    return 结果;
})
例
(function(a,b){
    return a + b;
})
第一种场景:定义完毕后立刻调用。可以与 Java 的匿名内部类进行对比。
(function(a,b){
    return a + b;
})(1,2)
第二种场景:作为其它对象的方法,例如
页面有元素
<p id="p1">点我啊</p>
此元素有一个 onclick 方法,会在鼠标单击这个元素后被执行,onclick 方法刚开始是 null,需要赋值后才能使用
document.getElementById("p1").onclick = (function(){
    console.log("鼠标单击了...");
});
箭头函数
(参数) => {
    // 函数体
    return 结果;
}
- 如果没有参数,() 还是要保留
- 如果只有一个参数,() 可以省略
- 如果函数体内只有一行代码,{} 可以省略
- 如果这一行代码就是结果,return 可以省略
例
document.getElementById("p1").onclick = () => console.log("aa");
函数是对象
以下形式在 js 中非常常见!
- 可以参与赋值,例,具名函数也能参与赋值
function abc() {
    console.log("bb");
}
// abc() 是调用, abc 则是拿到类似于函数的地址
document.getElementById("p1").onclick = abc;
- 有属性、有方法,执行
console.dir(abc),输出结果如下
ƒ abc()
    arguments: null
    caller: null
    length: 0
    name: "abc"
    ➡prototype: {constructor: ƒ}
    [[FunctionLocation]]: VM1962:1
    ➡[[Prototype]]: ƒ ()
    ➡[[Scopes]]: Scopes[1]
- 其中带有 f 标记的是方法,不带的是属性
-
带有 ➡ 符号的可以继续展开,限于篇幅省略了
- 带有
[[ ]]的是内置属性,不能访问,只能查看 - 相对重要的是
[[Prototype]]和[[Scopes]]会在后面继承和作用域时讲到
- 可以作为方法参数
function a() {
    console.log('a')
}

function b(fn) {          // fn 将来可以是一个函数对象
    console.log('b')
    fn();                 // 调用函数对象
}

b(a)
- 可以作为方法返回值
function c() {
    console.log("c");
    function d() {
        console.log("d");
    }
    return d;
}

c()()
函数作用域
函数可以嵌套(js 代码中很常见,只是嵌套的形式更多是匿名函数,箭头函数)
function a() {
    function b() {
    }
}
看下面的例子
function c() {
    var z = 30;
}

var x = 10;
function a() {
    var y = 20;
    function b() {
        // 看这里
        console.log(x, y);
    }
    b();
}
a();
- 以函数为分界线划定作用域,所有函数之外是全局作用域
- 查找变量时,由内向外查找
- 在内层作用域找到变量,就会停止查找,不会再找外层
- 所有作用域都找不到变量,报错
- 作用域本质上是函数对象的属性,可以通过 console.dir 来查看调试
闭包
var x = 10;
function a() {
    var y = 20;
    function b() {
        console.log(x,y);
    }
    return b;
}
a()();  // 在外面执行了 b
- 函数定义时,它的作用域已经确定好了,因此无论函数将来去了哪,都能从它的作用域中找到当时那些变量
- 别被概念忽悠了,闭包就是指函数能够访问自己的作用域中变量
let、var 与作用域
如果函数外层引用的是 let 变量,那么外层普通的 {} 也会作为作用域边界,最外层的 let 也占一个 script 作用域。
let x = 10;
if(true) {
    let y = 20;
    function b() {
        console.log(x,y);
    }
    console.dir(b);
}
如果函数外层引用的是 var 变量,外层普通的 {} 不会视为边界,下面的代码只剩一个全局作用域。
var x = 10;
if(true) {
    var y = 20;
    function b() {
        console.log(x,y);
    }
    console.dir(b);
}
如果 var 变量出现了重名,则他俩会被视为同一作用域中的同一个变量
var e = 10;
if(true) {
    var e = 20;
    console.log(e);	// 打印 20
}
console.log(e);		// 因为是同一个变量,还是打印 20
如果是 let,则视为两个作用域中的两个变量
let e = 10;
if(true) {
    let e = 20;
    console.log(e);	// 打印 20
}
console.log(e);		// 打印 10
要想里面的 e 和外面的 e 能区分开来,最简单的办法是改成 let,或者用函数来界定作用域范围
var e = 10;
if(true) {
    function b() {
        var e = 20;
    	console.log(e);
    }
    b();
}
console.log(e);
2) Array :star:
语法
// 创建数组
let arr = [1,2,3];

// 获取数组元素
console.log(arr[0]); // 输出 1

// 修改数组元素
array[0] = 5;		 // 数组元素变成了 [5,2,3]

// 遍历数组元素,其中 length 是数组属性,代表数组长度
for(let i = 0; i < arr.length; i++) {
    console.log(arr[i]);
}
API
- push、shift、splice
let arr = [1,2,3];

arr.push(4);    	// 向数组尾部(右侧)添加元素, 结果 [1,2,3,4]
arr.shift();		// 从数组头部(左侧)移除元素, 结果 [2,3,4]
arr.splice(1,1);	// 删除【参数1】索引位置的【参数2】个元素,结果 [2,4], 索引位置从 0 开始计数。
- join
let arr = ['a','b','c'];

arr.join(); 		// 默认使用【,】作为连接符,结果 'a,b,c'
arr.join('');		// 结果 'abc'
arr.join('-');		// 结果 'a-b-c'
- map、filter、forEach
let arr = [1,2,3,6];

function a(i) {   // 代表的新旧元素之间的变换规则
    return i * 10
}

// map 与 Java lambda 中的 map 类似,用于元素转换。
// arr.map(a) // 具名函数,结果 [10,20,30,60]

// arr.map( (i) => {return i * 10} ); // 箭头函数
arr.map( i => i * 10 ); // 箭头函数
- 传给 map 的函数,参数代表旧元素,返回值代表新元素
map 的内部实现(伪代码)
function map(a) { // 参数是一个函数
    let narr = [];
    for(let i = 0; i < arr.length; i++) {
        let o = arr[i]; // 旧元素
        let n = a(o);   // 新元素
        narr.push(n);
    }
    return narr;
}
filter 例子
let arr = [1,2,3,6];
arr.filter( (i)=> i % 2 == 1 ); // 结果 [1,3]
- 传给 filter 的函数,参数代表旧元素,返回 true 表示要留下的元素
forEach 例子
let arr = [1,2,3,6];

/*for(let i = 0; i < arr.length; i++) {
    console.log(arr[i]);
}*/

arr.forEach( (i) => console.log(i) );
两个称呼
- 高阶函数,map,filter,forEach
- 回调函数,例如作为参数传入的函数
3) Object :star::star:
语法
let obj = {
    属性名: 值,
    方法名: 函数,
    get 属性名() {},
    set 属性名(新值) {}
}
例1
let stu1 = {
    name: "小明",
    age: 18,
    study: function(){
        console.log(this.name + "爱学习");
    }
}
例2
let name = "小黑";
let age = 20;
let study = function(){
    console.log(this.name + "爱学习");
}

let stu2 = { name, age, study }
例3(重点)
let stu3 = {
    name: "小白",
    age: 18,
    study(){
        console.log(this.name + "爱学习");
    }
}
- 注意:对象方法这么写,仅限于对象内部
例4
let stu4 = {
    // 需要支持 ES6 的浏览器才能在控制台执行
    _name: null, /*类似于Java中私有成员变量*/
    get name() {
        console.log("进入了get");
        return this._name;
    },
    set name(name) {
        console.log("进入了set");
        this._name = name;
    }
}
调用 get,set
stu4.name = "小白"

console.log(stu4.name)
特色:计算属性
上述的简写方法名可以与计算属性键相互兼容
const methodKey = 'sayName';
let person = {
    [methodKey](name){
        console.log(`My name is ${name}`);
    }
}

person['sayName']('jerry')
person.sayName('jerry')
特色:属性增删
对比一下 Java 中的 Object
- Java 的 Object 是以类作为模板来创建,对象不能脱离类模板的范围,一个对象的属性、能用的方法都是确定好的
- js 的对象,不需要什么模板,它的属性和方法可以随时加减
let stu = {name:'张三'};
stu.age = 18;					// 添加属性
delete stu.age;					// 删除属性

stu.study = function() {		// 添加方法
    console.log(this.name + "在学习");
}
添加 get,set,需要借助 Object.definePropery
let stu = {_name:null};

Object.defineProperty(stu, "name", {
    get(){
        return this._name;
    },
    set(name){
        this._name = name;
    }
});
- 参数1:目标对象
- 参数2:属性名
- 参数3:get,set 的定义
构造函数
js 中的构造函数和普通函数的语法一样,只要使用 new 操作符调用的函数就是构造函数。
function Person(){
    this.name = 'jerry';
    this.sayName = function(){
        console.log(this.name);
    }
}

let p1 = new Person()
let p2 = new Person // 如果不想传参数,构造函数后面的括号可以不加
上面 new 了两个对象,但是由于函数是在 Person 内部创建的,相当于每 new 一个 person 就有一个对应的函数被创建 p1#sayName 和 p2#sayName 并不相等。
function Person(){
    this.name = 'jerry';
    this.sayName = new Function('console.log(this.name)')// 逻辑上等价
}
解决这个问题也很简单,在 Person 外部定义函数即可
function Person(){
    this.name = 'jerry';
    this.sayName = sayName;
}

function sayName(){
    console.log(this.name);
}

let p1 = new Person()
let p2 = new Person // 如果不想传参数,构造函数后面的括号可以不加
特色:this
先来对 Java 中的 this 有个理解
public class TestMethod {

    static class Student {
        private String name;

        public Student(String name) {
            this.name = name;
        }

        public void study(Student this, String subject) {
            System.out.println(this.name + "在学习 " + subject);
        }
    }

    public static void main(String[] args) {
        Student stu = new Student("小明");

        // 下面的代码,本质上是执行 study(stu, "Java"),因此 this 就是 stu
        stu.study("Java");
    }
}
- Java 中的 this 是个隐式参数
- Java 中,我们说 this 代表的就是调用方法的那个对象
js 中的 this 也是隐式参数,但它与函数运行时上下文相关。特别需要注意的是,箭头函数内出现的 this,以外层 this 理解。
例如,一个“落单”的函数,其 this 是全局对象(一般是 window 对象)
function study(subject) {
    console.log(this.name + "在学习 " + subject)
}
测试一下
study("js"); // 输出 在学习 js
这是因为,此时函数执行,全局对象 window 被当作了 this,window 对象的 name 属性是空串
同样的函数,如果作为对象的方法
let stu = {
    name:"小白",
    study // 为什么这个就和 stu 对象关联了起来。下面那个 stu 就没有关联起来
}
这种情况下,会将当前对象作为 this
stu.study('js'); // 输出 小白在学习 js
还可以动态改变 this
let stu = {name:"小黑"};
study.call(stu, "js");	// 输出 小黑在学习 js
这回 study 执行时,就把 call 的第一个参数 stu 作为 this
一个例外是,在箭头函数内出现的 this,以外层 this 理解
用匿名函数
window.name = 'window'
let stu = {
    name: "小花",
    friends: ["小白","小黑","小明"],
    play() {
        // play 作为对象的方法,其 this 就是 stu,对象调用函数的话 this 就表示 stu
        // 因此第一个 this 表示 stu
        this.friends.forEach(function(e){
            // 第二个 this 位于匿名函数中,是个落单的函数,并不是 stu 对象的函数,因此其 this 代表的 window 对象。
            console.log(this.name + "与" + e + "在玩耍");
        });
    }
}

stu.play()
/*
 window与小白在玩耍
 window与小黑在玩耍
 window与小明在玩耍
*/
- this.name 所在的函数是【落单】的函数,因此 this 代表 window
输出结果为
与小白在玩耍
与小黑在玩耍
与小明在玩耍
用箭头函数
let stu = {
    name: "小花",
    friends: ["小白","小黑","小明"],
    play() {
        this.friends.forEach(e => {
            console.log(this.name + "与" + e + "在玩耍");
        })
    }
}
- this.name 所在的函数是箭头函数,因此 this 要看它外层的 play 函数,play 又是属于 stu 的方法,因此 this 代表 stu 对象
输出结果为
小花与小白在玩耍
小花与小黑在玩耍
小花与小明在玩耍
不用箭头函数的做法
let stu = {
    name: "小花",
    friends: ["小白","小黑","小明"],
    play() {
        let me = this;
        this.friends.forEach(function(e){
            console.log(me.name + "与" + e + "在玩耍");
        });
    }
}
特色:原型继承
先回顾下 Java 的继承
classDiagram
class Father
class Son
Father <|-- Son : Inheritance
class Father{
	String name
	int age
	void method()
}
class Son{
String sex
}
通过类(类模板)创建的对象会包含:Markword、类指针(执行方法时可通过类指针找到类中对应的方法)、成员属性;即,对象只存储对象头(Markword)和数据,不包含方法。
classDiagram
class Object{
Markword
类指针=Father
name=wor
age=10
}
如果包含继承关系,则会综合子类模板和父类模板来创建对象。
JavaScript 的继承是原型继承。
let
father = {
    f1: '父属性',
    m1: function() {
        console.log("父方法");
    }
}
// 以父对象为原型创建子对象
let son = Object.create(father);

console.log(son.f1);  // 打印 父属性
son.m1();			  // 打印 父方法
- father 是父对象,son 去调用 .m1 或 .f1 时,自身对象没有,就到父对象找
- son 自己可以添加自己的属性和方法
- son 里有特殊属性
__proto__代表它的父对象,js 术语: son 的原型对象 - 不同浏览器对打印 son 的
__proto__属性时显示不同- Edge 打印 console.dir(son) 显示
[[Prototype]] - Firefox 打印 console.dir(son) 显示
<prototype>
- Edge 打印 console.dir(son) 显示
特色:基于函数的原型继承:star::star:
出于方便的原因,js 又提供了一种基于函数的原型继承
函数职责
负责创建子对象,给子对象提供属性、方法,功能上相当于构造方法;其父对象是 Object
函数有个特殊的属性 prototype,它就是函数创建的子对象的父对象
注意!名字有差异,这个属性的作用就是为新对象提供原型
// 为对象指定一个父类 Object。
function cons(f2) {
    // 创建子对象(this), 给子对象提供属性和方法 【用 new 创建的对象,因此 this 指的对象】
    this.f2 = f2;
    this.m2 = function () {
        console.log("子方法");
    }
}

// 使用 new 创建子对象
// let obj = new cons()

// cons.prototype 就是父对象(默认是 Object), 下面的代码是给父对象 Object 绑定属性和方法
cons.prototype.f1 = "父属性";
cons.prototype.m1 = function() {
    console.log("父方法");
}
配合 new 关键字,创建子对象
let son = new cons("子属性")
子对象的 __proto__ 就是函数的 prototype 属性
JSON
之前我们讲 http 请求格式时,讲过 json 这种数据格式,它的语法看起来与 js 对象非常相似,例如:
一个 json 对象可以长这样:
{
    "name":"张三",
    "age":18
}
一个 js 对象长这样:
{
    name:"张三",
    age:18
}
那么他们的区别在哪儿呢?
- 本质不同
- json 本质上是个字符串,它的职责是作为客户端和服务器之间传递数据的一种格式,它的属性只是样子货,无通过
json xx.属性获取到属性值。 - js 对象是切切实实的对象,可以有属性方法
- json 本质上是个字符串,它的职责是作为客户端和服务器之间传递数据的一种格式,它的属性只是样子货,无通过
- 语法细节不同
-
json 中只能有 null、true false、数字、字符串(只有双引号)、对象、数组 - json 中不能有除以上的其它 js 对象的特性,如方法等
- json 中的属性必须用双引号引起来
-
json 字符串与 js 对象的转换
JSON.parse(json字符串);  // 返回js对象
JSON.stringify(js对象);  // 返回json字符串
动态类型
静态类型语言,如 Java,值有类型,变量也有类型、赋值给变量时,类型要相符
int a = 10;
String b = "abc";

int c = "abc";  // 错误
而 js 属于动态类型语言,值有类型,但变量没有类型,赋值给变量时,没要求
例如
let a = 200;

let b = 100;
b = 'abc';
b = true;
动态类型看起来比较灵活,但变量没有类型,会给后期维护带来困难,例如
function test(obj) {
    // obj 的类型未知,必须根据不同类型做出相应的容错处理
}
2.运算符与表达式
+ - * / % **+= -= *= /= %= **=++ --- 位运算、移位运算
== != > >= < <==== !==:star:&& || !:star:?? ?.:star:...:star:- 解构赋值 :star:
1) ===
严格相等运算符,用作逻辑判等
1 == 1    	// 返回 true
1 == '1'	// 返回 true,会先将右侧的字符串转为数字,再做比较
1 === '1'	// 返回 false,类型不等,直接返回 false
typeof 查看某个值的类型
typeof 1	// 返回 'number'
typeof '1'	// 返回 'string'
2) ||
需求,如果参数 n 没有传递,给它一个【男】
推荐做法
function test(n = '男') { // 给默认初始化值
    console.log(n);
}
你可能的做法
function test(n) {
    if(n === undefined) {
        n = '男';
    }
    console.log(n);
}
还可能是这样
function test(n) {
    n = (n === undefined) ? '男' : n;
    console.log(n);
}
一些老旧代码中可能的做法(不推荐)
function test(n) {
    n = n || '男';
    console.log(n);
}
它的语法是
值1 || 值2
如果值1 是 Truthy,返回值1,如果值1 是 Falsy 返回值 2
3) ?? 与 ?.
??
需求,如果参数 n 没有传递或是 null,给它一个【男】
如果用传统办法
function test(n) {
    if(n === undefined || n === null) {
        n = '男';
    }
    console.log(n);
}
用 ??
function test(n) {
    n = n ?? '男';
    console.log(n);
}
语法
值1 ?? 值2
- 值1 是 nullish,返回值2
- 值1 不是 nullish,返回值1
?.
需求,函数参数是一个对象,可能包含有子属性
例如,参数可能是
let stu1 = {
    name:"张三",
    address: {
        city: '北京'
    }
};

let stu2 = {
    name:"李四"
}

let stu3 = {
    name:"李四",
    address: null
}
现在要访问子属性(有问题)
function test(stu) {
    console.log(stu.address.city)
}
现在希望当某个属性是 nullish 时,短路并返回 undefined,可以用 ?.
function test(stu) {
    // 先检测 address 是不是 nullish, 如果是 nullish 就不执行后面访问子属性的操作了
    console.log(stu.address?.city)
}
用传统办法
function test(stu) {
    if(stu.address === undefined || stu.address === null) {
        console.log(undefined);
        return;
    }
    console.log(stu.address.city)
}
4) …
展开运算符
- 打散数组,把元素传递给多个参数
- 复制数组或对象,不过是浅拷贝,深拷贝的话可以用
对象-->json-->对象 - 合并数组或对象
打散数组
作用1:打散数组,把元素传递给多个参数
let arr = [1,2,3];

function test(a,b,c) {
    console.log(a,b,c);
}
需求,把数组元素依次传递给函数参数
传统写法
test(arr[0],arr[1],arr[2]); // 输出 1,2,3
展开运算符写法
test(...arr); // 输出 1,2,3
- 打散可以理解为【去掉了】数组外侧的中括号,只剩下数组元素
复制数组/对象
作用2:复制数组或对象
数组
let arr1 = [1,2,3];
let arr2 = [...arr1];		// 复制数组
对象
let obj1 = {name:'张三', age: 18};

let obj2 = {...obj1};		// 复制对象
注意:展开运算符复制属于浅拷贝,例如
let o1 = {name:'张三', address: {city: '北京'} }

let o2 = {...o1};
合并数组/对象
作用3:合并数组或对象
合并数组
let a1 = [1,2];
let a2 = [3,4];

let b1 = [...a1,...a2];		// 结果 [1,2,3,4]
let b2 = [...a2,5,...a1]	// 结果 [3,4,5,1,2]
合并对象
let o1 = {name:'张三'};
let o2 = {age:18};
let o3 = {name:'李四'};

let n1 = {...o1, ...o2};	// 结果 {name:'张三',age:18}

let n2 = {...o3, ...o2, ...o1}; // 结果{name:'李四',age:18}
- 复制对象时出现同名属性,后面的会覆盖前面的
5) [] {}
解构赋值
[]
用在声明变量时
let arr = [1,2,3];

let [a, b, c] = arr;	// 结果 a=1, b=2, c=3
用在声明参数时
let arr = [1,2,3];

function test([a,b,c]) {
    console.log(a,b,c) 	// 结果 a=1, b=2, c=3
}

test(arr);
{}
用在声明变量时
let obj = {name:"张三", age:18};

let {name,age} = obj;	// 结果 name=张三, age=18
用在声明参数时
let obj = {name:"张三", age:18};

function test({name, age}) {
    console.log(name, age); // 结果 name=张三, age=18
}

test(obj)
3. 控制语句
if ... elseswitchwhiledo ... whileforfor ... in:star:for ... of:star:try ... catch:star:
1) for in
主要用来遍历对象
// key : value 的赋值语法,与类外部的 let c = function(){} 类似
let father = {name:'张三', age:18, study:function(){}};

for(const n in father) {
    console.log(n);
}
- 其中 const n 代表遍历出来的属性名
- 注意1:方法名也能被遍历出来(它其实也算一种特殊属性)
- 注意2:遍历子对象时,父对象的属性会跟着遍历出来
let son = Object.create(father);
son.sex = "男";

for(const n in son) {
    console.log(n);
}
- 注意3:在 for in 内获取属性值,要使用 [] 语法,而不能用 . 语法
for(const n in son) {
    console.log(n, son[n]);
}
2) for of
主要用来遍历数组,也可以是其它可迭代对象,如 Map,Set 等
let a1 = [2,3,4];

for(const i of a1) {
    console.log(i); // 遍历 a1 中的元素; 输出 2,3,4
}

let a2 = [
    {name:'张三', age:18},
    {name:'李四', age:20},
    {name:'王五', age:22}
];

for(const obj of a2) {
    console.log(obj.name, obj.age);
}

// 解构
for(const {name,age} of a2) {
    console.log(name, age);
}
3) try catch
let stu1 = {name:'张三', age:18, address: {city:'北京'}};
let stu2 = {name:'张三', age:18};

function test(stu) {
    try {
        console.log(stu.address.city)
    } catch(e) {
        console.log('出现了异常', e.message)
    } finally {
        console.log('finally');
    }
}
4. API
环境准备
1) 安装 nvm
nvm 即 (node version manager),好处是方便切换 node.js 版本
安装注意事项
- 要卸载掉现有的 nodejs
- 提示选择 nvm 和 nodejs 目录时,一定要避免目录中出现空格
- 选用【以管理员身份运行】cmd 程序来执行 nvm 命令
- 首次运行前设置好国内镜像地址
nvm node_mirror http://npm.taobao.org/mirrors/node/
nvm npm_mirror https://npm.taobao.org/mirrors/npm/
首先查看有哪些可用版本
nvm list available
输出
|   CURRENT    |     LTS      |  OLD STABLE  | OLD UNSTABLE |
|--------------|--------------|--------------|--------------|
|    18.7.0    |   16.16.0    |   0.12.18    |   0.11.16    |
|    18.6.0    |   16.15.1    |   0.12.17    |   0.11.15    |
|    18.5.0    |   16.15.0    |   0.12.16    |   0.11.14    |
|    18.4.0    |   16.14.2    |   0.12.15    |   0.11.13    |
|    18.3.0    |   16.14.1    |   0.12.14    |   0.11.12    |
|    18.2.0    |   16.14.0    |   0.12.13    |   0.11.11    |
|    18.1.0    |   16.13.2    |   0.12.12    |   0.11.10    |
|    18.0.0    |   16.13.1    |   0.12.11    |    0.11.9    |
|    17.9.1    |   16.13.0    |   0.12.10    |    0.11.8    |
|    17.9.0    |   14.20.0    |    0.12.9    |    0.11.7    |
|    17.8.0    |   14.19.3    |    0.12.8    |    0.11.6    |
|    17.7.2    |   14.19.2    |    0.12.7    |    0.11.5    |
|    17.7.1    |   14.19.1    |    0.12.6    |    0.11.4    |
|    17.7.0    |   14.19.0    |    0.12.5    |    0.11.3    |
|    17.6.0    |   14.18.3    |    0.12.4    |    0.11.2    |
|    17.5.0    |   14.18.2    |    0.12.3    |    0.11.1    |
|    17.4.0    |   14.18.1    |    0.12.2    |    0.11.0    |
|    17.3.1    |   14.18.0    |    0.12.1    |    0.9.12    |
|    17.3.0    |   14.17.6    |    0.12.0    |    0.9.11    |
|    17.2.0    |   14.17.5    |   0.10.48    |    0.9.10    |
建议安装 LTS(长期支持版)
nvm install 16.16.0
nvm install 14.20.0
执行 nvm list 会列出已安装版本
切换到 16.16.0
nvm use 16.16.0
切换到 14.20.0
nvm use 14.20.0
安装后 nvm 自己的环境变量会自动添加,但可能需要手工添加 nodejs 的 PATH 环境变量
2) 检查 npm
npm 是 js 的包管理器,就类似于 Java 界的 maven,要确保它使用的是国内镜像
检查镜像
npm get registry
如果返回的不是 https://registry.npm.taobao.org/,需要做如下设置
npm config set registry https://registry.npm.taobao.org/
3) 搭建前端服务器
新建一个保存项目的 client 文件夹,进入文件夹执行
npm install express --save-dev # express 前端用的服务器, 开发时存在, 部署时不会打包
- 会生成 node_modules、package.json、package-lock.json
- package.json 管理依赖,相对于 maven 的 pom 文件。
修改 package.json 文件
{
  "type": "module",		// 让后续代码支持 import 语法
  "devDependencies": {
    "express": "^4.18.1"
  }
}
- 其中 devDependencies 是 npm install –save-dev 添加的
编写 main.js 代码,启动服务器。
import express from 'express'
const app = express()

// 指定静态资源的目录为当前目录(./)
app.use(express.static('./'))
app.listen(7070)
执行 js 代码(运行前端服务器)
node main.js
前端案例
初步效果
架构
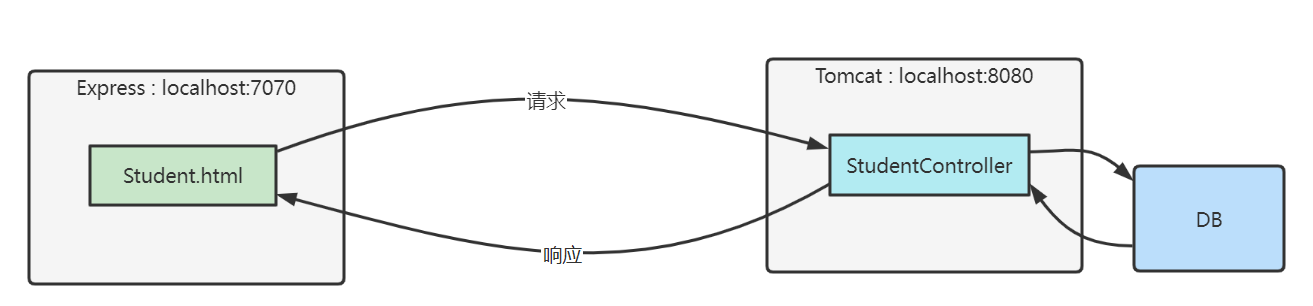
- 前端只有静态页面,使用 Express 服务器
- 后端使用 Tomcat 服务器,通过 SpringBoot、MyBatis 等框架获取数据库数据
1) 查找元素
- document.getElementById - 根据 id 值查找一个元素
-
[document 元素].querySelector - 根据选择器查找第一个匹配元素 -
[document 元素].querySelectorAll - 根据选择器查找所有匹配元素
例如,有下面的 html 代码
<div>
    <div class="title">学生列表</div>
    <div class="thead">
        <div class="row bold">
            <div class="col">编号</div>
            <div class="col">姓名</div>
            <div class="col">性别</div>
            <div class="col">年龄</div>
        </div>
    </div>
    <div class="tbody">
        <div class="row">
            <div class="col">1</div>
            <div class="col">张三</div>
            <div class="col">男</div>
            <div class="col">18</div>
        </div>
    </div>
</div>
执行
document.querySelector('.title'); // 找到 <div class="title">学生列表</div>
执行
document.querySelector('.col'); // 找到 <div class="col">编号</div>
执行
document.querySelectorAll('.col');

/*
  找到的是一个集合
  <div class="col">编号</div>
  <div class="col">姓名</div>
  <div class="col">性别</div>
  <div class="col">年龄</div>
  <div class="col">1</div>
  <div class="col">张三</div>
  <div class="col">男</div>
  <div class="col">18</div>
*/
执行
const thead = document.querySelector('.thead');

// 只在 thead 元素范围内找
thead.querySelectorAll('.col');

/*
  找到的是一个集合
  <div class="col">编号</div>
  <div class="col">姓名</div>
  <div class="col">性别</div>
  <div class="col">年龄</div>
*/
根据 id 属性查找既可以用
document.getElementById("id值")
也可以用
document.querySelector("#id值")
2) 修改元素内容
- 元素.innerHTML
- 元素.textContent
例如
document.querySelector('.title').innerHTML = '侠客列表'
效果
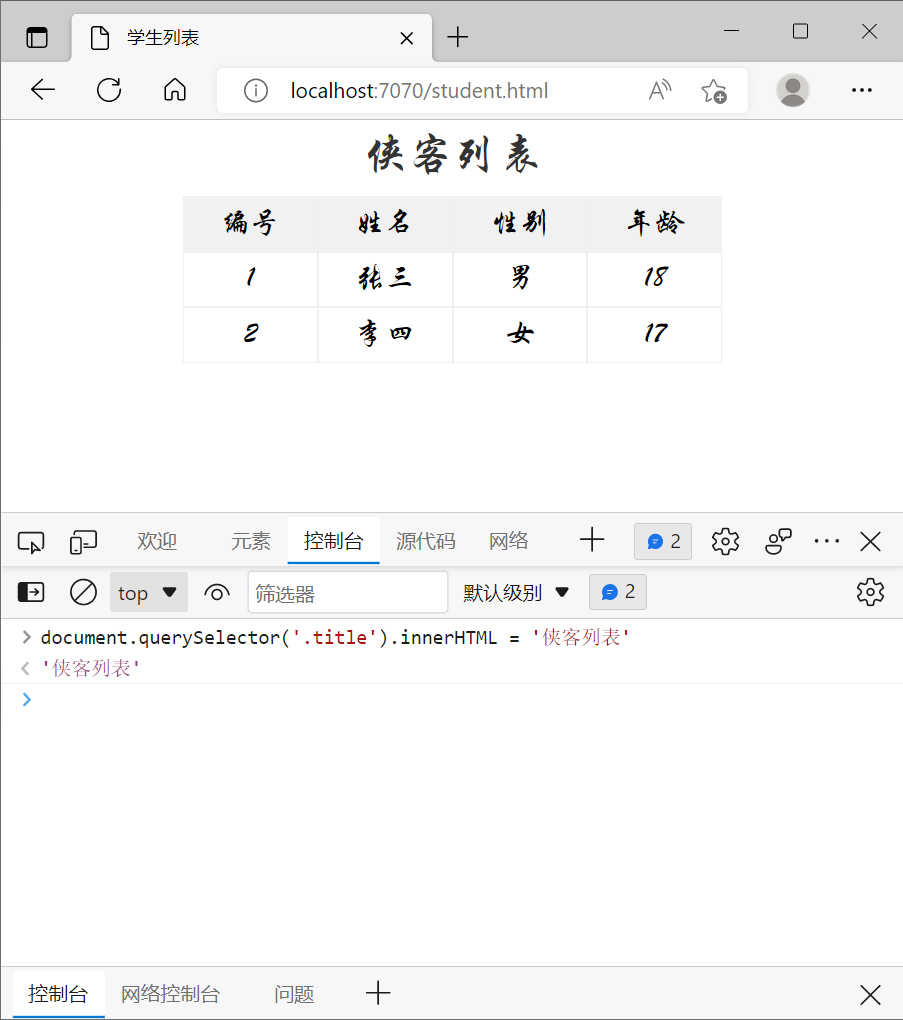
innerHTML 会解析内容中的标签,例如
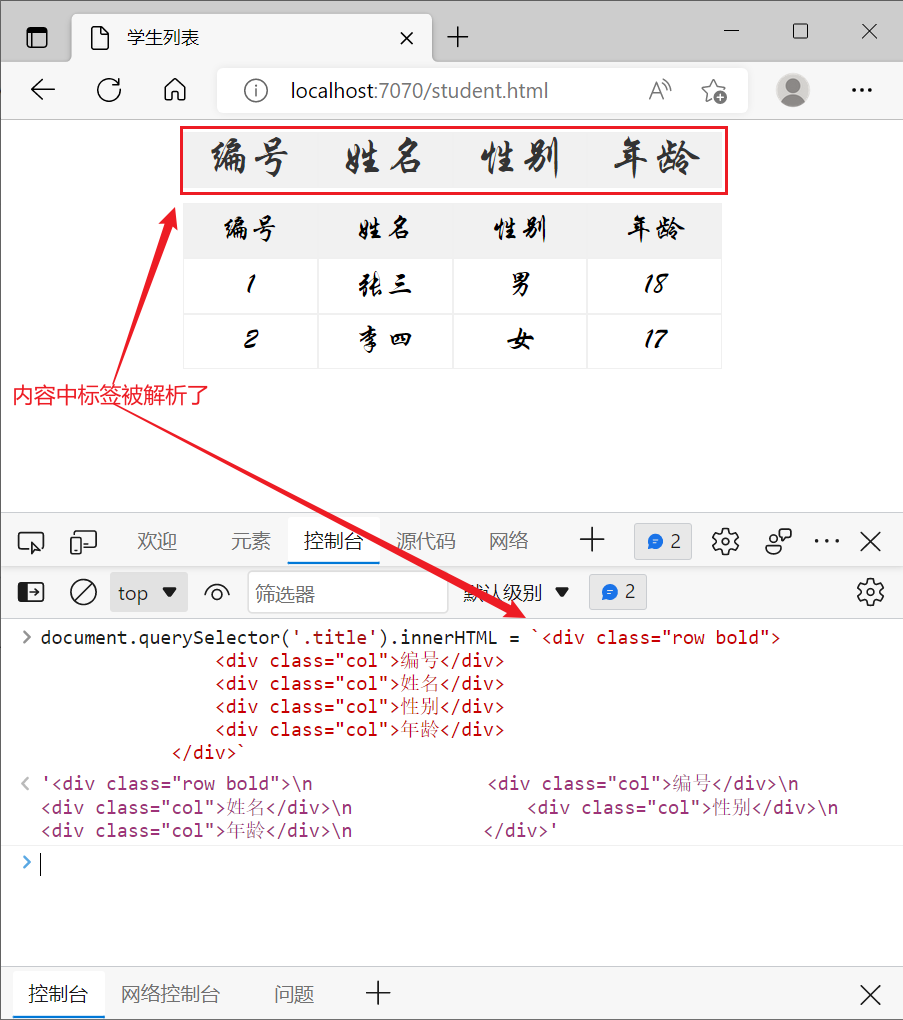
textContext 不会解析内容中的标签
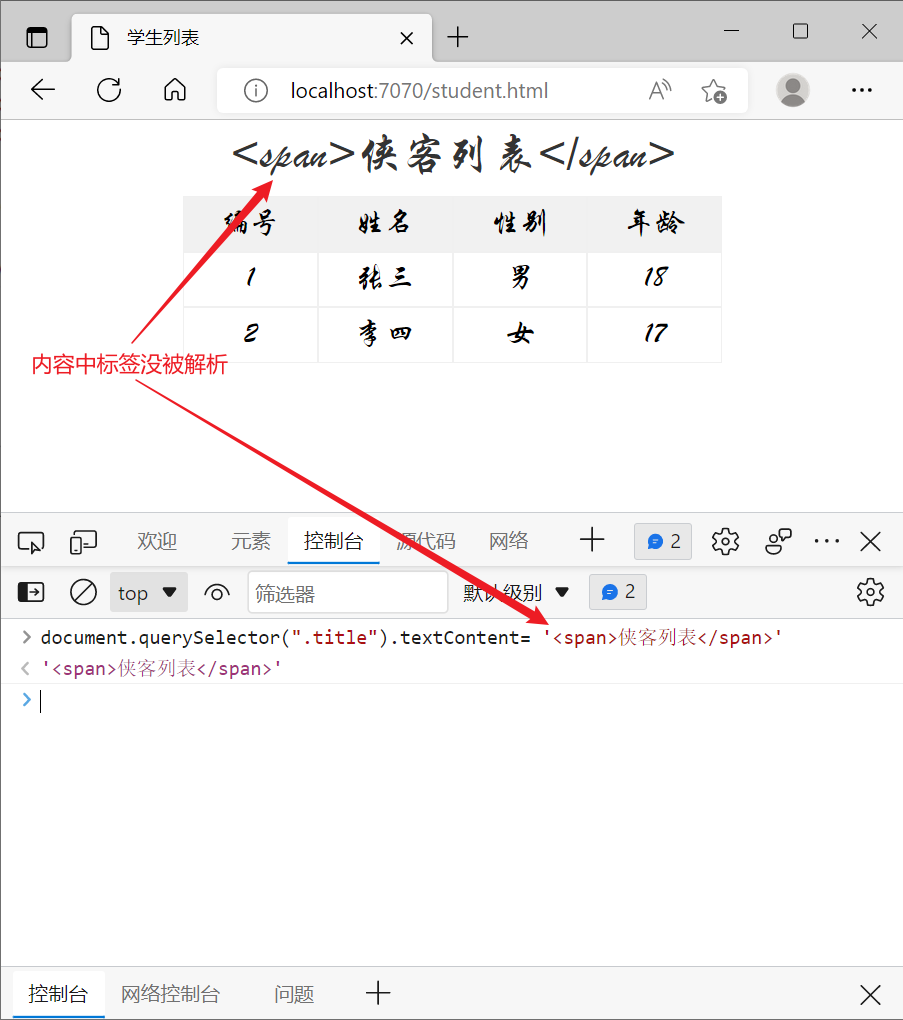
给 innerHTML 或 textContent 赋值空串,可以实现清空标签内容的效果
3) 利用模板
模板的内容并不会在页面显示,只是保留了一段可重用的代码。
<div>
    <div class="title">学生列表</div>
    <div class="thead">
        <div class="row bold">
            <div class="col">编号</div>
            <div class="col">姓名</div>
            <div class="col">性别</div>
            <div class="col">年龄</div>
        </div>
    </div>
    <div class="tbody">
    </div>
</div>

<template id="tp">
    <div class="row">
        <div class="col">xx</div>
        <div class="col">xx</div>
        <div class="col">xx</div>
        <div class="col">xx</div>
    </div>
</template>

<script>
    // 将来这些数据从 Java 端返回
    let array = [
        { id: 1, name: '张三', sex: '男', age: 18 },
        { id: 2, name: '李四', sex: '女', age: 17 }
    ];

    const tp = document.getElementById("tp");
    const row = tp.content;
    const [c1,c2,c3,c4] = row.querySelectorAll(".col");
    const tbody = document.querySelector('.tbody');
    for(const {id,name,sex,age} of array) {
        c1.textContent = id;
        c2.textContent = name;
        c3.textContent = sex;
        c4.textContent = age;
        // 复制元素, true 多层子元素复制
        const newRow = document.importNode(row, true);
        // 建立父子关系,左边父,右边子
        tbody.appendChild(newRow);
    }
</script>
4) Fetch API
Fetch API 可以用来获取远程数据,它有两种方式接收结果,同步方式与异步方式
格式
fetch(url, options) // 返回 Promise
同步方式
const 结果 = await Promise
// 后续代码
- await 关键字必须在一个标记了 async 的 function 内来使用
- 后续代码不会在结果返回前执行
异步方式
Promise
	.then(结果 => { ... })
// 后续代码
- 后续代码不必等待结果返回就可以执行
例:
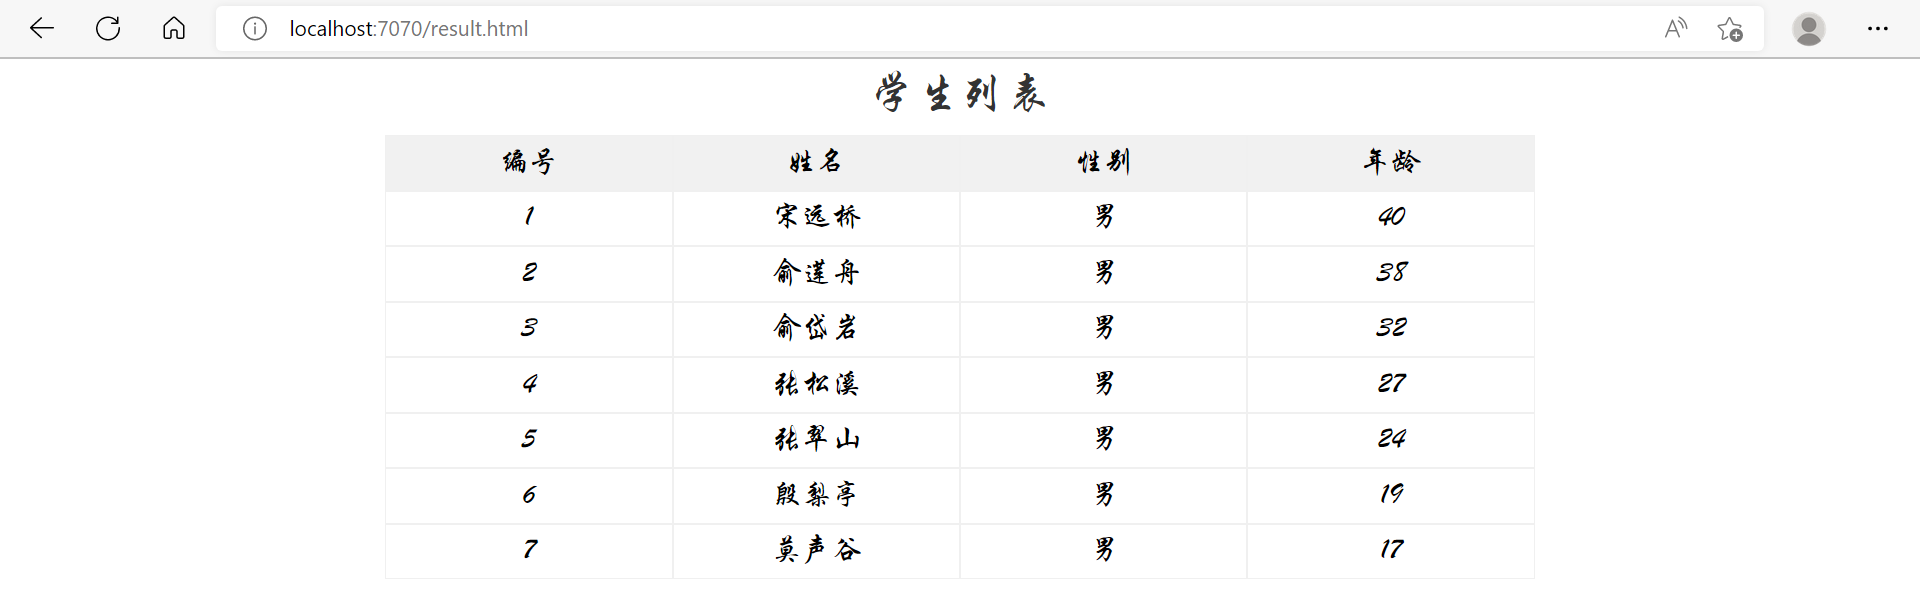
在 express 服务器上有 students.json 文件
[
    { "id": 1, "name": "张三", "sex": "男", "age": 18 },
    { "id": 2, "name": "李四", "sex": "女", "age": 17 }
]
现在用 fetch api 获取这些数据,并展示
同步方式:async + await
<script>
    async function findStudents() {
        try {
            // 获取响应对象
            const resp = await fetch('students.json')

            // 获取响应体, 按json格式进行解析,将其转换为js数组
            const array = await resp.json();

            // 显示数据
            const tp = document.getElementById("tp");
            const row = tp.content;
            const [c1,c2,c3,c4] = row.querySelectorAll(".col");
            const tbody = document.querySelector('.tbody');
            for(const {id,name,sex,age} of array) {
                c1.textContent = id;
                c2.textContent = name;
                c3.textContent = sex;
                c4.textContent = age;
                // 复制元素
                const newRow = document.importNode(row, true);
                // 建立父子关系
                tbody.appendChild(newRow);
            }
        } catch (e) {
            console.log(e);
        }

    }
    findStudents()
</script>
- fetch(‘students.json’) 内部会发送请求,但响应结果不能立刻返回,因此 await 就是等待响应结果返回
- 其中 resp.json() 也不是立刻能返回结果,它返回的也是 Promise 对象,也要配合 await 取结果
异步方式:配合 then 方法(返回的是 Promise 对象就可以链式调用)
<script>
    fetch('students.json')
        .then( resp => resp.json() )
        .then( array => {
        	// 显示数据
            const tp = document.getElementById("tp");
            const row = tp.content;
            const [c1,c2,c3,c4] = row.querySelectorAll(".col");
            const tbody = document.querySelector('.tbody');
            for(const {id,name,sex,age} of array) {
                c1.textContent = id;
                c2.textContent = name;
                c3.textContent = sex;
                c4.textContent = age;
                // 复制元素
                const newRow = document.importNode(row, true);
                // 建立父子关系
                tbody.appendChild(newRow);
            }
        })
        .catch( e => console.log(e) )

</script>
- 第一个 then 是在响应返回后,才会调用它里面的箭头函数,箭头函数参数即 resp 响应对象
- 第二个 then 是在 json 解析完成后,才会调用它里面的箭头函数,箭头函数参数即解析结果(本例是 array 数组)
- 上一个 then 返回的是 Promise 对象时,才能链式调用下一个 then
跨域问题
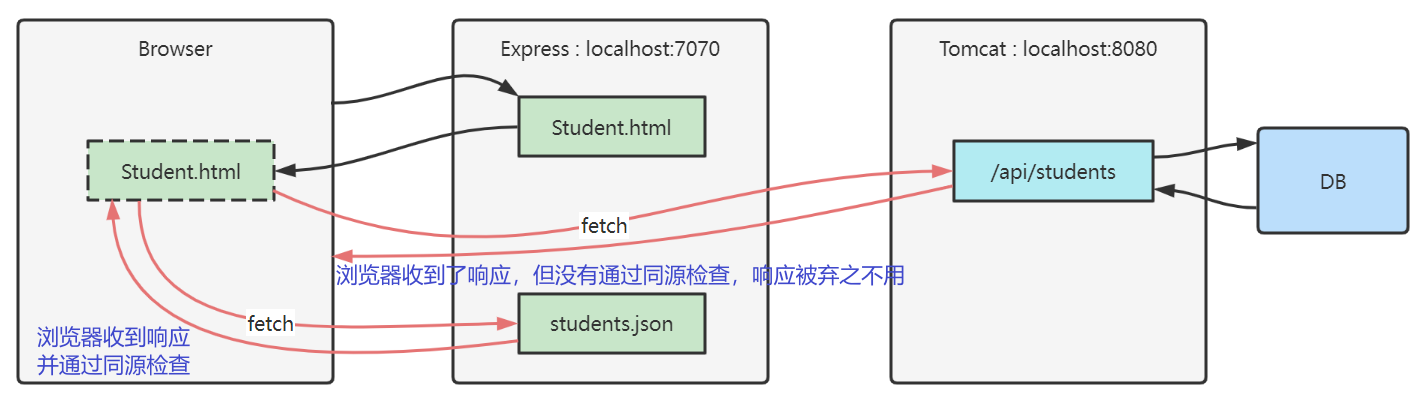
- 只要协议、主机、端口之一不同,就不同源,例如
- http://localhost:7070/a 和 https://localhost:7070/b 就不同源,它们使用的协议不一样。
- 同源检查是浏览器的行为,而且只针对 fetch、xhr 请求
- 如果是其它客户端,例如 Java http client,postman,它们是不做同源检查的
- 通过表单提交、浏览器直接输入 url 地址这些方式发送的请求,也不会做同源检查
- 更多相关知识请参考
-
[跨源资源共享(CORS) - HTTP MDN (mozilla.org)](https://developer.mozilla.org/zh-CN/docs/Web/HTTP/CORS)
-
请求响应头解决

- fetch 请求跨域,会携带一个 Origin 头,代表【发请求的资源源自何处】,目标通过它就能辨别是否发生跨域
- 我们的例子中:student.html 发送 fetch 请求,告诉 tomcat,我源自 localhost:7070
- 目标资源通过返回 Access-Control-Allow-Origin 头,告诉浏览器【允许哪些源使用此响应】
- 我们的例子中:tomcat 返回 fetch 响应,告诉浏览器,这个响应允许源自 localhost:7070 的资源使用
代理解决
以后浏览器所有的数据都发给 7070,8080 的数据请求则是先请求 7070 中的代理,然后代理通过 js 的 api 访问 8080 请求数据,这样就绕过了浏览器,解决了跨域问题。
- fetch 用的 browser 的 api,代理请求 8080 的数据用的则是 js 的 api ==> 解决跨域问题。
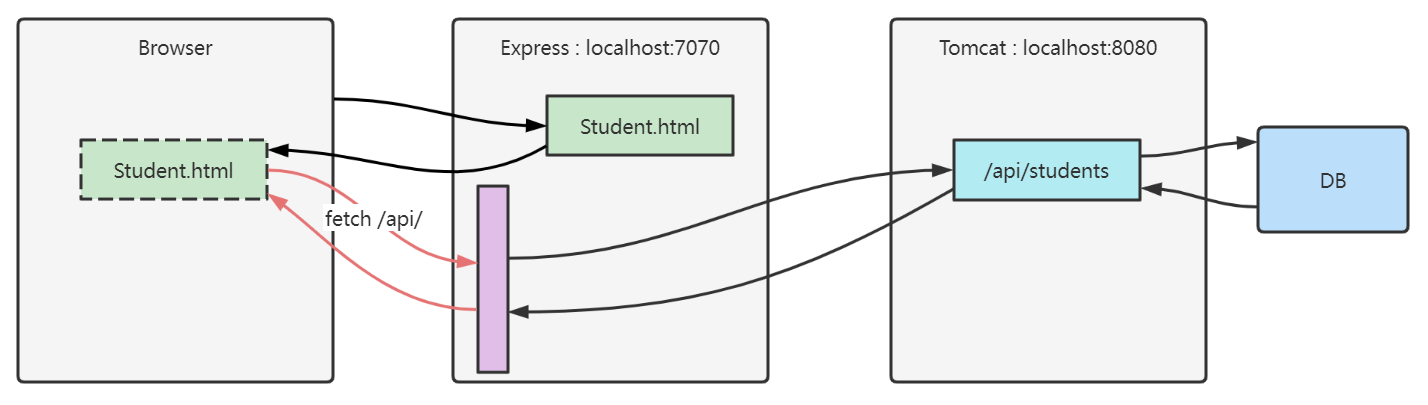
npm install http-proxy-middleware --save-dev
在 express 服务器启动代码中加入
import {createProxyMiddleware} from 'http-proxy-middleware'

// ...
// 带 api 前缀的都会走代理
app.use('/api', createProxyMiddleware({ target: 'http://localhost:8080', changeOrigin: true }));
fetch 代码改为
const resp = await fetch('http://localhost:7070/api/students')
或
const resp = await fetch('/api/students') // 这样就可以请求到 http://localhost:8080/api/students 接口的数据了
查看对应的 fetch 请求时会发现,访问的是 http://localhost:7070/api/students,但实际上走的是 8080 端口的。
5) 模块化
如果我们需要引用其他的 js 文件可以使用老办法 <script src="xx.js"></script>,也可以使用新方式 <script type="module"></script> 模块之间导入导出。每个 js 文件都可以视为一个模块,模块与模块之间要相互引用的话需要导出导入。
- src 这种方式不支持导入导出语法。js 可以是不同源的,可以引入网络中不同源的 js。
- type=’module’ 支持导入导出语法。js 必须是同源的。
单个导出 const、let、function,让其他 js 文件也可以使用。
export const a = 10;
export let b = 20;
export function c() {
    console.log('c');
}
一齐导出
const a = 10;
let b = 20;
function c() {
    console.log('c')
}

export {a,b,c}
导出 default,只能有一个
export const a = 10;
export let b = 20;
export function c() {
    console.log('c')
}

export default b;
import 语法
<script type="module">
	import 语句
</script>
- import 需要遵循同源策略
整个导入,将所有的内容作为一个模块导入。
import * as module from '/1.js'
console.log(module.a)		// 输出10
console.log(module.b)		// 输出20
module.c()					// 输出c
单个导入
import {a,c} from '/1.js'
console.log(a)				// 输出10
c()							// 输出c
导入默认
import x from '/1.js'		// 名字随意
console.log(x)				// 输出20
第三章 Vue 2
需要安装 node。安装 vue。
where node 查看 windows node 的安装路径
1. Vue 基础
1) 环境准备
安装脚手架
npm install -g @vue/cli
- -g 参数表示全局安装,这样在任意目录都可以使用 vue 脚本创建项目
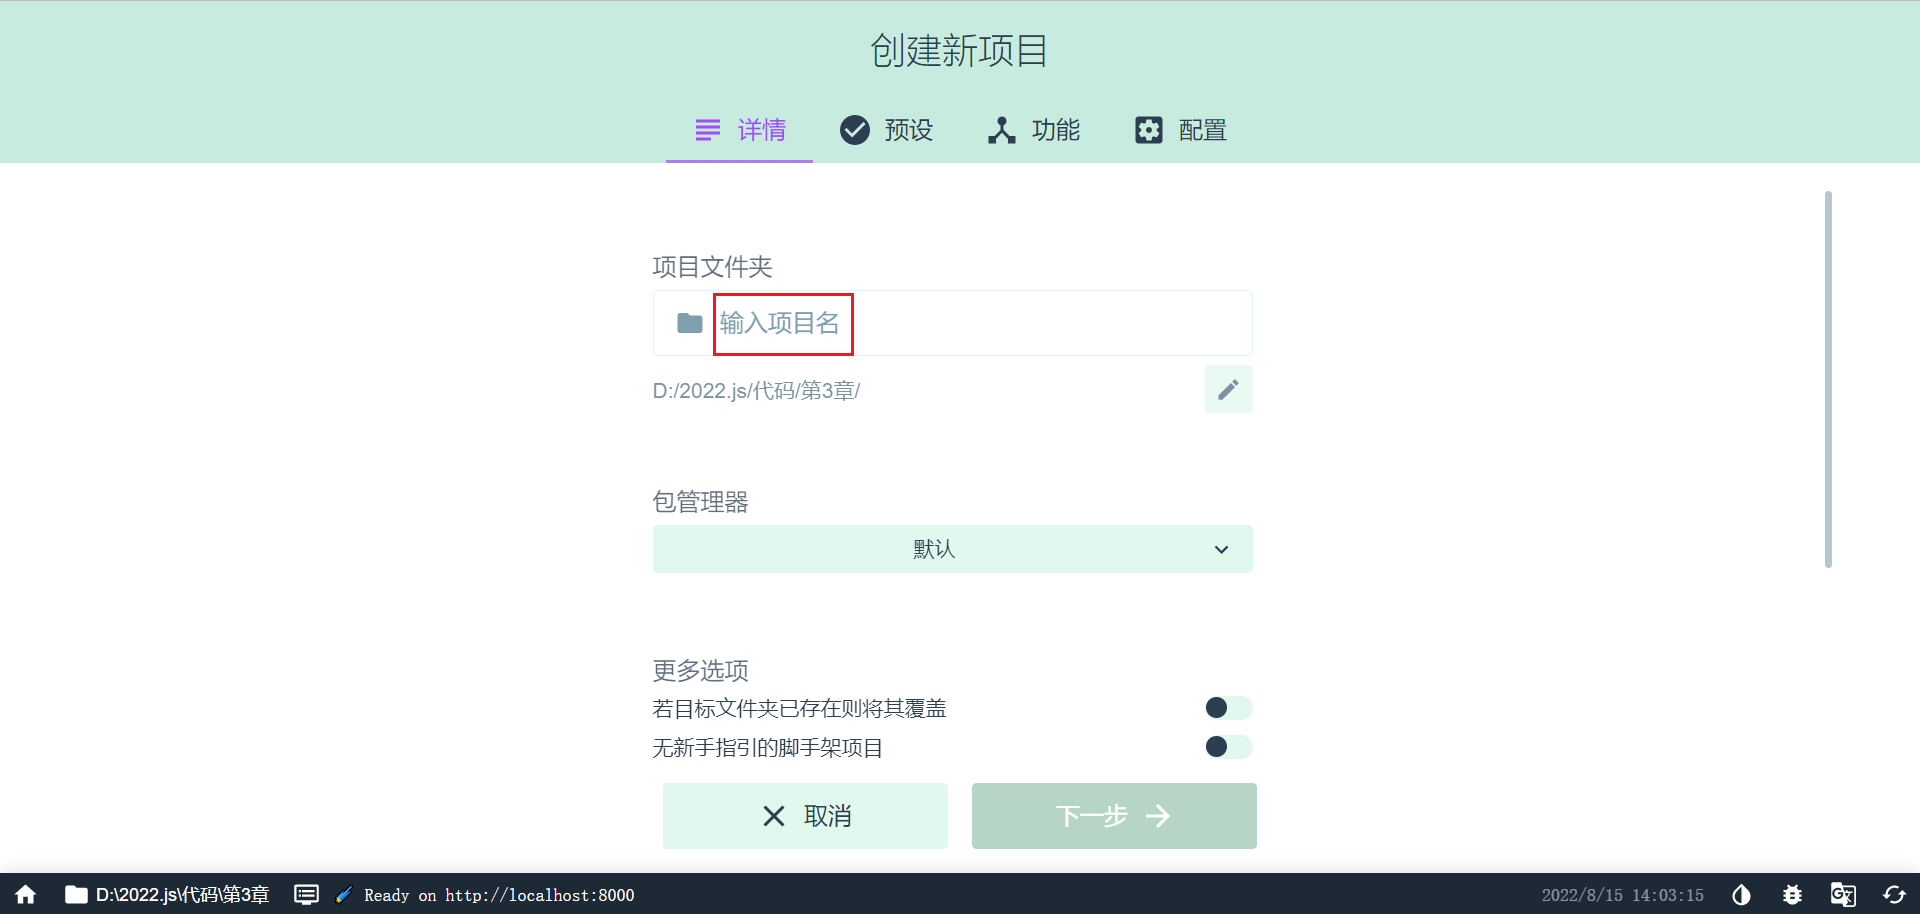
创建项目
vue ui
使用图形向导来创建 vue 项目,如下图,输入项目名
选择手动配置项目
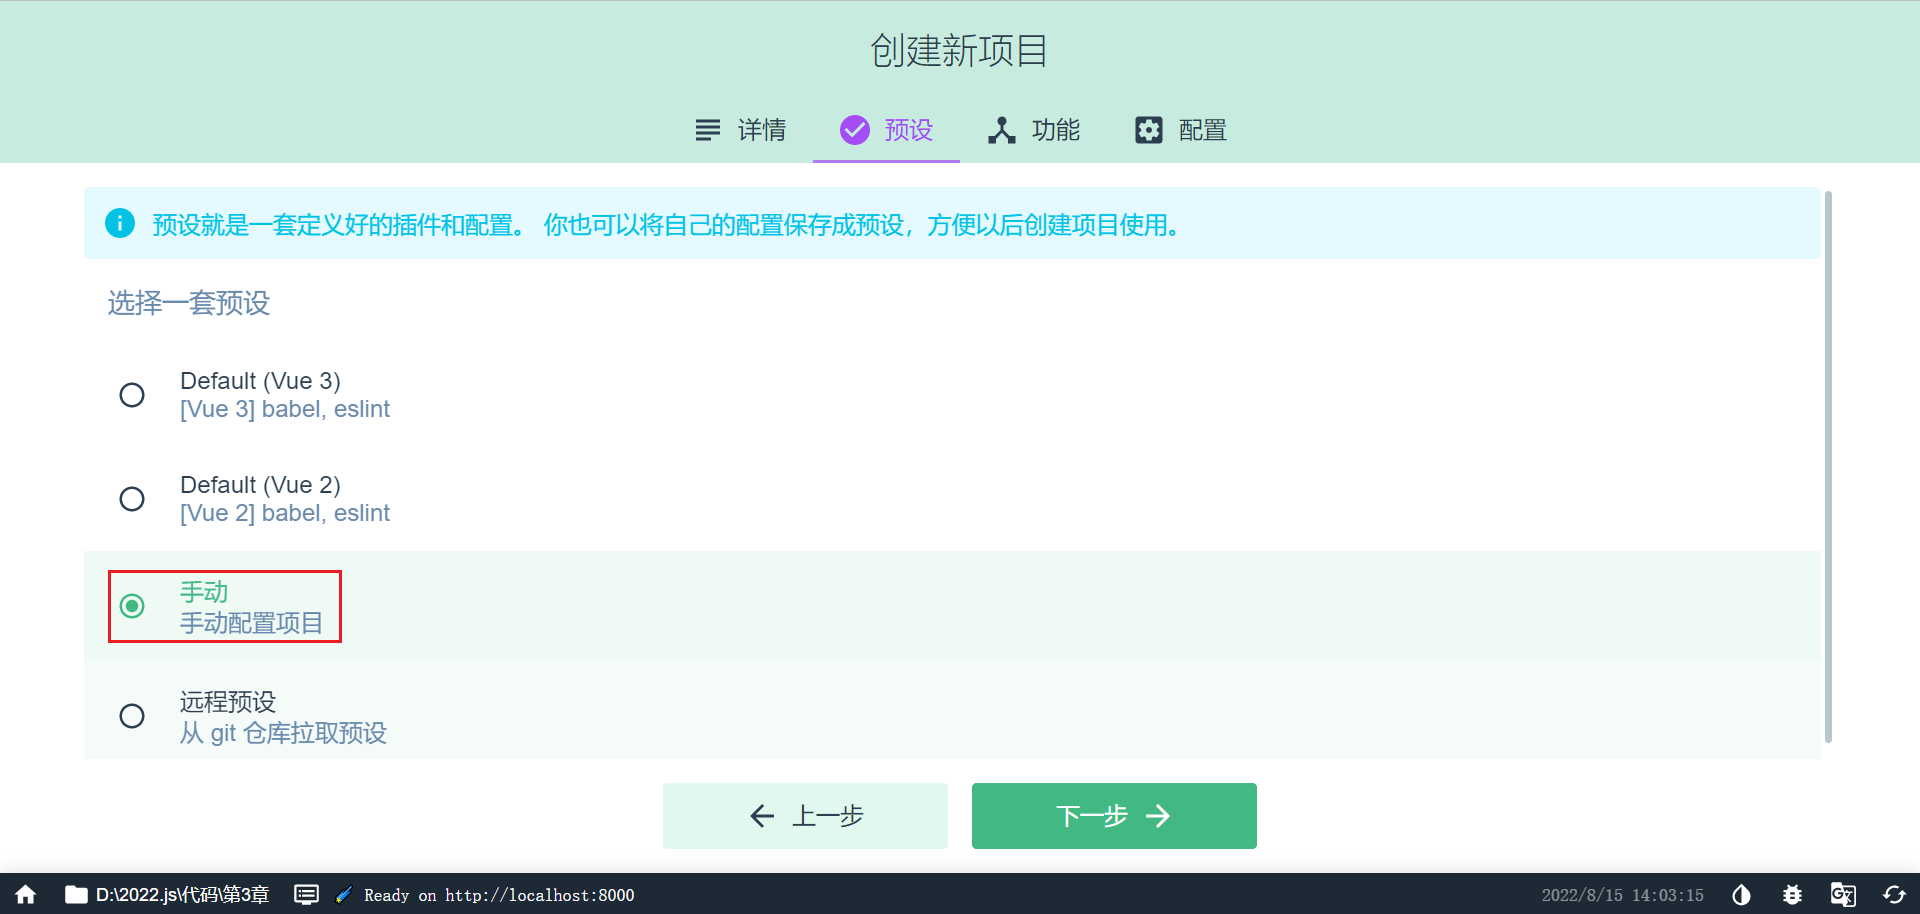
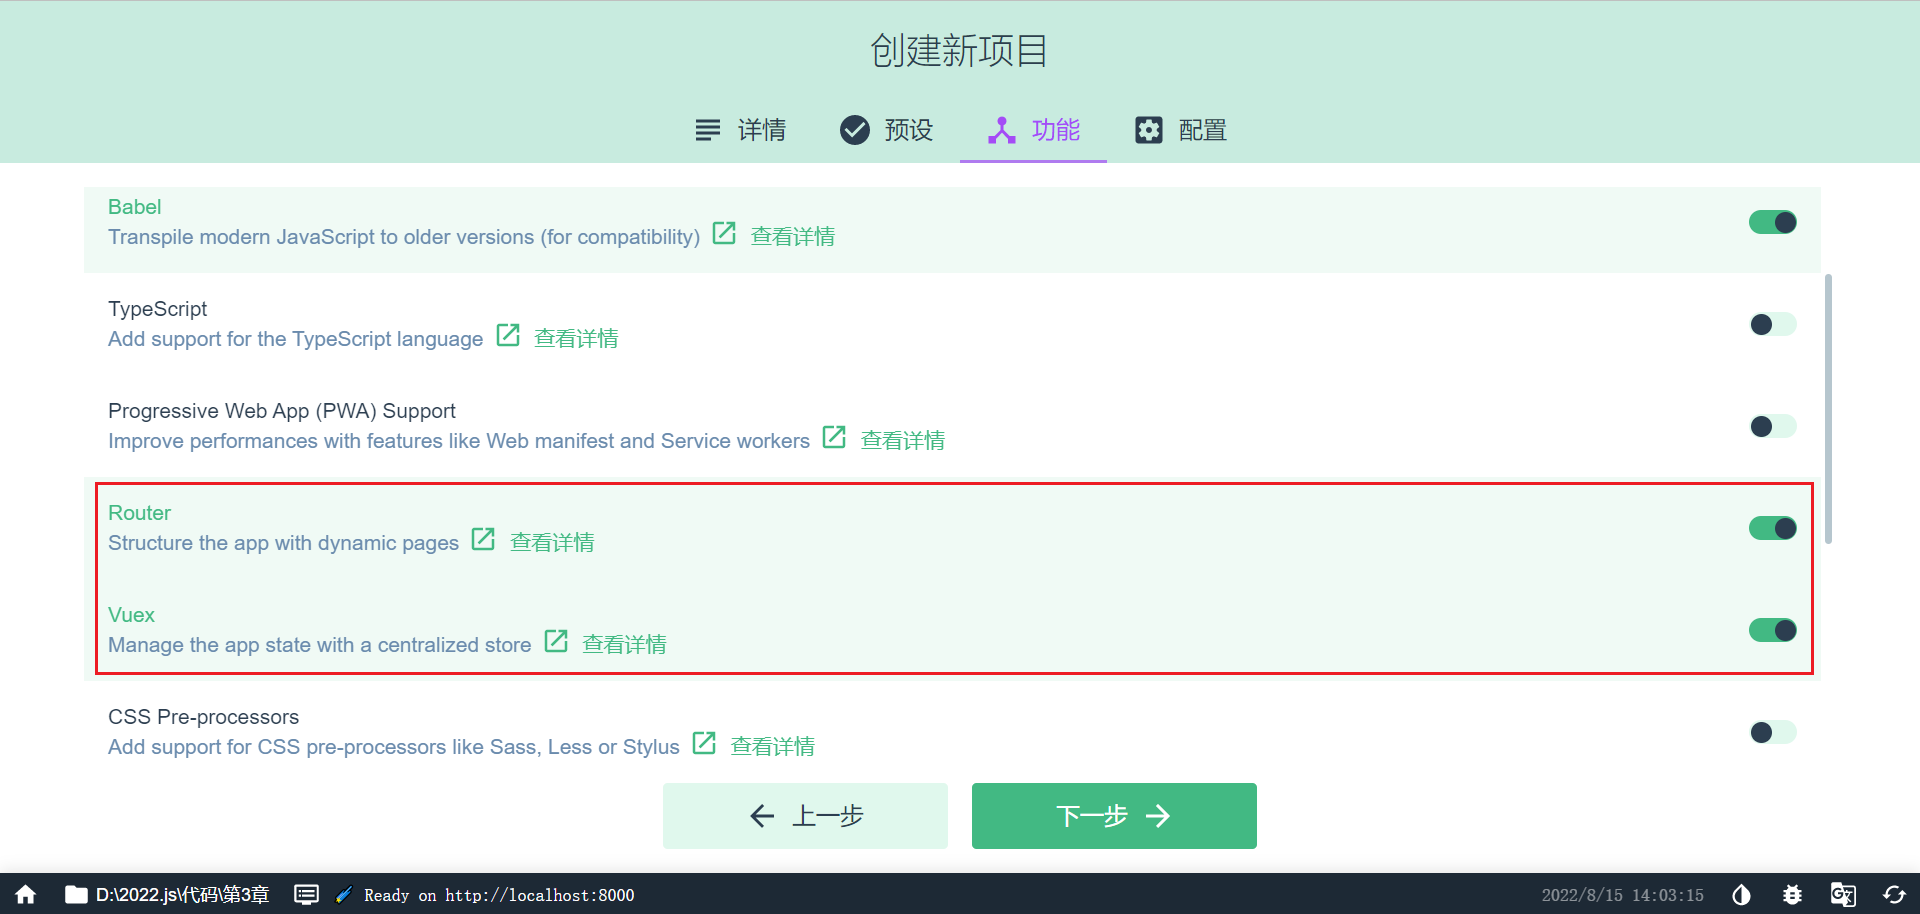
添加 vue router(实现组件跳转) 和 vuex(实现数据共享)
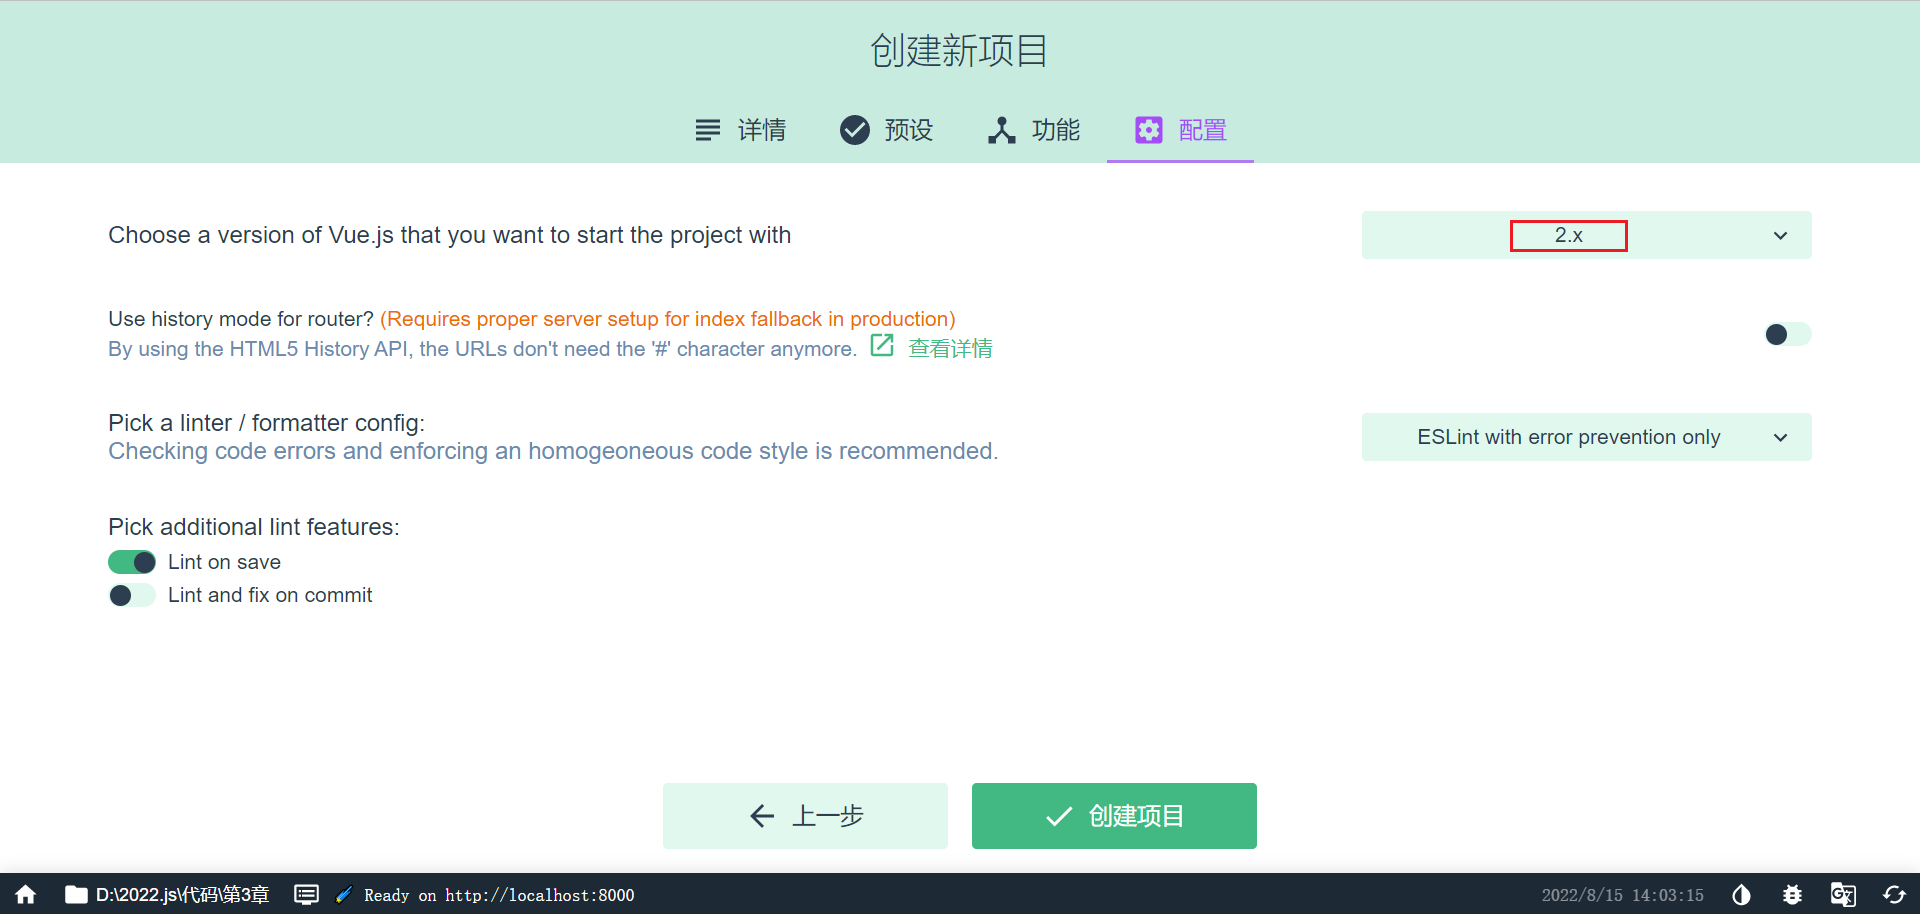
选择版本,创建项目
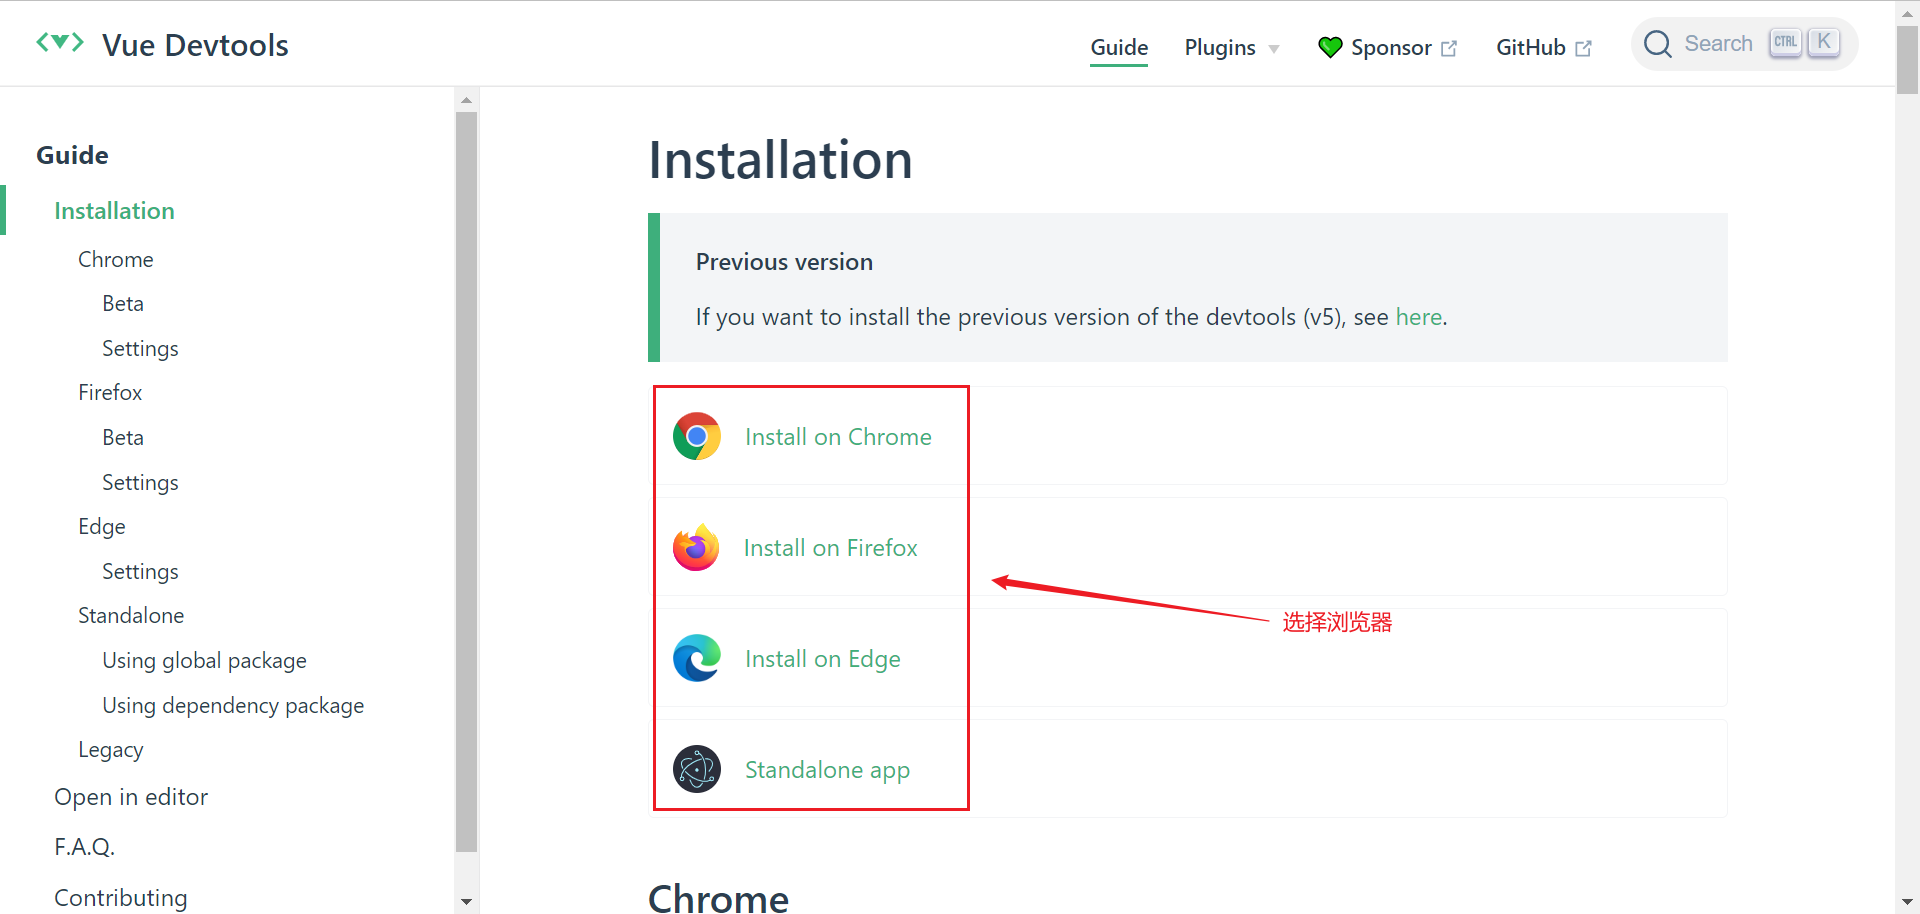
安装 devtools
- devtools 插件网址:https://devtools.vuejs.org/guide/installation.html
运行项目
进入项目目录,执行
npm run serve
修改端口
前端服务器默认占用了 8080 端口,需要修改一下
-
文档地址:[DevServer webpack](https://webpack.js.org/configuration/dev-server/#devserverport) -
打开 vue.config.js 添加
  const { defineConfig } = require('@vue/cli-service')
  module.exports = defineConfig({

    // ...
    transpileDependencies: true,
    devServer: {
      port: 7070
    }

  })
添加代理
为了避免前后端服务器联调时, fetch、xhr 请求产生跨域问题,需要配置代理
-
文档地址同上
-
打开 vue.config.js 添加
  const { defineConfig } = require('@vue/cli-service')
  module.exports = defineConfig({
    // ...
    devServer: {
      port: 7070,
      proxy: {
        '/api': {
          target: 'http://localhost:8080',
          changeOrigin: true
        }
      }
    }

  })
Vue 项目结构
D:\vue2\study_vue2>tree src
D:\VUE2\STUDY_VUE2\SRC
├─assets
├─components
├─router
├─store
└─views
- assets - 静态资源
- components - 可重用组件
- router - 路由
- store - 数据共享
- views - 视图组件
以后还会添加
- api - 跟后台交互,发送 fetch、xhr 请求,接收响应
- plugins - 插件
2) Vue 组件
Vue 的组件文件以 .vue 结尾,每个组件由三部分组成
<template></template>

<script></script>

<style></style>
- template 模板部分,由它生成 html 代码
- script 代码部分,控制模板的数据来源和行为
- style 样式部分,一般不咋关心
入口组件是 App.vue,先删除原有代码,来个 Hello, World 例子
<template>
  <h1></h1>
</template>

<script>
export default {
  data() {
    return {
      msg: "Hello, Vue!"
    }
  }
}
</script>
解释
- export default 导出组件对象,供 main.js 导入使用
- 这个对象有一个 data 方法,返回一个对象,给 template 提供数据
- `` 在 Vue 里称之为插值表达式,用来绑定 data 方法返回的对象属性,绑定的含义是数据发生变化时,页面显示会同步变化
文本插值
<template>
    <div>
        <h1></h1>
        <h1></h1>
    </div>
</template>
<script>
const options = {
    data: function () {
        return { name: '张三', age: 70 }; // return 的对象才是模板可以拿到的数据。
    }
};
export default options;
</script>
里只能绑定一个属性,绑定多个属性需要用多个分别绑定- template 内只能有一个根元素
- 插值内可以进行简单的表达式计算
属性绑定
<template>
    <div>
        <div><input type="text" v-bind:value="name"></div>
        <div><input type="date" v-bind:value="birthday"></div>
        <div><input type="text" :value="age"></div>
    </div>
</template>
<script>
const options = {
    data: function () {
        return { name: '王五', birthday: '1995-05-01', age: 20 };
    }
};
export default options;
</script>
- 简写方式:可以省略 v-bind 只保留冒号。
- 这种是单向数据绑定,js 中更改的会显示在 html 中,但是 html 中变动的(如输入框手动输入数据)不会同步到 js 中。
事件绑定
<!-- 事件绑定 -->
<template>
    <div>
        <div><input type="button" value="点我执行m1" v-on:click="m1"></div>
        <div><input type="button" value="点我执行m2" @click="m2"></div>
        <div>8</div>
    </div>
</template>
<script>
const options = {
    data: function () {
        return { count: 0 };
    },
    methods: {
        m1() {
            this.count ++;
            console.log("m1")
        },
        m2() {
            this.count --;
            console.log("m2")
        }
    }
};
export default options;
</script>
- 简写方式:可以把 v-on: 替换为 @
- 在 methods 方法中的 this 代表的是 data 函数返回的数据对象
双向绑定
<template>
    <div>
        <div>
            <label for="">请输入姓名</label>
            <input type="text" v-model="name">
        </div>
        <div>
            <label for="">请输入年龄</label>
            <input type="text" v-model="age">
        </div>
        <div>
            <label for="">请选择性别</label>
            男 <input type="radio" value="男" v-model="sex">
            女 <input type="radio" value="女" v-model="sex">
        </div>
        <div>
            <label for="">请选择爱好</label>
            游泳 <input type="checkbox" value="游泳" v-model="fav">
            打球 <input type="checkbox" value="打球" v-model="fav">
            健身 <input type="checkbox" value="健身" v-model="fav">
        </div>
    </div>
</template>
<script>
const options = {
    data: function () {
        return { name: '', age: null, sex:'男' , fav:['打球']};
    },
    methods: {
    }
};
export default options;
</script>
- 用 v-model 实现双向绑定,即
- javascript 数据可以同步到表单标签
- 反过来用户在表单标签输入的新值也会同步到 javascript 这边
- 双向绑定只适用于表单这种带【输入】功能的标签,其它标签的数据绑定,单向就足够了
- 复选框这种标签,双向绑定的 javascript 数据类型一般用数组
计算属性
<!-- 计算属性 -->
<template>
    <div>
        <h2></h2>
        <h2></h2>
        <h2></h2>
    </div>
</template>
<script>
const options = {
    data: function () {
        return { firstName: '三', lastName: '张' };
    },
    /* methods: {
        fullName() {
            console.log('进入了 fullName')
            return this.lastName + this.firstName;
        }
    },*/
    computed: {
        fullName() {
            console.log('进入了 fullName')
            return this.lastName + this.firstName;
        }
    }
};
export default options;
- 普通方法调用必须加 (),没有缓存功能
- 计算属性使用时就把它当属性来用,不加 (),有缓存功能:
- 一次计算后,会将结果缓存,下次再计算时,只要数据没有变化,不会重新计算,直接返回缓存结果
axios
axios 它的底层是用了 XMLHttpRequest(xhr)方式发送请求和接收响应,xhr 相对于之前讲过的 fetch api 来说,功能更强大,但由于是比较老的 api,不支持 Promise,axios 对 xhr 进行了封装,使之支持 Promise,并提供了对请求、响应的统一拦截功能
安装
npm install axios -S
导入
import axios from 'axios'
- axios 默认导出一个对象,这里的 import 导入的就是它默认导出的对象
| 请求 | 备注 |
|---|---|
axios.get(url[, config]) |
:star: |
axios.delete(url[, config]) |
|
axios.head(url[, config]) |
|
axios.options(url[, config]) |
|
axios.post(url[, data[, config]]) |
:star: |
axios.put(url[, data[, config]]) |
|
axios.patch(url[, data[, config]]) |
- config - 选项对象、例如查询参数、请求头…
- data - 请求体数据、最常见的是 json 格式数据
- get、head 请求无法携带请求体,这应当是浏览器的限制所致(xhr、fetch api 均有限制)
- options、delete 请求可以通过 config 中的 data 携带请求体
例子
<template>
    <div>
        <input type="button" value="获取远程数据" @click="sendReq()">
    </div>
</template>
<script>
import axios from 'axios'
const options = {
    methods: {
        async sendReq() {
            // 1. 演示 get, post
            // const resp = await axios.post('/api/a2');

            // 2. 发送请求头
            // const resp = await axios.post('/api/a3',{},{
            //     headers:{
            //         Authorization:'abc'
            //     }
            // });

            // 3. 发送请求时携带查询参数 ?name=xxx&age=xxx
            // const name = encodeURIComponent('&&&');
            // const age = 18;
            // const resp = await axios.post(`/api/a4?name=${name}&age=${age}`);

            // 不想自己拼串、处理特殊字符、就用下面的办法
            // const resp = await axios.post('/api/a4', {}, {
            //     params: {
            //         name:'&&&&',
            //         age: 20
            //     }
            // });

            // 4. 用请求体发数据,格式为 urlencoded
            // const params = new URLSearchParams();
            // params.append("name", "张三");
            // params.append("age", 24)

            // const resp = await axios.post('/api/a4', params);

            // 5. 用请求体发数据,格式为 multipart
            // const params = new FormData();
            // params.append("name", "李四");
            // params.append("age", 30);
            // const resp = await axios.post('/api/a5', params);

            // 6. 用请求体发数据,格式为 json
            const resp = await axios.post('/api/a5json', {
                name: '王五',
                age: 50
            });

            console.log(resp);
        }
    }
};
export default options;
</script>
创建实例
const _axios = axios.create(config);
- axios 对象可以直接使用,但使用的是默认的设置
- 用 axios.create 创建的对象,可以覆盖默认设置,config 见下面说明
常见的 config 项有
| 名称 | 含义 |
|---|---|
| baseURL | 将自动加在 url 前面 |
| headers | 请求头,类型为简单对象 |
| params | 跟在 URL 后的请求参数,类型为简单对象或 URLSearchParams |
| data | 请求体,类型有简单对象、FormData、URLSearchParams、File 等 |
| withCredentials | 跨域时是否携带 Cookie 等凭证,默认为 false |
| responseType | 响应类型,默认为 json |
例
const _axios = axios.create({
    baseURL: 'http://localhost:8080',
    withCredentials: true
});
await _axios.post('/api/a6set')
await _axios.post('/api/a6get')
- 生产环境希望 xhr 请求不走代理,可以用 baseURL 统一修改
- 希望跨域请求携带 cookie,需要配置 withCredentials: true,服务器也要配置 allowCredentials = true,否则浏览器获取跨域返回的 cookie 时会报错
响应格式
| 名称 | 含义 |
|---|---|
| data | 响应体数据 :star: |
| status | 状态码 :star: |
| headers | 响应头 |
- 200 表示响应成功
- 400 请求数据不正确 age=abc
- 401 身份验证没通过
- 403 没有权限
- 404 资源不存在
- 405 不支持请求方式 post
- 500 服务器内部错误
请求拦截器
_axios.interceptors.request.use(
  function(config) {
    // 比如在这里添加统一的 headers
    return config;
  },
  function(error) {
    return Promise.reject(error);
  }
);
响应拦截器
_axios.interceptors.response.use(
  function(response) {
    // 2xx 范围内走这里
    return response;
  },
  function(error) {
    // 超出 2xx, 比如 4xx, 5xx 走这里
    return Promise.reject(error);
  }
);
条件渲染
<template>
    <div>
        <input type="button" value="获取远程数据" @click="sendReq()">
        <div class="title">学生列表</div>
        <div class="thead">
            <div class="row bold">
                <div class="col">编号</div>
                <div class="col">姓名</div>
                <div class="col">性别</div>
                <div class="col">年龄</div>
            </div>
        </div>
        <div class="tbody">
            <div class="row" v-if="students.length > 0">显示学生数据</div>
            <div class="row" v-else>暂无学生数据</div>
        </div>
    </div>
</template>
<script>
import axios from '../util/myaxios'
const options = {
    data: function() {
        return {
            students: []
        };
    },
    methods : {
        async sendReq() {
            const resp = await axios.get("/api/students");
            console.log(resp.data.data)
            this.students = resp.data.data;
        }
    }
};
export default options;
</script>
<style scoped>
    div {
        font-family: 华文行楷;
        font-size: 20px;
    }

    .title {
        margin-bottom: 10px;
        font-size: 30px;
        color: #333;
        text-align: center;
    }

    .row {
        background-color: #fff;
        display: flex;
        justify-content: center;
    }

    .col {
        border: 1px solid #f0f0f0;
        width: 15%;
        height: 35px;
        text-align: center;
        line-height: 35px;
    }

    .bold .col {
        background-color: #f1f1f1;
    }
</style>
列表渲染
<template>
    <div>
        <!-- <input type="button" value="获取远程数据" @click="sendReq()"> -->
        <div class="title">学生列表</div>
        <div class="thead">
            <div class="row bold">
                <div class="col">编号</div>
                <div class="col">姓名</div>
                <div class="col">性别</div>
                <div class="col">年龄</div>
            </div>
        </div>
        <div class="tbody">
            <div v-if="students.length > 0">
                <div class="row" v-for="s of students" :key="s.id">
                    <div class="col"></div>
                    <div class="col"></div>
                    <div class="col"></div>
                    <div class="col"></div>
                </div>
            </div>
            <div class="row" v-else>暂无学生数据</div>
        </div>
    </div>
</template>
<script>
import axios from '../util/myaxios'
const options = {
    mounted: function(){
        this.sendReq()
    },
    data: function() {
        return {
            students: []
        };
    },
    methods : {
        async sendReq() {
            const resp = await axios.get("/api/students");
            console.log(resp.data.data)
            this.students = resp.data.data;
        }
    }
};
export default options;
</script>
<style scoped>
    div {
        font-family: 华文行楷;
        font-size: 20px;
    }

    .title {
        margin-bottom: 10px;
        font-size: 30px;
        color: #333;
        text-align: center;
    }

    .row {
        background-color: #fff;
        display: flex;
        justify-content: center;
    }

    .col {
        border: 1px solid #f0f0f0;
        width: 15%;
        height: 35px;
        text-align: center;
        line-height: 35px;
    }

    .bold .col {
        background-color: #f1f1f1;
    }
</style>
- v-if 和 v-for 不能用于同一个标签
- v-for 需要配合特殊的标签属性 key 一起使用,并且 key 属性要绑定到一个能起到唯一标识作用的数据上,本例绑定到了学生编号上
- options 的 mounted 属性对应一个函数,此函数会在组件挂载后(准备就绪)被调用,可以在它内部发起请求,去获取学生数据
重用组件
按钮组件
<template>
    <div class="button" :class="[type,size]">
        a<slot></slot>b
    </div>
</template>
<script>
const options = {
    props: ["type", "size"]
};
export default options;
</script>
- 注意,省略了样式部分
使用组件
<template>
    <div>
        <h1>父组件</h1>
        <my-button type="primary" size="small">1</my-button>
        <my-button type="danger" size="middle">2</my-button>
        <my-button type="success" size="large">3</my-button>
    </div>
</template>
<script>
import MyButton from '../components/MyButton.vue'
const options = {
    components: {
        MyButton
    }
};
export default options;
</script>
2. Vue 进阶
1) ElementUI
安装
npm install element-ui -S
引入组件
import Element from 'element-ui'
import 'element-ui/lib/theme-chalk/index.css'

Vue.use(Element)
测试,在自己的组件中使用 ElementUI 的组件
<el-button>按钮</el-button>
表格组件
<template>
    <div>
        <el-table :data="students">
            <el-table-column label="编号" prop="id"></el-table-column>
            <el-table-column label="姓名" prop="name"></el-table-column>
            <el-table-column label="性别" prop="sex"></el-table-column>
            <el-table-column label="年龄" prop="age"></el-table-column>
        </el-table>
    </div>
</template>
<script>
import axios from '../util/myaxios'
const options = {
    async mounted() {
        const resp = await axios.get('/api/students');
        this.students = resp.data.data
    },
    data() {
        return {
            students: []
        }
    }
}
export default options;
</script>
分页组件
<template>
    <div>
        <el-table v-bind:data="students">
            <el-table-column label="编号" prop="id"></el-table-column>
            <el-table-column label="姓名" prop="name"></el-table-column>
            <el-table-column label="性别" prop="sex"></el-table-column>
            <el-table-column label="年龄" prop="age"></el-table-column>
        </el-table>
        <el-pagination
            :total="total"
            :page-size="queryDto.size"
            :current-page="queryDto.page"
            layout="prev,pager,next,sizes,->,total"
            :page-sizes="[5,10,15,20]"
            @current-change="currentChange"
            @size-change="sizeChange"
        ></el-pagination>
    </div>
</template>
<script>
import axios from '../util/myaxios'
const options = {
    mounted() {
        this.query();
    },
    methods: {
        currentChange(page) {
            this.queryDto.page = page;
            this.query();
        },
        sizeChange(size){
            this.queryDto.size = size;
            this.query();
        },
        async query() {
            const resp = await axios.get('/api/students/q', {
                params: this.queryDto
            });
            this.students = resp.data.data.list;
            this.total = resp.data.data.total;
        }
    },
    data() {
        return {
            students: [],
            total: 0,
            queryDto: {
                page: 1,
                size: 5
            }
        }
    }
}
export default options;
</script>
- 三种情况都应该触发查询
- mounted 组件挂载完成后
- 页号变化时
- 页大小变化时
- 查询传参应该根据后台需求,灵活采用不同方式
- 本例中因为是 get 请求,无法采用请求体,只能用 params 方式传参
- 返回响应的格式也许会很复杂,需要掌握【根据返回的响应结构,获取数据】的能力
分页搜索
<template>
    <div>
        <el-input placeholder="请输入姓名" size="mini" v-model="queryDto.name"></el-input>
        <el-select placeholder="请选择性别" size="mini" v-model="queryDto.sex" clearable>
            <el-option value="男"></el-option>
            <el-option value="女"></el-option>
        </el-select>
        <el-select placeholder="请选择年龄" size="mini" v-model="queryDto.age" clearable>
            <el-option value="0,20" label="0到20岁"></el-option>
            <el-option value="21,30" label="21到30岁"></el-option>
            <el-option value="31,40" label="31到40岁"></el-option>
            <el-option value="41,120" label="41到120岁"></el-option>
        </el-select>
        <el-button type="primary" size="mini" @click="search()">搜索</el-button>
        <el-divider></el-divider>
        <el-table v-bind:data="students">
            <el-table-column label="编号" prop="id"></el-table-column>
            <el-table-column label="姓名" prop="name"></el-table-column>
            <el-table-column label="性别" prop="sex"></el-table-column>
            <el-table-column label="年龄" prop="age"></el-table-column>
        </el-table>
        <el-pagination :total="total" :page-size="queryDto.size" :current-page="queryDto.page"
            layout="prev,pager,next,sizes,->,total" :page-sizes="[5, 10, 15, 20]" @current-change="currentChange"
            @size-change="sizeChange"></el-pagination>
    </div>
</template>
<script>
import axios from '../util/myaxios'
const options = {
    mounted() {
        this.query();
    },
    methods: {
        currentChange(page) {
            this.queryDto.page = page;
            this.query();
        },
        sizeChange(size) {
            this.queryDto.size = size;
            this.query();
        },
        async query() {
            const resp = await axios.get('/api/students/q', {
                params: this.queryDto
            });
            this.students = resp.data.data.list;
            this.total = resp.data.data.total;
        },
        search() {
            this.query();
        }
    },
    data() {
        return {
            students: [],
            total: 0,
            queryDto: {
                name: '',
                sex: '',
                age: '',
                page: 1,
                size: 5
            }
        }
    }
}
export default options;
</script>
- sex 与 age 均用
''表示用户没有选择的情况 - age 取值
0,20会被 spring 转换为new int[]{0, 20} - age 取值
''会被 spring 转换为new int[0]
级联选择
级联选择器中选项的数据结构为
[
    {value:100, label:'主页',children:[
        {value:101, label:'菜单1', children:[
            {value:105, label:'子项1'},
            {value:106, label:'子项2'}
        ]},
        {value:102, label:'菜单2', children:[
            {value:107, label:'子项3'},
            {value:108, label:'子项4'},
            {value:109, label:'子项5'}
        ]},
        {value:103, label:'菜单3', children:[
            {value:110, label:'子项6'},
            {value:111, label:'子项7'}
        ]},
        {value:104, label:'菜单4'}
    ]}
]
下面的例子是将后端返回的一维数组【树化】
<template>
    <el-cascader :options="ops"></el-cascader>
</template>
<script>
import axios from '../util/myaxios'
const options = {
    async mounted() {
        const resp = await axios.get('/api/menu')
        console.log(resp.data.data)
        const array = resp.data.data;

        const map = new Map();

        // 1. 将所有数据存入 map 集合(为了接下来查找效率)
        for(const {id,name,pid} of array) {
            map.set(id, {value:id, label:name, pid:pid})
        }
        // 2. 建立父子关系
        // 3. 找到顶层对象
        const top = [];
        for(const obj of map.values()) {
            const parent = map.get(obj.pid);
            if(parent !== undefined) {
                parent.children ??= [];
                parent.children.push(obj);
            } else {
                top.push(obj)
            }
        }
        this.ops = top;
    },
    data(){
        return {
            ops: []
        }
    }
};
export default options;
</script>
2) Vue-Router
vue 属于单页面应用,所谓的路由,就是根据浏览器路径不同,用不同的视图组件替换这个页面内容展示
使用方式
- 提供一个路由配置表,不同 URL 对应不同组件的配置
- 初始化路由实例 new VueRouter()
- 挂载到 Vue 实例上
- 提供一个路由占位,用来挂载 URL 匹配到的组件
配置路由
新建一个路由 js 文件,例如 src/router/example14.js,内容如下
import Vue from 'vue'
import VueRouter from 'vue-router'
import ContainerView from '@/views/example14/ContainerView.vue'
import LoginView from '@/views/example14/LoginView.vue'
import NotFoundView from '@/views/example14/NotFoundView.vue'

Vue.use(VueRouter)

const routes = [
  {
    path:'/',
    component: ContainerView
  },
  {
    path:'/login',
    component: LoginView
  },
  {
    path:'/404',
    component: NotFoundView
  }
]

const router = new VueRouter({
  routes
})

export default router
- 最重要的就是建立了【路径】与【视图组件】之间的映射关系
- 本例中映射了 3 个路径与对应的视图组件
在 main.js 中采用我们的路由 js
import Vue from 'vue'
import e14 from './views/Example14View.vue'
import router from './router/example14'  // 修改这里
import store from './store'
import Element from 'element-ui'
import 'element-ui/lib/theme-chalk/index.css'

Vue.config.productionTip = false

Vue.use(Element)
new Vue({
  router,
  store,
  render: h => h(e14)
}).$mount('#app')
根组件是 Example14View.vue,内容为:
<template>
    <div class="all">
        <router-view></router-view>
    </div>
</template>
- 样式略
- 其中
<router-view>起到占位作用,改变路径后,这个路径对应的视图组件就会占据<router-view>的位置,替换掉它之前的内容
动态导入
import Vue from 'vue'
import VueRouter from 'vue-router'

Vue.use(VueRouter)

const routes = [
  {
    path:'/',
    component: () => import('@/views/example14/ContainerView.vue')
  },
  {
    path:'/login',
    component: () => import('@/views/example14/LoginView.vue')
  },
  {
    path:'/404',
    component: () => import('@/views/example14/NotFoundView.vue')
  }
]

const router = new VueRouter({
  routes
})

export default router
- 静态导入是将所有组件的 js 代码打包到一起,如果组件非常多,打包后的 js 文件会很大,影响页面加载速度
- 动态导入是将组件的 js 代码放入独立的文件,用到时才加载
嵌套路由
组件内再要切换内容,就需要用到嵌套路由(子路由),下面的例子是在【ContainerView 组件】内定义了 3 个子路由
const routes = [
  {
    path:'/',
    component: () => import('@/views/example14/ContainerView.vue'),
    redirect: '/c/p1',
    children: [
      {
        path:'c/p1',
        component: () => import('@/views/example14/container/P1View.vue')
      },
      {
        path:'c/p2',
        component: () => import('@/views/example14/container/P2View.vue')
      },
      {
        path:'c/p3',
        component: () => import('@/views/example14/container/P3View.vue')
      }
    ]
  },
  {
    path:'/login',
    component: () => import('@/views/example14/LoginView.vue')
  },
  {
    path:'/404',
    component: () => import('@/views/example14/NotFoundView.vue')
  },
  {
    path:'*',
    redirect: '/404'
  }
]
子路由变化,切换的是【ContainerView 组件】中 <router-view></router-view> 部分的内容
<template>
    <div class="container">
        <router-view></router-view>
    </div>
</template>
- redirect 可以用来重定向(跳转)到一个新的地址
- path 的取值为 * 表示匹配不到其它 path 时,就会匹配它
ElementUI 布局
通常主页要做布局,下面的代码是 ElementUI 提供的【上-【左-右】】布局
<template>
    <div class="container">
        <el-container>
            <el-header></el-header>
            <el-container>
                <el-aside width="200px"></el-aside>
                <el-main>
                    <router-view></router-view>
                </el-main>
            </el-container>
        </el-container>
    </div>
</template>
路由跳转
标签式
<el-aside width="200px">
    <router-link to="/c1/p1">P1</router-link>
    <router-link to="/c1/p2">P2</router-link>
    <router-link to="/c1/p3">P3</router-link>
</el-aside>
编程式
<el-header>
    <el-button type="primary" icon="el-icon-edit"
               circle size="mini" @click="jump('/c1/p1')"></el-button>
    <el-button type="success" icon="el-icon-check"
               circle size="mini" @click="jump('/c1/p2')"></el-button>
    <el-button type="warning" icon="el-icon-star-off"
               circle size="mini" @click="jump('/c1/p3')"></el-button>
</el-header>
jump 方法
<script>
const options = {
    methods : {
        jump(url) {
            this.$router.push(url);
        }
    }
}
export default options;
</script>
- 其中 this.$router 是拿到路由对象
- push 方法根据 url 进行跳转
导航菜单
<el-menu router background-color="#545c64" text-color="#fff" active-text-color="#ffd04b">
    <el-submenu index="/c1">
        <span slot="title">
            <i class="el-icon-platform-eleme"></i>
            菜单1
        </span>
        <el-menu-item index="/c1/p1">子项1</el-menu-item>
        <el-menu-item index="/c1/p2">子项2</el-menu-item>
        <el-menu-item index="/c1/p3">子项3</el-menu-item>
    </el-submenu>
    <el-menu-item index="/c2">
        <span slot="title">
            <i class="el-icon-phone"></i>
            菜单2
        </span>
    </el-menu-item>
    <el-menu-item index="/c3">
        <span slot="title">
            <i class="el-icon-star-on"></i>
            菜单3
        </span>
    </el-menu-item>
</el-menu>
- 图标和菜单项文字建议用
<span slot='title'></span>包裹起来 el-menu标签上加上router属性,表示结合导航菜单与路由对象,此时,就可以利用菜单项的index属性来路由跳转
动态路由与菜单
将菜单、路由信息(仅主页的)存入数据库中
insert into menu(id, name, pid, path, component, icon) values
    (101, '菜单1', 0,   '/m1',    null,         'el-icon-platform-eleme'),
    (102, '菜单2', 0,   '/m2',    null,         'el-icon-delete-solid'),
    (103, '菜单3', 0,   '/m3',    null,         'el-icon-s-tools'),
    (104, '菜单4', 0,   '/m4',    'M4View.vue', 'el-icon-user-solid'),
    (105, '子项1', 101, '/m1/c1', 'C1View.vue', 'el-icon-s-goods'),
    (106, '子项2', 101, '/m1/c2', 'C2View.vue', 'el-icon-menu'),
    (107, '子项3', 102, '/m2/c3', 'C3View.vue', 'el-icon-s-marketing'),
    (108, '子项4', 102, '/m2/c4', 'C4View.vue', 'el-icon-s-platform'),
    (109, '子项5', 102, '/m2/c5', 'C5View.vue', 'el-icon-picture'),
    (110, '子项6', 103, '/m3/c6', 'C6View.vue', 'el-icon-upload'),
    (111, '子项7', 103, '/m3/c7', 'C7View.vue', 'el-icon-s-promotion');
不同的用户查询的的菜单、路由信息是不一样的
例如:访问 /api/menu/admin 返回所有的数据
[
    {
        "id": 102,
        "name": "菜单2",
        "icon": "el-icon-delete-solid",
        "path": "/m2",
        "pid": 0,
        "component": null
    },
    {
        "id": 107,
        "name": "子项3",
        "icon": "el-icon-s-marketing",
        "path": "/m2/c3",
        "pid": 102,
        "component": "C3View.vue"
    },
    {
        "id": 108,
        "name": "子项4",
        "icon": "el-icon-s-platform",
        "path": "/m2/c4",
        "pid": 102,
        "component": "C4View.vue"
    },
    {
        "id": 109,
        "name": "子项5",
        "icon": "el-icon-picture",
        "path": "/m2/c5",
        "pid": 102,
        "component": "C5View.vue"
    }
]
访问 /api/menu/wang 返回
[
    {
        "id": 103,
        "name": "菜单3",
        "icon": "el-icon-s-tools",
        "path": "/m3",
        "pid": 0,
        "component": null
    },
    {
        "id": 110,
        "name": "子项6",
        "icon": "el-icon-upload",
        "path": "/m3/c6",
        "pid": 103,
        "component": "C6View.vue"
    },
    {
        "id": 111,
        "name": "子项7",
        "icon": "el-icon-s-promotion",
        "path": "/m3/c7",
        "pid": 103,
        "component": "C7View.vue"
    }
]
前端根据他们身份不同,动态添加路由和显示菜单
动态路由
export function addServerRoutes(array) {
  for (const { id, path, component } of array) {
    if (component !== null) {
      // 动态添加路由
      // 参数1:父路由名称
      // 参数2:路由信息对象
      router.addRoute('c', {
        path: path,
        name: id,
        component: () => import(`@/views/example15/container/${component}`)
      });
    }
  }
}
- js 这边只保留几个固定路由,如主页、404 和 login
- 以上方法执行时,将服务器返回的路由信息加入到名为 c 的父路由中去
- 这里要注意组件路径,前面 @/views 是必须在 js 这边完成拼接的,否则 import 函数会失效
重置路由
在用户注销时应当重置路由
export function resetRouter() {
  router.matcher = new VueRouter({ routes }).matcher
}
页面刷新
页面刷新后,会导致动态添加的路由失效,解决方法是将路由数据存入 sessionStorage
<script>
import axios from '@/util/myaxios'
import {resetRouter, addServerRoutes} from '@/router/example15'
const options = {
    data() {
        return {
            username: 'admin'
        }
    },
    methods: {
        async login() {
            resetRouter(); // 重置路由
            const resp = await axios.get(`/api/menu/${this.username}`)
            const array = resp.data.data;
            // localStorage     即使浏览器关闭,存储的数据仍在
            // sessionStorage   以标签页为单位,关闭标签页时,数据被清除
            sessionStorage.setItem('serverRoutes', JSON.stringify(array))
            addServerRoutes(array); // 动态添加路由
            this.$router.push('/');
        }
    }
}
export default options;
</script>
页面刷新,重新创建路由对象时,从 sessionStorage 里恢复路由数据
const router = new VueRouter({
  routes
})

// 从 sessionStorage 中恢复路由数据
const serverRoutes = sessionStorage.getItem('serverRoutes');
if(serverRoutes) {
  const array = JSON.parse(serverRoutes);
  addServerRoutes(array) // 动态添加路由
}
动态菜单
代码部分
<script>
const options = {
    mounted() {
        const serverRoutes = sessionStorage.getItem('serverRoutes');
        const array = JSON.parse(serverRoutes);
        const map = new Map();
        for(const obj of array) {
            map.set(obj.id, obj);
        }
        const top = [];
        for(const obj of array) {
            const parent = map.get(obj.pid);
            if(parent) {
                parent.children ??= [];
                parent.children.push(obj);
            } else {
                top.push(obj);
            }
        }
        this.top = top;
    },
    data() {
        return {
            top: []
        }
    }
}
export default options;
</script>
菜单部分
<el-menu router background-color="#545c64" text-color="#fff" active-text-color="#ffd04b" :unique-opened="true">
    <template v-for="m1 of top">
<el-submenu v-if="m1.children" :key="m1.id" :index="m1.path">
    <span slot="title">
        <i :class="m1.icon"></i>
        </span>
    <el-menu-item v-for="m2 of m1.children" :key="m2.id" :index="m2.path">
        <span slot="title">
            <i :class="m2.icon"></i>
        </span>
        </el-menu-item>
        </el-submenu>
<el-menu-item v-else :key="m1.id" :index="m1.path">
    <span slot="title">
        <i :class="m1.icon"></i>
        </span>
        </el-menu-item>
    </template>
</el-menu>
- 没有考虑递归菜单问题,认为菜单只有两级
3) Vuex
入门
vuex 可以在多个组件之间共享数据,并且共享的数据是【响应式】的,即数据的变更能及时渲染到模板
- 与之对比 localStorage 与 sessionStorage 也能共享数据,但缺点是数据并非【响应式】
首先需要定义 state 与 mutations 他们一个用来读取共享数据,一个用来修改共享数据
src/store/index.js
import Vue from 'vue'
import Vuex from 'vuex'

Vue.use(Vuex)

/*
  读取数据,走 state, getters
  修改数据,走 mutations, actions
*/
export default new Vuex.Store({
  state: {
    name: '',
    age: 18
  },
  getters: {
  },
  mutations: {
    updateName(state, name) {
      state.name = name;
    }
  },
  actions: {
  },
  modules: {
  }
})
修改共享数据
<template>
    <div class="p">
        <el-input placeholder="请修改用户姓名"
            size="mini" v-model="name"></el-input>
        <el-button type="primary" size="mini" @click="update()">修改</el-button>
    </div>
</template>
<script>
const options = {
    methods: {
        update(){
            this.$store.commit('updateName', this.name);
        }
    },
    data () {
        return {
            name:''
        }
    }
}
export default options;
</script>
- mutations 方法不能直接调用,只能通过
store.commit(mutation方法名, 参数)来间接调用
读取共享数据
<template>
    <div class="container">
        <el-container>
            <el-header>
                <div class="t">
                    欢迎您:,
    			</div>
            </el-header>
            <el-container>
                <el-aside width="200px">
                </el-aside>
                <el-main>
                    <router-view></router-view>
                </el-main>
            </el-container>
        </el-container>
    </div>
</template>
mapState
每次去写 $store.state.name 这样的代码显得非常繁琐,可以用 vuex 帮我们生成计算属性
<template>
    <div class="container">
        <el-container>
            <el-header>
                <div class="t">欢迎您:, </div>
            </el-header>
            <el-container>
                <el-aside width="200px">
                </el-aside>
                <el-main>
                    <router-view></router-view>
                </el-main>
            </el-container>
        </el-container>
    </div>
</template>
<script>
import { mapState } from 'vuex'
const options = {
    computed: {
        ...mapState(['name', 'age'])
    }
}
export default options;
</script>
- mapState 返回的是一个对象,对象内包含了 name() 和 age() 的这两个方法作为计算属性
- 此对象配合
...展开运算符,填充入 computed 即可使用
mapMutations
<template>
    <div class="p">
        <el-input placeholder="请修改用户姓名"
            size="mini" v-model="name"></el-input>
        <el-button type="primary" size="mini" @click="updateName(name)">修改</el-button>
    </div>
</template>
<script>
import {mapMutations} from 'vuex'
const options = {
    methods: {
        ...mapMutations(['updateName'])
    },
    data () {
        return {
            name:''
        }
    }
}
export default options;
</script>
- 类似的,调用 mutation 修改共享数据也可以简化
- mapMutations 返回的对象中包含的方法,就会调用 store.commit() 来执行 mutation 方法
- 注意参数传递略有不同
actions
mutations 方法内不能包括修改不能立刻生效的代码,否则会造成 Vuex 调试工具工作不准确,必须把这些代码写在 actions 方法中
import Vue from 'vue'
import Vuex from 'vuex'

Vue.use(Vuex)

/*
  读取数据,走 state, getters
  修改数据,走 mutations, actions
*/
import axios from '@/util/myaxios'
export default new Vuex.Store({
  state: {
    name: '',
    age: 18
  },
  getters: {
  },
  mutations: {
    updateName(state, name) {
      state.name = name;
    },
    // 错误的用法,如果在mutations方法中包含了异步操作,会造成开发工具不准确
    /* async updateServerName(state) {
      const resp = await axios.get('/api/user');
      const {name, age} = resp.data.data;
      state.name = name;
      state.age = age;
    } */
    updateServerName(state, user) {
      const { name, age } = user;
      state.name = name;
      state.age = age;
    }
  },
  actions: {
    async updateServerName(context) {
      const resp = await axios.get('/api/user');
      context.commit('updateServerName', resp.data.data)
    }
  },
  modules: {
  }
})
- 首先应当调用 actions 的 updateServerName 获取数据
- 然后再由它间接调用 mutations 的 updateServerName 更新共享数据
页面使用 actions 的方法可以这么写
<template>
    <div class="p">
        <el-button type="primary" size="mini"
            @click="updateServerName()">从服务器获取数据,存入store</el-button>
    </div>
</template>
<script>
import { mapActions } from 'vuex'
const options = {
    methods: {
        ...mapActions(['updateServerName'])
    }
}
export default options;
</script>
-
mapActions 会生成调用 actions 中方法的代码
-
调用 actions 的代码内部等价于,它返回的是 Promise 对象,可以用同步或异步方式接收结果
this.$store.dispatch('action名称', 参数)
3. Vue 实战
课程不准备从头开发一个 Vue 项目,这里我准备采用这样的教学方法:带着大家看一个较为典型的基于 Vue 的项目实现,分析其中几个重点流程
这里选择了 vue-element-admin 这个项目骨架,它采用的技术与我们之前学过的较为契合
- vue 2
- element-ui 2
- vue-router 3
- vuex 3
- axios
1) 安装
git clone https://gitee.com/panjiachen/vue-element-admin.git client-action

cd client-action

git branch -a

git checkout -b i18n remotes/origin/i18n

git config --global url."https://".insteadOf git://

npm install

npm run dev
- 需要切换分支到 i18n,否则不支持国际化(中文)功能
- npm install 要多试几次,因为中间会连接 gitbub 下载一些依赖,网络不稳定会导致失败
- npm run dev 运行后回自动打开浏览器,使用的端口是 9527
2) 后端路径
开发环境下执行下面命令
npm run dev
- 会同时启动 mock-server
在开发环境下,后端访问路径起始路径配置在文件 .env.development 中
VUE_APP_BASE_API = '/dev-api'
- 默认向后台的请求都发给
http://localhost:9527/dev-api的 mock-server 获得的都是模拟数据 - 需要跟真实后台联调时,可以改动以上地址为
VUE_APP_BASE_API = 'http://localhost:8080/api'
发送请求的 axios 工具被封装在 src/utils/request.js 中
import axios from 'axios'
import { MessageBox, Message } from 'element-ui'
import store from '@/store'
import { getToken } from '@/utils/auth'

// create an axios instance
const service = axios.create({
  baseURL: process.env.VUE_APP_BASE_API, // url = base url + request url
  // withCredentials: true, // send cookies when cross-domain requests
  timeout: 5000 // request timeout
})

// ...
原有代码的 URI 路径都是这样的:
/vue-element-admin/user/login
/vue-element-admin/user/info
/vue-element-admin/user/logout
...
如果觉得不爽,可以来一个全局替换
/user/login
/user/info
/user/logout
...
token 的请求头修改一下,在 src/utils/request.js 中
...
service.interceptors.request.use(
  config => {
    // do something before request is sent

    if (store.getters.token) {
      // let each request carry token
      // ['X-Token'] is a custom headers key
      // please modify it according to the actual situation
      config.headers['Authorization'] = getToken()
    }
    return config
  },
  error => {
    // do something with request error
    console.log(error) // for debug
    return Promise.reject(error)
  }
)
...
3) 登录流程
src/views/login/index.vue
<script>
import { validUsername } from '@/utils/validate'
import LangSelect from '@/components/LangSelect'
import SocialSign from './components/SocialSignin'

export default {
  // ...
  methods: {
    handleLogin() {
      this.$refs.loginForm.validate(valid => {
        if (valid) {
          this.loading = true
          this.$store.dispatch('user/login', this.loginForm)
            .then(() => {
              this.$router.push({ path: this.redirect || '/', query: this.otherQuery })
              this.loading = false
            })
            .catch(() => {
              this.loading = false
            })
        } else {
          console.log('error submit!!')
          return false
        }
      })
    }
    // ...
  }
}
</script>
这里调用了 store 的 actions,user/login
- 因为是异步调用,因此只能用 actions
- 登录成功会优先跳转至 this.redirect 路径、否则跳转至 /
- / 查看
src/router/index.js的路由表可知,会重定向至 /dashboard
src/store/modules/user.js
import { login, logout, getInfo } from '@/api/user'
// ...
const actions = {
// user login
login({ commit }, userInfo) {
const { username, password } = userInfo
return new Promise((resolve, reject) => {
login({ username: username.trim(), password: password }).then(response => {
const { data } = response
commit('SET_TOKEN', data.token)
setToken(data.token)
resolve()
}).catch(error => {
reject(error)
})
})
}
// ...
}
- 发请求用了
src/api/user.js,请求成功使用 commit 将 token 存入 mutations,同时往 cookie 存储了一份 - 这里的 response 其实是真正的 response.data,见后面的说明
- 评价
- 向 cookie 或 sessionStorage 存储 token 即可,token 无需做成响应式,不必放入 store
- 作者使用了 Promise API,其实可以改变为 await 方式,提高可读性
src/api/user.js
import request from '@/utils/request'
export function login(data) {
return request({
url: '/user/login',
method: 'post',
data
})
}
// ...
- 其中 request 相当于我们之前封装的 myaxios
src/utils/request.js
import axios from 'axios'
import { MessageBox, Message } from 'element-ui'
import store from '@/store'
import { getToken } from '@/utils/auth'
// create an axios instance
const service = axios.create({
baseURL: process.env.VUE_APP_BASE_API, // url = base url + request url
// withCredentials: true, // send cookies when cross-domain requests
timeout: 5000 // request timeout
})
// ...
service.interceptors.response.use(
// ...
response => {
const res = response.data
if (res.code !== 20000) {
// ...
} else {
return res
}
},
error => {
// ...
}
)
export default service
- 其中响应拦截器发现响应正确,返回 resp.data 这样,其它处代码解构时少了一层 data
src/permission.js
登录成功后,只是获得了 token,还未获取用户信息,获取用户信息是在路由跳转的 beforeEach 里做的
sequenceDiagram
participant c as 登录页
participant r as Router
participant s as Store
participant t as Tomcat
rect rgba(255,0,0,0.2)
c ->> +s: login(username,password)
s ->> +t: login(username,password)
t -->> -s: token
s ->> s: 存储 token
s -->> -c:
end
rect rgba(0,255,0,0.2)
c ->> +r: 跳转至 /
r ->> +s: beforeEach getInfo(token)
s ->> +t: getInfo(token)
t -->> -s: name,avatar,roles等
s ->> s: 存储用户信息
s -->> -r:
r ->> r: 根据roles动态生成路由
r -->> -c:
end
关键代码
import router from './router'
// ...
router.beforeEach(async(to, from, next) => {
// ...
const hasToken = getToken()
if (hasToken) {
if (to.path === '/login') {
// ...
} else {
// ...
const { roles } = await store.dispatch('user/getInfo')
// ...
}
} else {
// ...
}
})
- 登录后跳转至 / 之前进入这里的 beforeEach 方法,方法内主要做两件事
- 一是调用 actions 方法获取用户角色,见 6
- 二是根据用户角色,动态生成路由,见 7
src/store/modules/user.js
这里用其中 getInfo 方法获取用户信息,其中角色返回给 beforeEach
import { login, logout, getInfo } from '@/api/user'
// ...
const actions = {
getInfo({ commit, state }) {
return new Promise((resolve, reject) => {
getInfo(state.token).then(response => {
const { data } = response
if (!data) {
reject('Verification failed, please Login again.')
}
const { roles, name, avatar, introduction } = data
if (!roles || roles.length <= 0) {
reject('getInfo: roles must be a non-null array!')
}
commit('SET_ROLES', roles)
commit('SET_NAME', name)
commit('SET_AVATAR', avatar)
commit('SET_INTRODUCTION', introduction)
resolve(data)
}).catch(error => {
reject(error)
})
})
}
}
src/router/index.js
路由表中路由分成两部分,静态路由与动态路由
export const constantRoutes = [
// ...
{
path: '/login',
component: () => import('@/views/login/index'),
hidden: true
},
{
path: '/',
component: Layout,
redirect: '/dashboard',
children: [
{
path: 'dashboard',
component: () => import('@/views/dashboard/index'),
name: 'Dashboard',
meta: { title: 'dashboard', icon: 'dashboard', affix: true }
}
]
}
// ...
]
- 其中 hidden: true 的路由只做路由跳转,不会在左侧导航菜单展示
动态路由
export const asyncRoutes = [
{
path: '/permission',
component: Layout,
redirect: '/permission/page',
alwaysShow: true, // will always show the root menu
name: 'Permission',
meta: {
title: 'permission',
icon: 'lock',
roles: ['admin', 'editor'] // you can set roles in root nav
},
children: [
{
path: 'page',
component: () => import('@/views/permission/page'),
name: 'PagePermission',
meta: {
title: 'pagePermission',
roles: ['admin'] // or you can only set roles in sub nav
}
},
{
path: 'directive',
component: () => import('@/views/permission/directive'),
name: 'DirectivePermission',
meta: {
title: 'directivePermission'
// if do not set roles, means: this page does not require permission
}
},
{
path: 'role',
component: () => import('@/views/permission/role'),
name: 'RolePermission',
meta: {
title: 'rolePermission',
roles: ['admin']
}
}
]
},
{
path: '/icon',
component: Layout,
children: [
{
path: 'index',
component: () => import('@/views/icons/index'),
name: 'Icons',
meta: { title: 'icons', icon: 'icon', noCache: true, roles: ['admin'] }
}
]
}
// ...
}
- 动态路由中关联了角色信息,根据用户的角色决定那些路由可用,但这样做的缺点是把角色和路由绑定死了
src/layout/index.vue
它对应的是我们之前介绍的 Container.vue 完成主页布局的,路由路径是 /
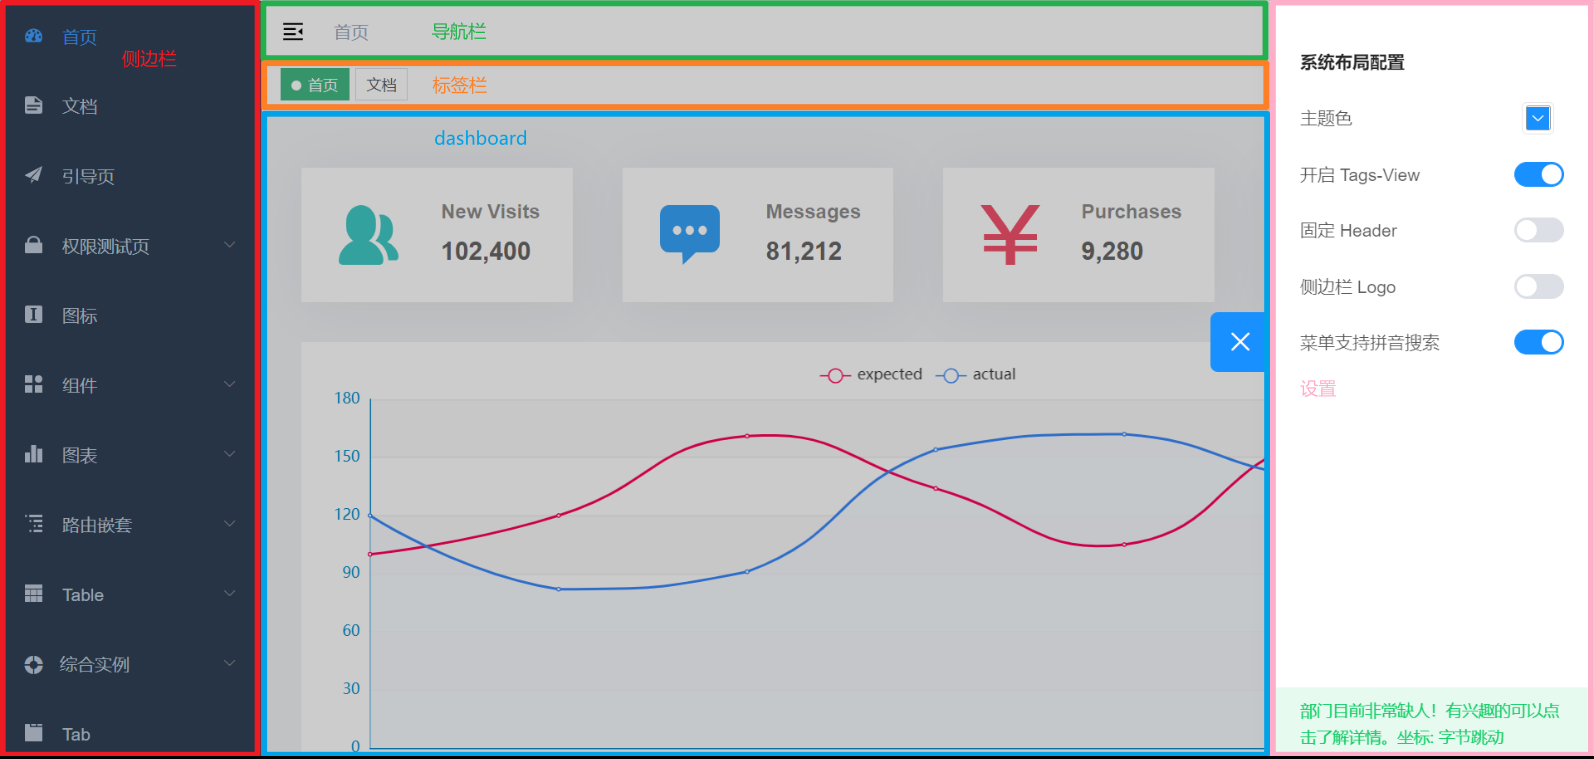
其中又由多部分组成,其中固定不变的是
- 侧边栏
- 导航栏
- 标签栏
- 设置
变化的是中间的 dashboard 部分(AppMain),它由 router-view 配合子路由切换显示
- 进入 / 后,就会 redirect 重定向到 /dashboard 子路由
- 进入首页后,会有一个
/api/transaction/list的后台请求报 404,作为练习,把它补充完整
4) 第三方登录
sequenceDiagram
participant a7 as 前端(9527)
participant a8 as 后端(8080)
participant g as gitee
rect rgba(0,255,0,0.2)
a7 ->> +g: 打开新窗口, 请求 /oauth/authorize
g ->> g: 认证通过
end
rect rgba(255,0,0,0.2)
g ->> -a8: 重定向 redirect uri
end
rect rgba(0,255,0,0.2)
a8 ->> +g: 请求 /oauth/token
g ->> -a8: 返回 access_token(gitee)
end
rect rgba(0,255,0,0.2)
a8 ->> +g: 请求 /api/v5/user
g -->> -a8:
end
a8 ->> 8: 生成 token(8080)
rect rgba(0,0,255,0.2)
a8 ->> +a7: 新窗口将 token(8080) 发送给老窗口(9527)
end
-
9527 打开新窗口,请求
https://gitee.com/oauth/authorize?client_id=${client_id}&redirect_uri=${redirect_uri}&response_type=code -
gitee 认证通过,重定向至 8080,并携带 code
-
8080 发送请求
https://gitee.com/oauth/token携带 client_id、client_secret、code,gitee 返回 access_token 给 8080-
这时走的是 https 协议,并且不经过浏览器,能够保证数据传输的安全性
-
重定向到 8080 时,如果被有心人拿到了 code,也没事,因为接下来会把 client_secret 发给 gitee 验证(client_secret 应当只存在 8080),只要 client_secret 不泄露,就可以保证安全
-
如果改成前端拿 code 换 access_token,那就意味着 access_token 得保存在前端,所有保存在前端的都有风险
-
-
8080 可以访问 gitee 的 api 了,拿到用户信息,存入数据库,返回 8080 的 token
-
8080 可以通过 window.opener.postMessage 把 token 给 9527 的老窗口
- 这里又会涉及到跨域,不过 9527 与 8080 直接存在信任关系,设置一下就好
-
9527 再走之前的逻辑就可以了,在 router 的 beforeEach 方法里,用 8080 token 换用户信息
5) 增删改查
首先,在 api 里添加与后端交互的代码:src/api/student.js
import axios from '@/utils/request'
export function all() {
return axios({
url: '/students',
method: 'get'
})
}
export function deleteById(id) {
return axios({
url: `/students/${id}`,
method: 'delete'
})
}
export function update(id, dto) {
return axios({
url: `/students/${id}`,
method: 'put',
data: dto
})
}
export function insert(dto) {
return axios({
url: `/students`,
method: 'post',
data: dto
})
}
然后,添加新的路由:src/router/index.js
export const asyncRoutes = [
// ...
{
path: '/student',
component: Layout,
children: [
{
path: 'index',
component: () => import('@/views/student/index'),
meta: { title: '学生管理', icon: 'el-icon-s-help', roles: ['admin'] }
}
]
},
// ...
]
- 注意 title 这里没有考虑国际化
最后,添加新的视图界面:src/views/student/index.vue
<template>
<div>
<el-table :data="students">
<el-table-column label="编号" prop="id"></el-table-column>
<el-table-column label="姓名" prop="name"></el-table-column>
<el-table-column label="性别" prop="sex"></el-table-column>
<el-table-column label="年龄" prop="age"></el-table-column>
<el-table-column fixed="right" label="操作" width="100">
<template slot-scope="scope">
<el-button @click="handleUpdate(scope.row)" type="text" size="small">修改</el-button>
<el-button @click="handleDelete(scope.row)" type="text" size="small">删除</el-button>
</template>
</el-table-column>
</el-table>
<el-dialog width="22%" :visible.sync="updateDialogVisible">
<el-form :model="updateForm">
<el-form-item label="编号">
<el-input size="mini" :readonly="true" v-model="updateForm.id"></el-input>
</el-form-item>
<el-form-item label="姓名">
<el-input size="mini" v-model="updateForm.name"></el-input>
</el-form-item>
<el-form-item label="性别">
<el-select size="mini" v-model="updateForm.sex">
<el-option value="男"></el-option>
<el-option value="女"></el-option>
</el-select>
</el-form-item>
<el-form-item label="年龄">
<el-input size="mini" v-model="updateForm.age"></el-input>
</el-form-item>
<el-form-item>
<el-button type="primary" size="mini" @click="confirmUpdate()">确定</el-button>
</el-form-item>
</el-form>
</el-dialog>
</div>
</template>
<script>
import { all, deleteById, update, insert } from '@/api/student'
const options = {
mounted() {
this.all()
},
data() {
return {
students: [],
updateDialogVisible: false,
updateForm: {
id: 0,
name: '',
sex: '男',
age: 0
}
}
},
methods: {
async confirmUpdate() {
await update(this.updateForm.id, this.updateForm)
this.updateDialogVisible = false
this.all()
},
handleUpdate(row) { // {id, name, sex, age}
this.updateDialogVisible = true
this.updateForm = { ...row }
// this.updateForm = row // 错误写法,不能让他俩指向同一个对象
},
async handleDelete(row) {
try {
await this.$confirm('此操作将永久删除该学生, 是否继续?', '提示', {
confirmButtonText: '确定',
cancelButtonText: '取消',
type: 'warning'
})
await deleteById(row.id)
this.all()
} catch (e) {
console.log('取消删除')
}
},
async all() {
const { data } = await all()
this.students = data
}
}
}
export default options
</script>
<style scoped>
.el-input,
.el-select {
width: 180px;
}
</style>
- 其中 handleUpdate 和 handleDelete 接收的参数,都是代表了当前行的学生对象
第四章 Vue 3
1. TypeScript
1) 动态类型的问题
前面我们讲过 js 属于动态类型语言,例如
function test(obj) {
}
obj 可能只是个字符串
test('hello, world')
obj 也有可能是个函数
test(()=>console.log('hello, world'))
obj 类型不确定,就给后期使用者带来了麻烦,一旦参数传不对,代码就崩溃了
动态类型意味着
- 运行代码时才知道发生什么 (running the code to see what happens)
静态类型意味着
- 在代码运行前,就对它的行为做出预测 (make predications about what code is expected before it runs)
下面的 typescript 代码,就在代码运行前对参数加入了约束限制
function test(msg : string) {
}
- 限制了参数只能做 string 那些事
function test(msg : Function) {
msg()
}
- 限制了参数只能做函数那些事
2) 入门
安装 typescript 编译器
npm install -g typescript
编写 ts 代码
function hello(msg: string) {
console.log(msg)
}
hello('hello,world')
执行 tsc 编译命令
tsc xxx.ts
编译生成 js 代码,编译后进行了类型擦除
function hello(msg) {
console.log(msg);
}
hello('hello,world');
再来一个例子,用 interface 定义用户类型
interface User {
name: string,
age: number
}
function test(u: User): void {
console.log(u.name)
console.log(u.age)
}
test({ name: 'zhangs', age: 18 })
编译后
function test(u) {
console.log(u.name);
console.log(u.age);
}
test({ name: 'zhangs', age: 18 });
可见,typescript 属于编译时实施类型检查(静态类型)的技术
3) 类型
| 类型 | 例 | 备注 |
|---|---|---|
| 字符串类型 | string | |
| 数字类型 | number | |
| 布尔类型 | boolean | |
| 数组类型 | number[],string[], boolean[] 依此类推 | |
| 任意类型 | any | 相当于又回到了没有类型的时代 |
| 复杂类型 | type 与 interface | |
| 函数类型 | () => void | 对函数的参数和返回值进行说明 |
| 字面量类型 | “a”|”b”|”c” | 限制变量或参数的取值 |
| nullish类型 | null 与 undefined | |
| 泛型 | <T>,<T extends 父类型> |
标注位置
标注变量
let message: string = 'hello,world'
- 一般可以省略,因为可以根据后面的字面量推断出前面变量类型
let message = 'hello,world'
标注参数
function greet(name: string) {
}
很多时候,都能够推断出参数类型
const names = ['Alice', 'Bob', 'Eve']
const lowercaseNames = names.map((e: string) => e.toLowerCase())
- 可以用类型推断,推断出 e 是 string 类型
标注返回值
function add(a: number, b: number) : number {
return a + b
}
- 一般也可以省略,因为可以根据返回值做类型推断
复杂类型
type
type Cat = {
name: string,
age: number
}
const c1: Cat = { name: '小白', age: 1 }
const c2: Cat = { name: '小花' } // 错误: 缺少 age 属性
const c3: Cat = { name: '小黑', age: 1, sex: '公' } // 错误: 多出 sex 属性
interface
interface Cat {
name: string,
age: number
}
const c1: Cat = { name: '小白', age: 1 }
const c2: Cat = { name: '小花' } // 错误: 缺少 age 属性
const c3: Cat = { name: '小黑', age: 1, sex: '公' } // 错误: 多出 sex 属性
可选属性
如果需要某个属性可选,可以用下面的语法
interface Cat {
name: string,
age?: number
}
const c1: Cat = { name: '小白', age: 1 }
const c2: Cat = { name: '小花' } // 正确: age 属性可选
- 可选属性要注意处理 undefined 值
鸭子类型
interface Cat {
name: string
}
function test(cat: Cat) {
console.log(cat.name)
}
const c1 = { name: '小白', age: 1 }
test(c1)
- const c1 并没有声明类型为 Cat,但它与 Cat 类型有一样的属性,也可以被当作是 Cat 类型
方法类型
interface Api {
foo(): void,
bar(str: string): string
}
function test(api: Api) {
api.foo()
console.log(api.bar('hello'))
}
test({
foo() { console.log('ok') },
bar(str: string) { return str.toUpperCase() }
})
字面量类型
function printText(s: string, alignment: "left" | "right" | "center") {
console.log(s, alignment)
}
printText('hello', 'left')
printText('hello', 'aaa') // 错误: 取值只能是 left | right | center
nullish 类型
function test(x?: string | null) {
console.log(x?.toUpperCase())
}
test('aaa')
test(null)
test()
-
x?: string null 表示可能是 undefined 或者是 string 或者是 null
泛型
下面的几个类型声明显然有一定的相似性
interface RefString {
value: string
}
interface RefNumber {
value: number
}
interface RefBoolean {
value: boolean
}
const r1: RefString = { value: 'hello' }
const r2: RefNumber = { value: 123 }
const r3: RefBoolean = { value: true }
可以改进为
interface Ref<T> {
value: T
}
const r1: Ref<string> = { value: 'hello' }
const r2: Ref<number> = { value: 123 }
const r3: Ref<boolean> = { value: true }
- 泛型的要点就是
<类型参数>,把【类型】也当作一个变化的要素,像参数一样传递过来,这样就可以派生出结构相似的新类型
函数定义也支持泛型
function ref<T>(n: T): Ref<T> {
return { value: n }
}
const v1 = ref("hello"); // Ref<string>
const v2 = ref(123.3333); // Ref<number>
v1.value.toLocaleLowerCase()
v2.value.toFixed(2)
4) 意义
更好理解框架
现在越来越多的前端框架采用 typescript,如果懂 typescript 语法,可以更好地阅读框架代码
以 Map 为例
const map = new Map<string, string>()
map
.set("a", "b")
.set("c", "d")
map.forEach((value,key,m)=>{
console.log(value, key)
})
- 注意编译需要
tsc --target es6 .\xxx.ts
更好的提示
例如,从服务器返回的一段 json,如果不用 typescript,则编辑器也不能给出准确的提示
interface User {
name: string,
age: number
}
const user: User = JSON.parse(`{ "name":"张三", "age":18 }`)
5) 类
关于 TypeScript 与 JavaScript 中的类语法不是重点,class 相关语法只是起到辅助作用,更重要的是前面讲的 interface
基本语法
class User {
name: string;
constructor(name: string) {
this.name = name
}
}
const u = new User('张三')
其实会被编译成这个样子(默认 –target=es3)
var User = /** @class */ (function () {
function User(name) {
this.name = name;
}
return User;
}());
var u = new User('张三');
所以 js 中的 class,并不等价于 Java 中的 class,它还是基于原型实现的,原理参考第二章(036、037)
只读属性
class User {
readonly name: string;
constructor(name: string) {
this.name = name
}
}
const u = new User('张三')
u.name = '李四' // 编译错误
- readonly 是 typescript 特有的,表示该属性只读
方法
class User {
readonly name: string;
constructor(name: string) {
this.name = name
}
study() {
console.log(`[${this.name}]正在学习`)
}
}
const u = new User('张三')
u.study()
get,set
class User {
_name: string;
constructor(name: string) {
this._name = name
}
get name() {
return this._name
}
set name(name: string) {
this._name = name
}
}
const u = new User('张三')
console.log(u.name)
u.name = '李四'
console.log(u.name)
- 注意,需要在编译时加上
tsc --target es6 .\xxx.ts选项 - es6 等价于 es2015,再此之上还有 es2016 … es2022
类与接口
interface User {
name: string
study(course: string): void
}
class UserImpl implements User {
name: string;
constructor(name: string) {
this.name = name
}
study(course: string) {
console.log(`[${this.name}]正在学习[${course}]`)
}
foo() { }
}
const user: User = new UserImpl('张三')
user.study('Typescript')
user.foo() // 错误,必须是接口中定义的方法
继承与接口
interface Flyable {
fly(): void
}
class Animal {
name: string;
constructor(name: string) {
this.name = name
}
}
class Bird extends Animal implements Flyable {
fly() {
console.log(`${this.name}在飞翔`)
}
}
const b: Flyable & Animal = new Bird("小花")
b.fly()
- Flyable & Animal 表示变量是 flyable 类型,同时也是 Animal 类型
方法重写
class Father {
study(): void {
console.log(`father study`)
}
}
class Son extends Father {
study(): void {
super.study()
console.log(`son study`)
}
}
const f: Father = new Son()
f.study()
2. Vue3 基础
技术选型
- Vue
- 选项式 API 还是 组合式 API✔️
- HTML 还是 单文件组件✔️
- 语法
- javascript 还是 typescript✔️
- 构建工具
- @vue/cli 还是 vite✔️
- 路由
- vue-router✔️
- 共享存储
- vuex 还是 pinia✔️
- 视图组件
- ElementUI 还是 Antdv✔️
1) 环境准备
创建项目
采用 vite 作为前端项目的打包,构建工具
npm init vite@latest
按提示操作
cd 项目目录
npm install
npm run dev
编码 IDE
推荐采用微软的 VSCode 作为开发工具,到它的官网 Visual Studio Code - Code Editing. Redefined 下载安装即可

要对 *.vue 做语法支持,还要安装一个 Volar 插件
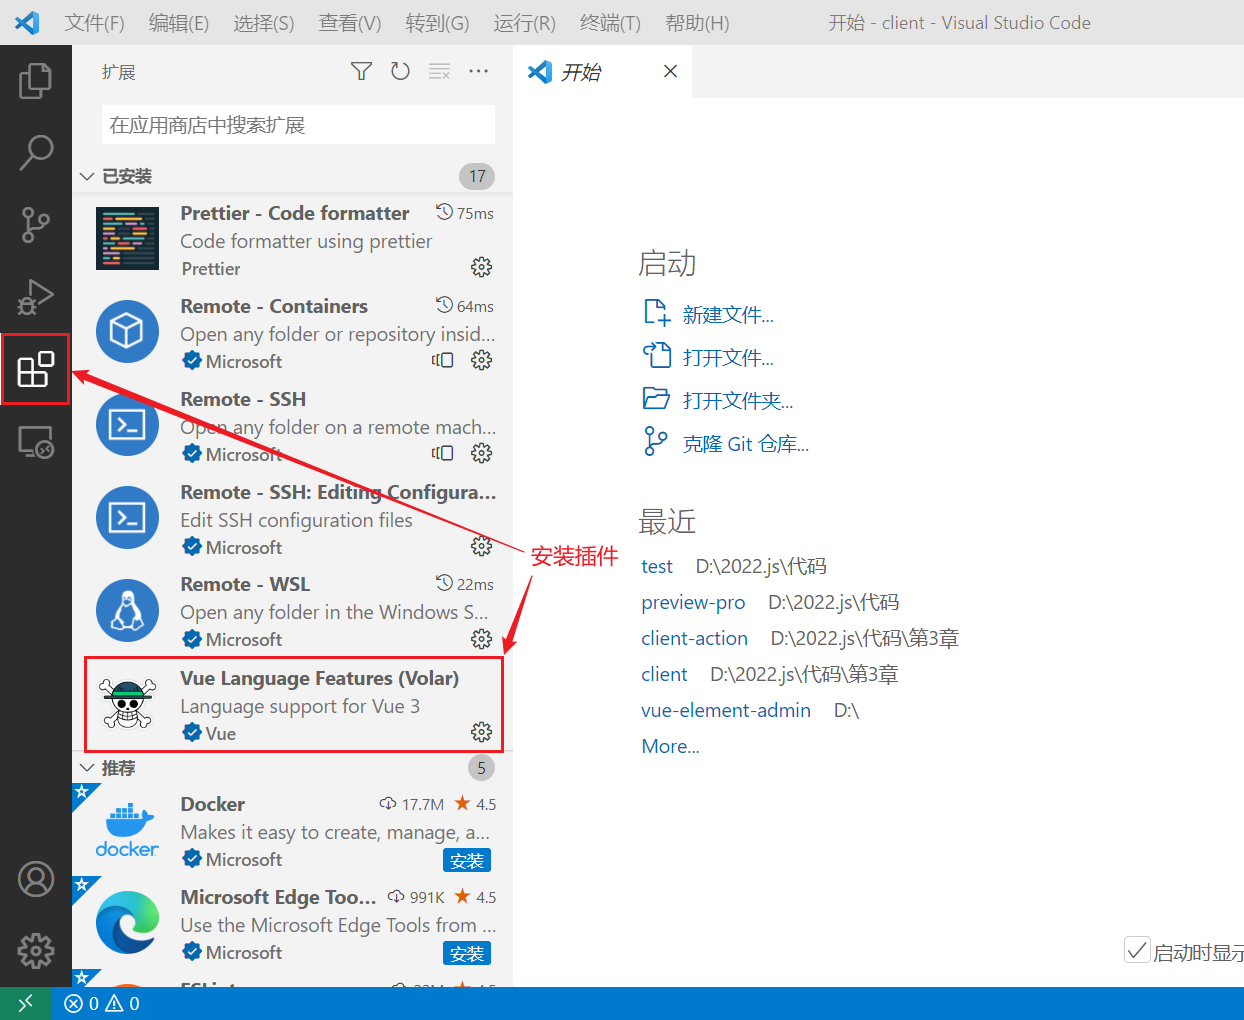
安装 devtools
- devtools 插件网址:https://devtools.vuejs.org/guide/installation.html
修改端口
打开项目根目录下 vite.config.ts
import { defineConfig } from 'vite'
import vue from '@vitejs/plugin-vue'
// https://vitejs.dev/config/
export default defineConfig({
plugins: [vue()],
server: {
port: 7070
}
})
-
文档地址:[配置 Vite {#configuring-vite} Vite中文网 (vitejs.cn)](https://vitejs.cn/config/#server-port)
配置代理
为了避免前后端服务器联调时, fetch、xhr 请求产生跨域问题,需要配置代理,同样是修改项目根目录下 vite.config.ts
import { defineConfig } from 'vite'
import vue from '@vitejs/plugin-vue'
// https://vitejs.dev/config/
export default defineConfig({
plugins: [vue()],
server: {
port: 7070,
proxy: {
'/api': {
target: 'http://localhost:8080',
changeOrigin: true
}
}
}
})
-
文档地址:[配置 Vite {#configuring-vite} Vite中文网 (vitejs.cn)](https://vitejs.cn/config/#server-proxy)
项目结构
index.html
package.json
tsconfig.json
vite.config.ts
├─public
└─src
├─assets
├─components
├─model
├─router
├─store
└─views
- index.html 为主页面
- package.json npm 配置文件
- tsconfig.json typescript 配置文件
- vite.config.ts vite 配置文件
- public 静态资源
- src/components 可重用组件
- src/model 模型定义
- src/router 路由
- src/store 共享存储
- src/views 视图组件
2) Vue 组件
Vue 的组件文件以 .vue 结尾,每个组件由三部分组成
<script setup lang="ts"></script>
<template></template>
<style scoped></style>
- script 代码部分,控制模板的数据来源和行为
- template 模板部分,由它生成 html 代码
- style 样式部分,一般不咋关心
根组件是 src/App.vue,先来个 Hello,world 例子
<script setup lang="ts">
import { ref } from "vue";
let msg = ref("hello"); // 把数据变成响应式的
function change() {
msg.value = "world";
console.log(msg);
}
</script>
<template>
<h1></h1>
<input type="button" value="修改msg" @click="change" />
</template>
- 用来把一个变量绑定到页面上某个位置
- 绑定的变量必须用 ref 函数来封装
- ref 返回的是【响应式】数据,即数据一旦变化,页面展示也跟着变化
main.ts
import { createApp } from 'vue'
import './style.css'
import App from './App.vue'
createApp(App)
.mount('#app')
- createApp 是创建一个 Vue 应用程序,它接收的参数 App 即之前我们看到的根组件
- mount 就是把根组件生成的 html 代码片段【挂载】到 index.html 中 id 为 app 的 html 元素上
可以修改自己的组件文件,挂载到主页面
新建 src/views/E0.vue,内容如下
<script setup lang="ts">
import { ref } from 'vue'
const msg = ref('Hello, World!!')
</script>
<template>
<h1></h1>
</template>
修改 main.ts 将自己的组件文件挂载
import { createApp } from 'vue'
import './style.css'
// import App from './App.vue'
import E0 from './views/E0.vue'
createApp(E0).mount('#app')
- 以后我们用这样的方式演示课堂案例
打开浏览器控制台,进入 Vue 的开发工具,尝试做如下修改
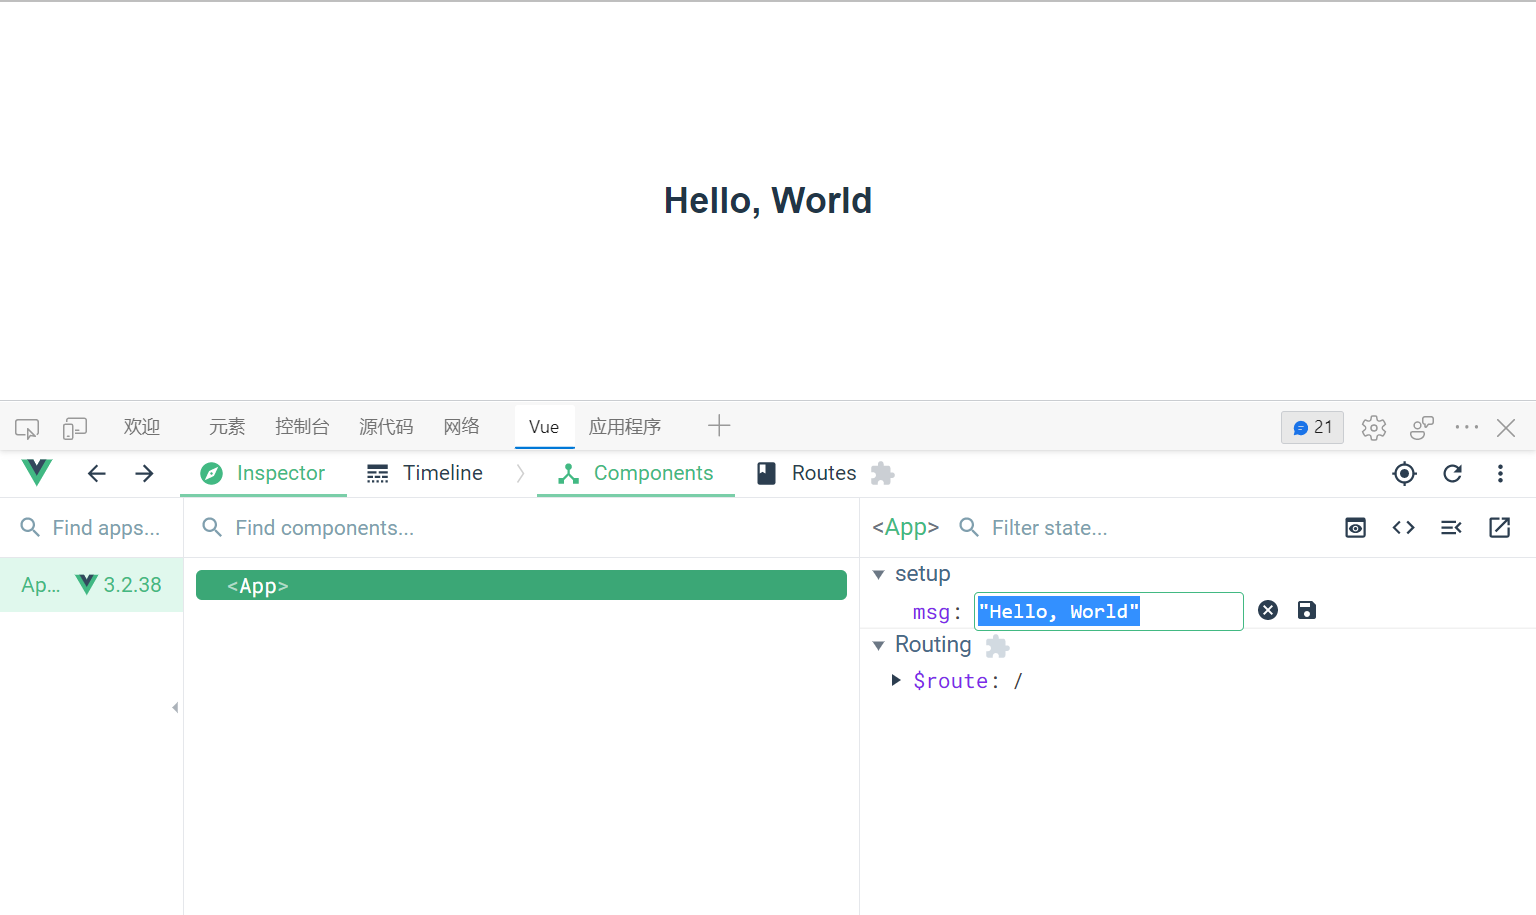
当把 msg 的值由 “Hello, World” 改为 “你好” 时,会发现页面展示同步发生了变化
ref 与 reactive
vue 提供了两个函数,都可以将数据变为【响应式】的
<script setup lang="ts">
import { ref, reactive } from 'vue'
const msg = ref('Hello, World')
const user = reactive({ name: '张三' })
</script>
<template>
<h2></h2>
<h2></h2>
</template>
- ref 能将任意类型的数据变为【响应式】的
- reactive 只能将对象类型变为【响应式】,对基本类型无效(例如 string,number,boolean)
还有一点不同
<script setup lang="ts">
import { ref, reactive } from 'vue'
const u1 = ref({ name: '张三' })
const u2 = reactive({ name: '张三' })
function test() {
console.log(u1.value)
console.log(u2)
}
test()
</script>
<template>
<h2></h2>
<h2></h2>
</template>
- 在 template 模板中使用 ref 包装的数据,直接写【变量名】就可以了
- 但在代码中要使用 ref 包装的数据,必须用【变量名.value】才能访问到
- reactive 包装的数据,在模板中和代码中都是一致的
属性绑定
<script setup lang="ts">
import { ref } from 'vue'
const path = ref('/src/assets/vue.svg')
</script>
<template>
<img :src="path" alt="">
</template>
- 【:属性名】用来将标签属性与【响应式】变量绑定
事件绑定
<script setup lang="ts">
import { ref } from 'vue'
const count = ref(0)
function dec() {
count.value--
}
function inc() {
count.value++
}
</script>
<template>
<input type="button" value="-" @click="dec">
<h2>8</h2>
<input type="button" value="+" @click="inc">
</template>
- 【@事件名】用来将标签属性与函数绑定,事件发生后执行函数内代码
表单绑定
<script setup lang="ts">
import { ref } from "vue";
const user = ref({
name:'张三',
age:18,
sex:'男',
fav:['游泳','打球']
})
function saveUser() {
console.log(user.value)
}
</script>
<template>
<div class="outer">
<div>
<label for="">请输入姓名</label>
<input type="text" v-model="user.name"/>
</div>
<div>
<label for="">请输入年龄</label>
<input type="text" v-model="user.age"/>
</div>
<div>
<label for="">请选择性别</label>
男 <input type="radio" value="男" v-model="user.sex"/>
女 <input type="radio" value="女" v-model="user.sex"/>
</div>
<div>
<label for="">请选择爱好</label>
游泳 <input type="checkbox" value="游泳" v-model="user.fav"/>
打球 <input type="checkbox" value="打球" v-model="user.fav"/>
健身 <input type="checkbox" value="健身" v-model="user.fav"/>
</div>
<div>
<input type="button" value="保存" @click="saveUser">
</div>
</div>
</template>
<style scoped>
div {
margin-bottom: 8px;
}
.outer {
width: 100%;
position: relative;
padding-left: 80px;
}
label {
text-align: left;
width: 100px;
display: inline-block;
position: absolute;
left :0;
}
</style>
- 用 v-model 实现双向绑定,即
- javascript 数据可以同步到表单标签
- 反过来用户在表单标签输入的新值也会同步到 javascript 这边
- 双向绑定只适用于表单这种带【输入】功能的标签,其它标签的数据绑定,单向就足够了
- 复选框这种标签,双向绑定的 javascript 数据类型一般用数组
计算属性
有时在数据展示时要做简单的计算
<script setup lang="ts">
import { ref } from 'vue'
const firstName = ref('三')
const lastName = ref('张')
</script>
<template>
<h2></h2>
<h3></h3>
<h4></h4>
</template>
看起来较为繁琐,可以用计算属性改进
<script setup lang="ts">
import { ref, computed } from 'vue'
const firstName = ref('三')
const lastName = ref('张')
const fullName = computed(() => {
console.log('enter')
return lastName.value + firstName.value
})
</script>
<template>
<h2></h2>
<h3></h3>
<h4></h4>
</template>
- fullName 即为计算属性,它具备缓存功能,即 firstName 和 lastName 的值发生了变化,才会重新计算
- 如果用函数实现相同功能,则没有缓存功能
<script setup lang="ts">
import { ref } from 'vue'
const firstName = ref('三')
const lastName = ref('张')
function fullName() {
console.log('enter')
return lastName.value + firstName.value
}
</script>
<template>
<h2></h2>
<h3></h3>
<h4></h4>
</template>
xhr
浏览器中有两套 API 可以和后端交互,发送请求、接收响应,fetch api 前面我们已经介绍过了,另一套 api 是 xhr,基本用法如下
const xhr = new XMLHttpRequest()
xhr.onload = function() {
console.log(xhr.response)
}
xhr.open('GET', 'http://localhost:8080/api/students')
xhr.responseType = "json"
xhr.send()
但这套 api 虽然功能强大,但比较老,不直接支持 Promise,因此有必要对其进行改造
function get(url: string) {
return new Promise((resolve, reject)=>{
const xhr = new XMLHttpRequest()
xhr.onload = function() {
if(xhr.status === 200){
resolve(xhr.response)
} else if(xhr.status === 404) {
reject(xhr.response)
} // 其它情况也需考虑,这里简化处理
}
xhr.open('GET', url)
xhr.responseType = 'json'
xhr.send()
})
}
- Promise 对象适合用来封装异步操作,并可以配合 await 一齐使用
- Promise 在构造时,需要一个箭头函数,箭头函数有两个参数 resolve 和 reject
- resolve 是异步操作成功时被调用,把成功的结果传递给它,最后会作为 await 的结果返回
- reject 在异步操作失败时被调用,把失败的结果传递给它,最后在 catch 块被捉住
- await 会一直等到 Promise 内调用了 resolve 或 reject 才会继续向下运行
调用示例1:同步接收结果,不走代理
try {
const resp = await get("http://localhost:8080/api/students")
console.log(resp)
} catch (e) {
console.error(e)
}
调用示例2:走代理
try {
const resp = await get('/api/students')
console.log(resp)
} catch(e) {
console.log(e)
}
- 走代理明显慢不少
axios
基本用法
axios 就是对 xhr api 的封装,手法与前面例子类似
安装
npm install axios
一个简单的例子
<script setup lang="ts">
import { ref, onMounted } from "vue";
import axios from "axios";
let count = ref(0);
async function getStudents() {
try {
const resp = await axios.get("/api/students");
count.value = resp.data.data.length;
} catch (e) {
console.log(e);
}
}
onMounted(() => {
getStudents()
})
</script>
<template>
<h2>学生人数为:8</h2>
</template>
- onMounted 指 vue 组件生成的 html 代码片段,挂载完毕后被执行
再来看一个 post 例子
<script setup lang="ts">
import { ref } from "vue";
import axios from "axios";
const student = ref({
name: '',
sex: '男',
age: 18
})
async function addStudent() {
console.log(student.value)
const resp = await axios.post('/api/students', student.value)
console.log(resp.data.data)
}
</script>
<template>
<div>
<div>
<input type="text" placeholder="请输入姓名" v-model="student.name"/>
</div>
<div>
<label for="">请选择性别</label>
男 <input type="radio" value="男" v-model="student.sex"/>
女 <input type="radio" value="女" v-model="student.sex"/>
</div>
<div>
<input type="number" placeholder="请输入年龄" v-model="student.age"/>
</div>
<div>
<input type="button" value="添加" @click="addStudent"/>
</div>
</div>
</template>
<style scoped>
div {
font-size: 14px;
}
</style>
环境变量
- 开发环境下,联调的后端服务器地址是
http://localhost:8080, - 上线改为生产环境后,后端服务器地址为
http://itheima.com
这就要求我们区分开发环境和生产环境,这件事交给构建工具 vite 来做
默认情况下,vite 支持上面两种环境,分别对应根目录下两个配置文件
- .env.development - 开发环境
- .env.production - 生产环境
针对以上需求,分别在两个文件中加入
VITE_BACKEND_API_BASE_URL = 'http://localhost:8080'
和
VITE_BACKEND_API_BASE_URL = 'http://itheima.com'
然后在代码中使用 vite 给我们提供的特殊对象 import.meta.env,就可以获取到 VITE_BACKEND_API_BASE_URL 在不同环境下的值
import.meta.env.VITE_BACKEND_API_BASE_URL
默认情况下,不能智能提示自定义的环境变量,做如下配置:新增文件 src/env.d.ts 并添加如下内容
/// <reference types="vite/client" />
interface ImportMetaEnv {
readonly VITE_BACKEND_API_BASE_URL: string
// 更多环境变量...
}
interface ImportMeta {
readonly env: ImportMetaEnv
}
-
参考文档地址 [环境变量和模式 Vite 官方中文文档 (vitejs.dev)](https://cn.vitejs.dev/guide/env-and-mode.html)
baseURL
可以自己创建一个 axios 对象,方便添加默认设置,新建文件 /src/api/request.ts
// 创建新的 axios 对象
import axios from 'axios'
const _axios = axios.create({
baseURL: import.meta.env.VITE_BACKEND_API_BASE_URL
})
export default _axios
然后在其它组件中引用这个 ts 文件,例如 /src/views/E8.vue,就不用自己拼接路径前缀了
<script setup lang="ts">
import axios from '../api/request'
// ...
await axios.post('/api/students', ...)
</script>
拦截器
// 创建新的 axios 对象
import axios from 'axios'
const _axios = axios.create({
baseURL: import.meta.env.VITE_BACKEND_API_BASE_URL
})
// 请求拦截器
_axios.interceptors.request.use(
(config)=>{ // 统一添加请求头
config.headers = {
Authorization: 'aaa.bbb.ccc'
}
return config
},
(error)=>{ // 请求出错时的处理
return Promise.reject(error)
}
)
// 响应拦截器
_axios.interceptors.response.use(
(response)=>{ // 状态码 2xx
// 这里的code是自定义的错误码
if(response.data.code === 200) {
return response
}
else if(response.data.code === 401) {
// 情况1
return Promise.resolve({})
}
// ...
},
(error)=>{ // 状态码 > 2xx, 400,401,403,404,500
console.error(error) // 处理了异常
if(error.response.status === 400) {
// 情况1
} else if(error.response.status === 401) {
// 情况2
}
// ...
return Promise.resolve({})
}
)
export default _axios
处理响应时,又分成两种情况
- 后端返回的是标准响应状态码,这时会走响应拦截器第二个箭头函数,用 error.response.status 做分支判断
- 后端返回的响应状态码总是200,用自定义错误码表示出错,这时会走响应拦截器第一个箭头函数,用 response.data.code 做分支判断
另外
- Promise.reject(error) 类似于将异常继续向上抛出,异常由调用者(Vue组件)来配合 try … catch 来处理
- Promise.resolve({}) 表示错误已解决,返回一个空对象,调用者中接到这个空对象时,需要配合 ?. 来避免访问不存在的属性
条件与列表
首先,新增模型数据 src/model/Model8080.ts
export interface Student {
id: number;
name: string;
sex: string;
age: number;
}
// 如果 spring 错误,返回的对象格式
export interface SpringError {
timestamp: string,
status: number,
error: string,
message: string,
path: string
}
// 如果 spring 成功,返回 list 情况
export interface SpringList<T> {
data: T[],
message?: string,
code: number
}
// 如果 spring 成功,返回 page 情况
export interface SpringPage<T> {
data: { list: T[], total: number },
message?: string,
code: number
}
// 如果 spring 成功,返回 string 情况
export interface SpringString {
data: string,
message?: string,
code: number
}
import { AxiosResponse } from 'axios'
export interface AxiosRespError extends AxiosResponse<SpringError> { }
export interface AxiosRespList<T> extends AxiosResponse<SpringList<T>> { }
export interface AxiosRespPage<T> extends AxiosResponse<SpringPage<T>> { }
export interface AxiosRespString extends AxiosResponse<SpringString> { }
其中
- AxiosRespPage 代表分页时的响应类型
- AxiosRespList 代表返回集合时的响应类型
- AxiosRespString 代表返回字符串时的响应类型
- AxiosRespError 代表 Spring 出错时时的响应类型
<script lang="ts" setup>
import { ref, onMounted } from "vue";
import axios from "../api/request";
import { Student, SpringList } from "../model/Model8080";
// 说明 students 数组类型为 Student[]
const students = ref<Student[]>([]);
async function getStudents() {
// 说明 resp.data 类型是 SpringList<Student>
const resp = await axios.get<SpringList<Student>>("/api/students");
console.log(resp.data.data);
students.value = resp.data.data;
}
onMounted(() => getStudents());
</script>
<template>
<div class="outer">
<div class="title">学生列表</div>
<div class="thead">
<div class="row bold">
<div class="col">编号</div>
<div class="col">姓名</div>
<div class="col">性别</div>
<div class="col">年龄</div>
</div>
</div>
<div class="tbody">
<div v-if="students.length === 0">暂无数据</div>
<template v-else>
<div class="row" v-for="s of students" :key="s.id">
<div class="col"></div>
<div class="col"></div>
<div class="col"></div>
<div class="col"></div>
</div>
</template>
</div>
</div>
</template>
<style scoped>
.outer {
font-family: 华文行楷;
font-size: 20px;
width: 500px;
}
.title {
margin-bottom: 10px;
font-size: 30px;
color: #333;
text-align: center;
}
.row {
background-color: #fff;
display: flex;
justify-content: center;
}
.col {
border: 1px solid #f0f0f0;
width: 15%;
height: 35px;
text-align: center;
line-height: 35px;
}
.bold .col {
background-color: #f1f1f1;
}
</style>
- 加入泛型是为了更好的提示
- v-if 与 v-else 不能和 v-for 处于同一标签
- template 标签还有一个用途,就是用它少生成一层真正 html 代码
- 可以看到将结果封装为响应式数据还是比较繁琐的,后面会使用 useRequest 改进
监听器
利用监听器,可以在【响应式】的基础上添加一些副作用,把更多的东西变成【响应式的】
-
原本只是数据变化 => 页面更新
-
watch 可以在数据变化时 => 其它更新
<template>
<input type="text" v-model="name" />
</template>
<script setup lang="ts">
import { ref, watch } from "vue";
function useStorage(name: string) {
const data = ref(sessionStorage.getItem(name) ?? "");
watch(data, (newValue) => {
sessionStorage.setItem(name, newValue);
});
return data;
}
const name = useStorage("name");
</script>
- 名称为 useXXXX 的函数,作用是返回带扩展功能的【响应式】数据
- localStorage 即使浏览器关闭,数据还在
- sessionStorage 数据工作在浏览器活动期间
vueuse
安装
npm install @vueuse/core
一些函数的用法
<template>
<h3>X: </h3>
<h3>Y: </h3>
<h3>8</h3>
<input type="button" @click="inc()" value="+">
<input type="button" @click="dec()" value="-">
<input type="text" v-model="name">
</template>
<script setup lang="ts">
import { useMouse, useCounter, useStorage } from '@vueuse/core'
const {x, y} = useMouse()
const {count, inc, dec} = useCounter()
const name = useStorage("name", "")
</script>
useRequest
| 响应式的 axios 封装,官网地址 [一个 Vue 请求库 | VueRequest (attojs.org)](https://next.cn.attojs.org/) |
首先安装 vue-request
npm install vue-request@next
组件
<template>
<h3 v-if="students.length === 0">暂无数据</h3>
<ul v-else>
<li v-for="s of students" :key="s.id">
<span></span>
<span></span>
<span></span>
</li>
</ul>
</template>
<script setup lang="ts">
import axios from "../api/request"
import { useRequest } from 'vue-request'
import { computed } from 'vue'
import { AxiosRespList, Student } from '../model/Model8080'
// data 代表就是 axios 的响应对象
const { data } = useRequest<AxiosRespList<Student>>(() => axios.get('/api/students'))
const students = computed(()=>{
return data?.value?.data.data || []
})
</script>
<style scoped>
ul li {
list-style: none;
font-family: "华文行楷";
}
li span:nth-child(1) {
font-size: 24px;
}
li span:nth-child(2) {
font-size: 12px;
color: crimson;
vertical-align: bottom;
}
li span:nth-child(3) {
font-size: 12px;
color: darkblue;
vertical-align: top;
}
</style>
- data.value 的取值一开始是 undefined,随着响应返回变成 axios 的响应对象
- 用 computed 进行适配
usePagination
在 src/model/Model8080.ts 中补充类型说明
export interface StudentQueryDto {
name?: string,
sex?: string,
age?: string, // 18,20
page: number,
size: number
}
- js 中类似于 18,20 这样以逗号分隔字符串,会在 get 传参时转换为 Java 中的整数数组
编写组件
<template>
<input type="text" placeholder="请输入姓名" v-model="dto.name">
<select v-model="dto.sex">
<option value="" selected>请选择性别</option>
<option value="男">男</option>
<option value="女">女</option>
</select>
<input type="text" placeholder="请输入年龄范围" v-model="dto.age">
<br>
<input type="text" placeholder="请输入页码" v-model="dto.page">
<input type="text" placeholder="请输入页大小" v-model="dto.size">
<input type="button" value="搜索" @click="search">
<hr>
<h3 v-if="students.length === 0">暂无数据</h3>
<ul v-else>
<li v-for="s of students" :key="s.id">
<span></span>
<span></span>
<span></span>
</li>
</ul>
<hr>
总记录数 总页数
</template>
<script setup lang="ts">
import axios from "../api/request"
import { usePagination } from 'vue-request'
import { computed, ref } from 'vue'
import { AxiosRespPage, Student, StudentQueryDto } from '../model/Model8080'
const dto = ref<StudentQueryDto>({name:'', sex:'', age:'', page:1, size:5})
// data 代表就是 axios 的响应对象
// 泛型参数1: 响应类型
// 泛型参数2: 请求类型
const { data, total, totalPage, run } = usePagination<AxiosRespPage<Student>, StudentQueryDto[]>(
(d) => axios.get('/api/students/q', {params: d}), // 箭头函数
{
defaultParams: [ dto.value ], // 默认参数, 会作为参数传递给上面的箭头函数
pagination: {
currentKey: 'page', // 指明当前页属性
pageSizeKey: 'size', // 指明页大小属性
totalKey: 'data.data.total' // 指明总记录数属性
}
} // 选项
)
const students = computed(()=>{
return data?.value?.data.data.list || []
})
function search() {
run(dto.value) // 会作为参数传递给usePagination的箭头函数
}
</script>
<style scoped>
ul li {
list-style: none;
font-family: "华文行楷";
}
li span:nth-child(1) {
font-size: 24px;
}
li span:nth-child(2) {
font-size: 12px;
color: crimson;
vertical-align: bottom;
}
li span:nth-child(3) {
font-size: 12px;
color: darkblue;
vertical-align: top;
}
input,select {
width: 100px;
}
</style>
- usePagination 只需要定义一次,后续还想用它内部的 axios 发请求,只需调用 run 函数
子组件
例1
定义子组件 Child1
<template>
<div class="container">
<div class="card">
<div>
<p class="name"></p>
<p class="location"></p>
</div>
<img :src="avatar || '/src/assets/vue.svg'"/>
</div>
</div>
</template>
<script setup lang="ts">
// 定义属性, 编译宏
defineProps<{name:string,country:string,avatar?:string}>()
</script>
<style scoped>
.container {
width: 100%;
display: flex;
flex-wrap: wrap;
justify-content: space-evenly;
flex-direction: row-reverse;
}
.name {
font-weight: bold;
}
.location {
font-size: 0.8em;
color: #6d597a;
}
.card {
display: flex;
justify-content: space-evenly;
padding: 1em;
margin: 1rem;
border-radius: 5px;
background: #fff;
width: 200px;
box-shadow: 0 14px 28px rgba(0, 0, 0, 0.25), 0 10px 10px rgba(0, 0, 0, 0.22);
}
.card:hover {
transform: rotate(-5deg);
}
.card img {
margin-left: 1em;
border-radius: 50%;
max-width: 55px;
max-height: 55px;
}
</style>
父组件引用
<template>
<Child1 name="张三" country="中国" avatar="/src/assets/vue.svg"></Child1>
<Child1 name="李四" country="印度" avatar="/vite.svg"></Child1>
<Child1 name="王五" country="韩国" ></Child1>
</template>
<script lang="ts" setup>
import Child1 from '../components/Child1.vue';
</script>
例2
首先添加类型说明 model/ModelRandomUser.ts
import { AxiosResponse } from "axios";
export interface AxiosRespResults extends AxiosResponse<Results>{}
export interface Results {
info: {
page: number,
results: number
},
results: Result[]
}
export interface Result {
gender: 'male' | 'female',
name: {
first: string,
last: string
},
location: {
country: string
},
picture: {
medium: string
},
login: {
username: string
}
}
子组件不变,父组件使用子组件
<!-- 父组件 -->
<template>
<Child1 v-for="u of users"
:name="u.name.first"
:country="u.location.country"
:avatar="u.picture.medium"
:key="u.login.username"></Child1>
</template>
<script setup lang="ts">
import axios from "axios";
import { useRequest } from "vue-request";
import { computed } from "vue";
import { AxiosRespResults } from '../model/ModelRandomUser'
import Child1 from "../components/Child1.vue";
const { data } = useRequest<AxiosRespResults>(
()=>axios.get('https://randomuser.me/api/?results=3')
)
const users = computed(()=>{
return data.value?.data.results || []
})
</script>
如果觉得 Result 数据结构嵌套太复杂,还可以做一个类型映射
<!-- 父组件 -->
<template>
<Child1 v-for="u of users"
:name="u.name"
:country="u.country"
:avatar="u.avatar"
:key="u.username"></Child1>
</template>
<script setup lang="ts">
import axios from "axios";
import { useRequest } from "vue-request";
import { computed } from "vue";
import { AxiosRespResults, Result } from '../model/ModelRandomUser'
import Child1 from "../components/Child1.vue";
const { data } = useRequest<AxiosRespResults>(
()=>axios.get('https://randomuser.me/api/?results=3')
)
const users = computed(()=>{
return data.value?.data.results.map(resultToUser) || []
})
interface User {
name: string,
country: string,
avatar: string,
username: string
}
function resultToUser(r:Result):User {
return {
name: r.name.first,
country: r.location.country,
avatar: r.picture.medium,
username: r.login.username
}
}
</script>
- resultToUser 将 Result 类型映射为 User 类型
3. Vue 进阶
1) Antdv
添加必要插件
npm install ant-design-vue
- ant-design-vue 组件库插件
引入 antdv 功能,修改 main.ts
import { createApp } from 'vue'
import './style.css'
import App from './App.vue'
import antd from 'ant-design-vue'
import 'ant-design-vue/dist/antd.css'
createApp(App).use(antd).mount('#app')
表格
<template>
<!-- <a-table :columns="columns" :dataSource="students" rowKey="id"></a-table> -->
<a-table :columns="columns" :dataSource="students" :rowKey="rowKey"></a-table>
</template>
<script setup lang="ts">
import axios from "../api/request";
import { ref, computed } from "vue";
import { useRequest } from "vue-request";
import { AxiosRespList, Student } from "../model/Model8080";
const {data} = useRequest<AxiosRespList<Student>>(
()=>axios.get('/api/students')
)
const students = computed(()=>{
return data.value?.data.data || []
})
function rowKey(r:Student) {
return r.id
}
const columns = ref([
{
title:'编号',
dataIndex:'id'
},
{
title:'姓名',
dataIndex:'name'
},
{
title:'性别',
dataIndex:'sex'
},
{
title:'年龄',
dataIndex:'age'
}
])
</script>
分页
<template>
<a-table :columns="columns" :data-source="students" row-key="id"
:pagination="pagination" @change="tableChange"></a-table>
</template>
<script setup lang="ts">
import axios from "../api/request";
import { ref, computed } from "vue";
import { usePagination } from "vue-request";
import { AxiosRespPage, Student, StudentQueryDto } from "../model/Model8080";
import { PaginationProps } from "ant-design-vue";
import DateBody from "ant-design-vue/lib/vc-picker/panels/DatePanel/DateBody";
const dto = ref({page: 1, size: 5})
const {data, total, run} = usePagination<AxiosRespPage<Student>, StudentQueryDto[]>(
(d)=> axios.get('/api/students/q', {params:d}),
{
defaultParams: [dto.value],
pagination: {
currentKey: "page",
pageSizeKey: 'size',
totalKey: 'data.data.total'
}
}
)
// 在页号或页大小改变时调用
function tableChange(pagination: PaginationProps) {
console.log(pagination)
dto.value.page = pagination.current ?? 1
dto.value.size = pagination.pageSize ?? 5
run(dto.value)
}
const pagination = computed<PaginationProps>(()=>{
return {
current: dto.value.page, // 当前页
pageSize: dto.value.size, // 页大小
total: total.value, // 总记录数
showSizeChanger: true, // 显示页大小的下拉列表
pageSizeOptions: ["1","2","3","4","5"] // 自定义下拉列表内容
}
})
const students = computed(()=>{
return data.value?.data.data.list || []
})
const columns = ref([
{
title: "编号",
dataIndex: "id",
},
{
title: "姓名",
dataIndex: "name",
},
{
title: "性别",
dataIndex: "sex",
},
{
title: "年龄",
dataIndex: "age",
},
]);
</script>
搜索、删除
<template>
<a-row>
<a-col :span="2">
<a-button type="primary" size="small">新增</a-button>
</a-col>
<a-col :span="4">
<a-popconfirm title="确认要删除选中学生吗?"
ok-text="确定" cancel-text="取消" @confirm="onDeleteIds"
@visibleChange="onVisibleChange" :visible="visible">
<a-button type="primary" size="small">删除选中</a-button>
</a-popconfirm>
</a-col>
<a-col :span="4">
</a-col>
<a-col :span="4">
<a-input v-model:value="dto.name" placeholder="输姓名" size="small"></a-input>
</a-col>
<a-col :span="4">
<a-select v-model:value="dto.sex" placeholder="选性别" :allowClear="true" size="small">
<a-select-option value="男">男</a-select-option>
<a-select-option value="女">女</a-select-option>
</a-select>
</a-col>
<a-col :span="4">
<a-select v-model:value="dto.age" placeholder="选年龄" :allowClear="true" size="small">
<a-select-option value="0,20">20以下</a-select-option>
<a-select-option value="21,30">21~30</a-select-option>
<a-select-option value="31,40">31~40</a-select-option>
<a-select-option value="40,120">40以上</a-select-option>
</a-select>
</a-col>
<a-col :span="2">
<a-button @click="tableChange" type="primary" size="small">搜索</a-button>
</a-col>
</a-row>
<hr>
<a-table :columns="columns" :data-source="students" row-key="id"
:pagination="pagination" @change="tableChange"
:row-selection="{selectedRowKeys:ids,onChange:onSelectChange}">
<template #bodyCell="{column, record}">
<template v-if="column.dataIndex==='name'">
</template>
<template v-else-if="column.dataIndex==='operation'">
<a>修改</a>
<a-divider type="vertical"></a-divider>
<a-popconfirm title="确认要删除该学生吗?"
ok-text="确定" cancel-text="取消" @confirm="onDelete(record.id)">
<a>删除</a>
</a-popconfirm>
</template>
</template>
</a-table>
</template>
<script setup lang="ts">
import axios from "../api/request";
import { ref, computed } from "vue";
import { usePagination, useRequest } from "vue-request";
import { AxiosRespPage, AxiosRespString, Student, StudentQueryDto } from "../model/Model8080";
import { PaginationProps } from "ant-design-vue";
// >>>>>>>>>>>>>> 搜索功能开始
const dto = ref({page: 1, size: 5, name: '', sex: null, age: null})
const {data, total, run: search} = usePagination<AxiosRespPage<Student>, StudentQueryDto[]>(
(d) => axios.get('/api/students/q', {params:d}),
{
defaultParams: [dto.value],
pagination: {
currentKey: "page",
pageSizeKey: 'size',
totalKey: 'data.data.total'
}
}
)
function tableChange(pagination: PaginationProps) {
// console.log(pagination)
dto.value.page = pagination.current ?? 1
dto.value.size = pagination.pageSize ?? 5
search(dto.value)
}
const pagination = computed<PaginationProps>(()=>{
return {
current: dto.value.page, // 当前页
pageSize: dto.value.size, // 页大小
total: total.value, // 总记录数
showSizeChanger: true, // 显示页大小的下拉列表
pageSizeOptions: ["1","2","3","4","5"] // 自定义下拉列表内容
}
})
const students = computed(()=>{
return data.value?.data.data.list || []
})
// <<<<<<<<<<<<<< 搜索功能结束
// >>>>>>>>>>>>>> 删除功能开始
async function onDelete(id:number) {
// console.log("学生id是:"+id)
await deleteById(id) // 删除请求 删除响应
search(dto.value) // 查询请求 查询响应
}
const { runAsync: deleteById } = useRequest<AxiosRespString, number[]>(
(id) => axios.delete(`/api/students/${id}`),
{
manual: true
}
)
// <<<<<<<<<<<<<< 删除功能结束
// >>>>>>>>>>>>>> 删除选中开始
const ids = ref<number[]>([])
function onSelectChange(keys:number[]) {
// console.log(keys)
ids.value = keys
}
async function onDeleteIds() {
await deleteByIds(ids.value)
ids.value = []
search(dto.value)
}
const { runAsync: deleteByIds } = useRequest<AxiosRespString, number[][]>(
(ids)=>axios.delete('/api/students', {data: ids}),
{
manual: true
}
)
const visible = ref(false)
function onVisibleChange(v:boolean) {
if(!v) { // 希望隐藏
visible.value = false
} else { // 希望显示
visible.value = ids.value.length > 0
}
}
// <<<<<<<<<<<<<< 删除选中结束
const columns = ref([
{
title: "编号",
dataIndex: "id",
},
{
title: "姓名",
dataIndex: "name",
},
{
title: "性别",
dataIndex: "sex",
},
{
title: "年龄",
dataIndex: "age",
},
{
title: '操作',
dataIndex: 'operation'
}
]);
</script>
<style scoped>
.ant-input, .ant-select {
width: 80px;
}
</style>
新增、修改
子组件
<template>
<a-modal :visible="visible" :title="title"
@ok="onOk" @cancel="onCancel">
<a-form>
<a-form-item label="编号" v-if="id">
<a-input readonly v-model:value="id"></a-input>
</a-form-item>
<a-form-item label="姓名">
<a-input v-model:value="dto.name"></a-input>
</a-form-item>
<a-form-item label="性别">
<a-radio-group v-model:value="dto.sex">
<a-radio-button value="男">男</a-radio-button>
<a-radio-button value="女">女</a-radio-button>
</a-radio-group>
</a-form-item>
<a-form-item label="年龄">
<a-input-number v-model:value="dto.age"></a-input-number>
</a-form-item>
</a-form>
</a-modal>
</template>
<script setup lang="ts">
import axios from "../api/request";
import { ref, computed } from "vue";
import { useRequest } from "vue-request";
import { StudentSaveDto, AxiosRespString } from "../model/Model8080";
import { Form } from 'ant-design-vue'
// 定义属性
const props = defineProps<{id:number, dto:StudentSaveDto, visible:boolean}>()
const title = computed(()=> props.id===0?'新增学生':'修改学生')
// 定义事件
const emit = defineEmits(['update:visible', 'saved'])
async function onOk() {
if(props.id === 0) {
await insert(props.dto)
} else {
await update(props.dto)
}
emit('saved')
// 发送事件给父组件, 希望把 visible 改为 false
emit('update:visible', false)
}
function onCancel() {
// 发送事件给父组件, 希望把 visible 改为 false
emit('update:visible', false)
}
const {runAsync:insert} = useRequest<AxiosRespString,StudentSaveDto[]>(
(dto)=>axios.post('/api/students', dto),
{
manual: true
}
)
const {runAsync:update} = useRequest<AxiosRespString,StudentSaveDto[]>(
(dto)=>axios.put(`/api/students/${props.id}`, dto),
{
manual: true
}
)
</script>
父组件使用子组件
<A4Save :id="id" :dto="saveDto" v-model:visible="saveVisible"></A4Save>
<script setup lang="ts">
// ...
// >>>>>>>>>>>>>> 新增、修改开始
const saveVisible = ref(false)
const id = ref(0)
const saveDto = reactive({name:'', sex:'男', age:18})
function onInsert() {
saveVisible.value = true
id.value = 0
Object.assign(saveDto, {name:'', sex:'男', age:18})
}
function onUpdate(record: Student) {
saveVisible.value = true
id.value = record.id
Object.assign(saveDto, record)
}
function onSaved() {
search(dto.value)
}
// <<<<<<<<<<<<<< 新增、修改结束
</script>
-
saveDto 使用 reactive 包装,是为了解决后续表单校验失效问题
-
Object.assign 是将源对象(参数2)的属性值赋值给目标对象(参数1)的同名属性,效果等价于
saveDto.name = record.name saveDto.sex = record.sex saveDto.age = record.age
全局消息
在 request.ts 中对响应消息统一处理
import { message } from 'ant-design-vue'
// ...
// 响应拦截器
_axios.interceptors.response.use(
(response)=>{ // 状态码 2xx
if(response.data.message) {
message.success(response.data.message, 3)
}
// ...
},
(error)=>{ // 状态码 > 2xx, 400,401,403,404,500
// ...
}
)
表单校验
<template>
<a-modal :visible="visible" :title="title"
@ok="onOk" @cancel="onCancel">
<a-form>
<a-form-item label="编号" v-if="id">
<a-input readonly v-model:value="id"></a-input>
</a-form-item>
<a-form-item label="姓名" v-bind="validateInfos.name">
<a-input v-model:value="dto.name"></a-input>
</a-form-item>
<a-form-item label="性别" v-bind="validateInfos.sex">
<a-radio-group v-model:value="dto.sex">
<a-radio-button value="男">男</a-radio-button>
<a-radio-button value="女">女</a-radio-button>
</a-radio-group>
</a-form-item>
<a-form-item label="年龄" v-bind="validateInfos.age">
<a-input-number v-model:value="dto.age"></a-input-number>
</a-form-item>
</a-form>
</a-modal>
</template>
<script setup lang="ts">
import axios from "../api/request";
import { ref, computed } from "vue";
import { useRequest } from "vue-request";
import { StudentSaveDto, AxiosRespString } from "../model/Model8080";
import { Form } from 'ant-design-vue'
// 定义属性
const props = defineProps<{id:number, dto:StudentSaveDto, visible:boolean}>()
const title = computed(()=> props.id===0?'新增学生':'修改学生')
// 定义事件
const emit = defineEmits(['update:visible', 'saved'])
async function onOk() {
try {
// 提交前校验
await validate()
if(props.id === 0) {
await insert(props.dto)
} else {
await update(props.dto)
}
emit('saved')
// 发送事件给父组件, 希望把 visible 改为 false
emit('update:visible', false)
} catch (e) {
console.error(e)
}
}
function onCancel() {
// 发送事件给父组件, 希望把 visible 改为 false
emit('update:visible', false)
}
const {runAsync:insert} = useRequest<AxiosRespString,StudentSaveDto[]>(
(dto)=>axios.post('/api/students', dto),
{
manual: true
}
)
const {runAsync:update} = useRequest<AxiosRespString,StudentSaveDto[]>(
(dto)=>axios.put(`/api/students/${props.id}`, dto),
{
manual: true
}
)
const rules = ref({
name: [
{required: true, message:'姓名必须'},
{min:2, message:'字符数至少为2'}
],
sex: [
{required: true, message:'性别必须'}
],
age: [
{required: true, message:'年龄必须'},
{min:10, message:'年龄最小为10岁', type:'number'},
{max:120, message:'年龄最大为120岁', type:'number'}
]
})
// 参数1: 待校验的数据
// 参数2: 校验规则
const { validateInfos, validate } = Form.useForm(props.dto, rules)
</script>
2) vue-router
安装
npm install vue-router@4
创建 router
首先创建一个 /src/router/a5router.ts 文件,在其中定义路由
import {createRouter, createWebHashHistory} from 'vue-router'
import A51 from '../views/A51.vue'
import A52 from '../views/A52.vue'
// 路由 => 路径和组件之间的对应关系
const routes = [
{
path: '/a1',
component: A51
},
{
path: '/a2',
component: A52
}
]
const router = createRouter({
history: createWebHashHistory(), // 路径格式
routes: routes // 路由数组
})
export default router
- createWebHashHistory 是用 # 符号作为【单页面】跳转技术,上面两个路由访问时路径格式为
- http://localhost:7070/#/a1
- http://localhost:7070/#/a2
-
每个路由都有两个必须属性
-
path:路径
-
component:组件
-
- createRouter 用来创建 router 对象,作为默认导出
需要在 main.ts 中导入 router 对象:
// ...
import A5 from './views/A5.vue' // vue-router
import router from './router/a5router'
createApp(A5).use(antdv).use(router).mount('#app')
A5 是根组件,不必在 router 中定义,但需要在其中定义 router-view,用来控制路由跳转后,A51、A52 这些组件的显示位置,内容如下
<template>
<div class="a5">
<router-view></router-view>
</div>
</template>
效果如下
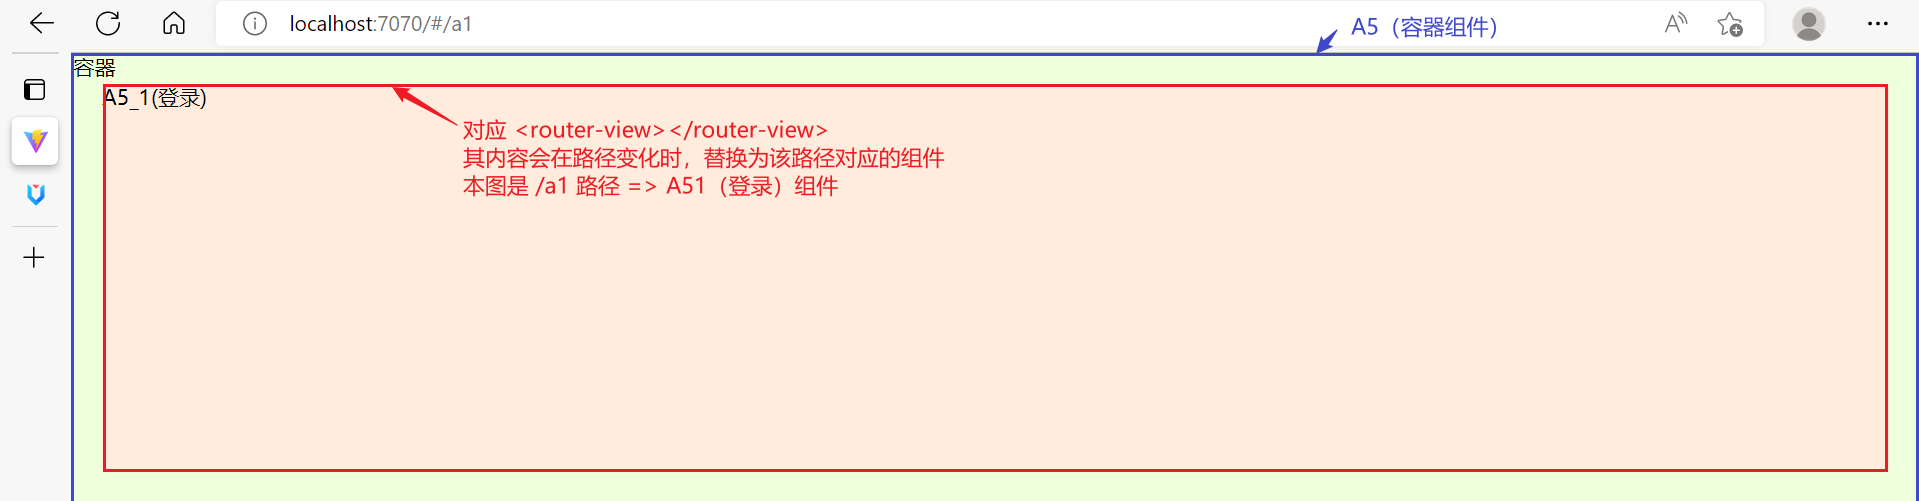

动态导入
import {createRouter, createWebHashHistory} from 'vue-router'
import A51 from '../views/A51.vue'
import A52 from '../views/A52.vue'
const routes = [
// ...
{
path: '/a3',
component: () => import('../views/A53.vue')
}
]
- 用 import 关键字导入,效果是打包时会将组件的 js 代码都打包成一个大的 js 文件,如果组件非常多,会影响页面加载速度
- 而 import 函数导入(动态导入),则是按需加载,即
- 当路由跳转到 /a3 路径时,才会去加载 A53 组件对应的 js 代码
- vue-router 官方推荐采用动态导入
嵌套路由
如果希望再嵌套更深层次的路由跳转,例如:希望在 A53 组件内再进行路由跳转
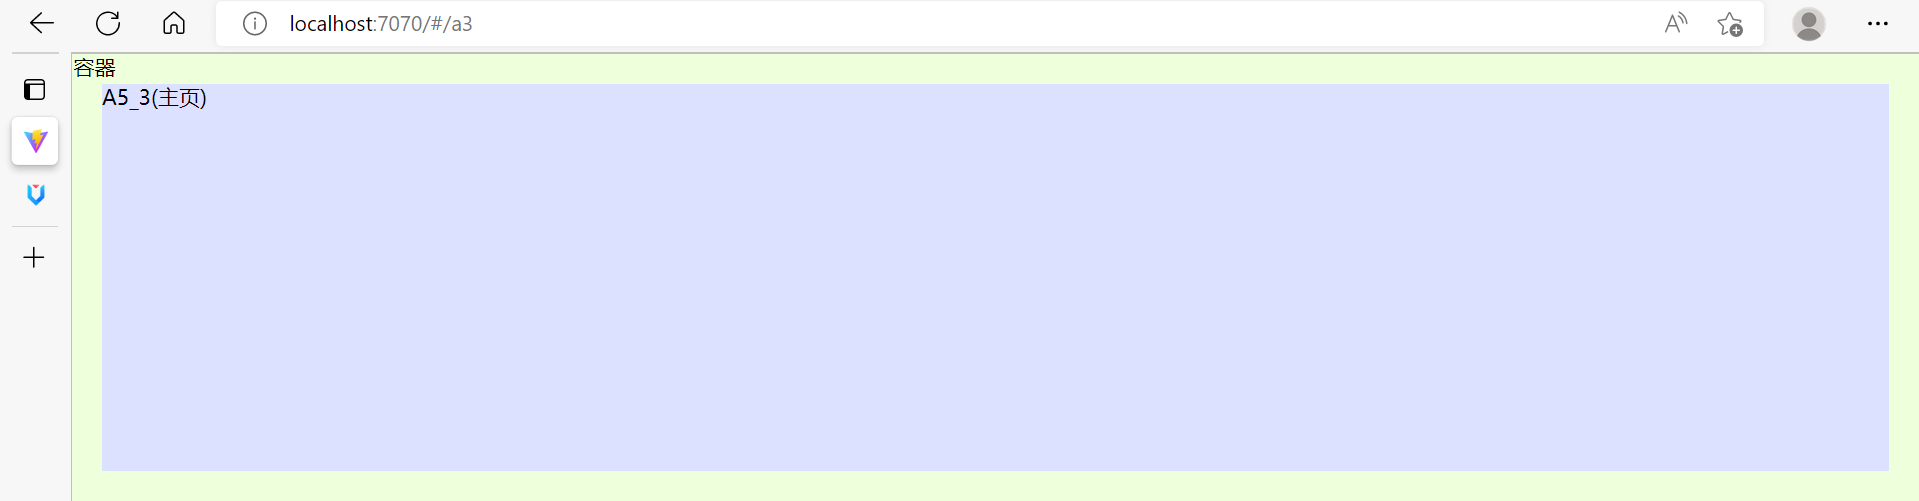
首先,修改 A53.vue
<template>
<div class="a53">
<router-view></router-view>
</div>
</template>
其次,再修改 /src/router/a5router.ts 文件 内容
import {createRouter, createWebHashHistory} from 'vue-router'
import A51 from '../views/A51.vue'
import A52 from '../views/A52.vue'
const routes = [
// ...
{
path: '/a3',
component: () => import('../views/A53.vue'),
children: [
{
path: 'student',
component: () => import('../views/A531.vue')
},
{
path: 'teacher',
component: () => import('../views/A532.vue')
}
]
}
]
// ...
将来访问 /a3/student 时,效果为
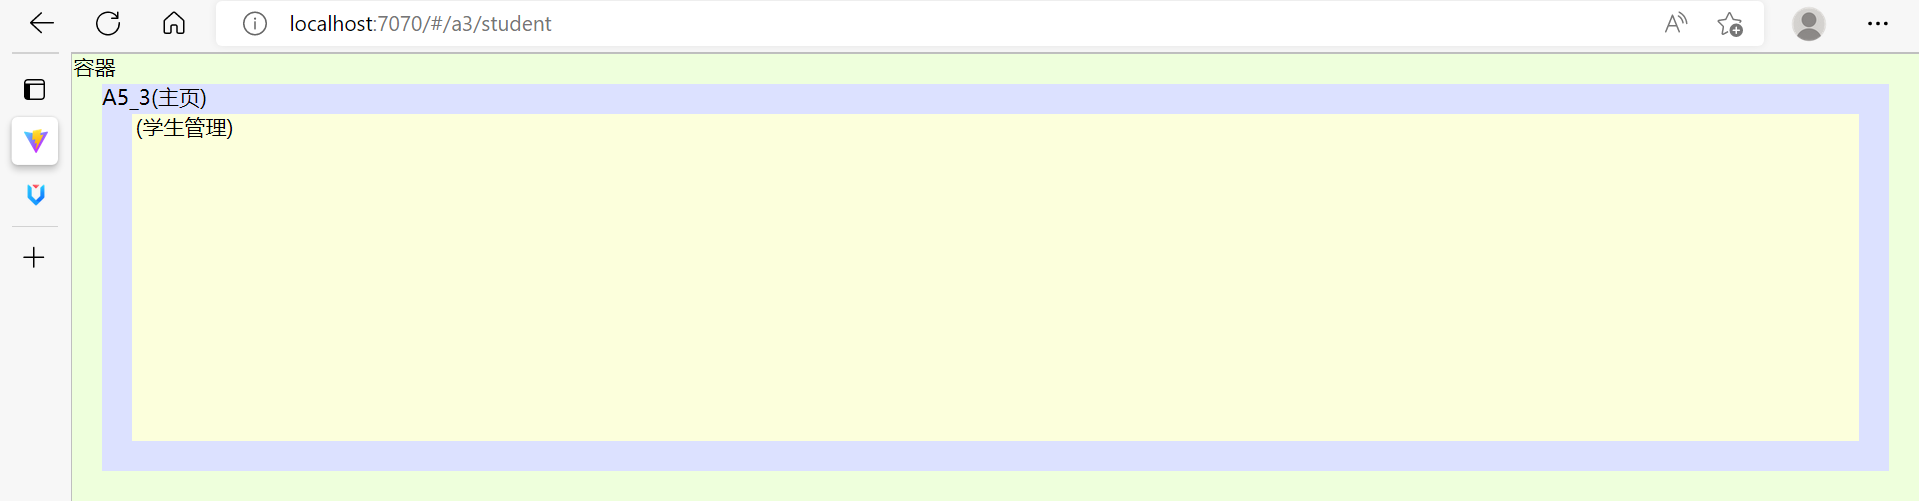
访问 /a3/teacher 时,效果为
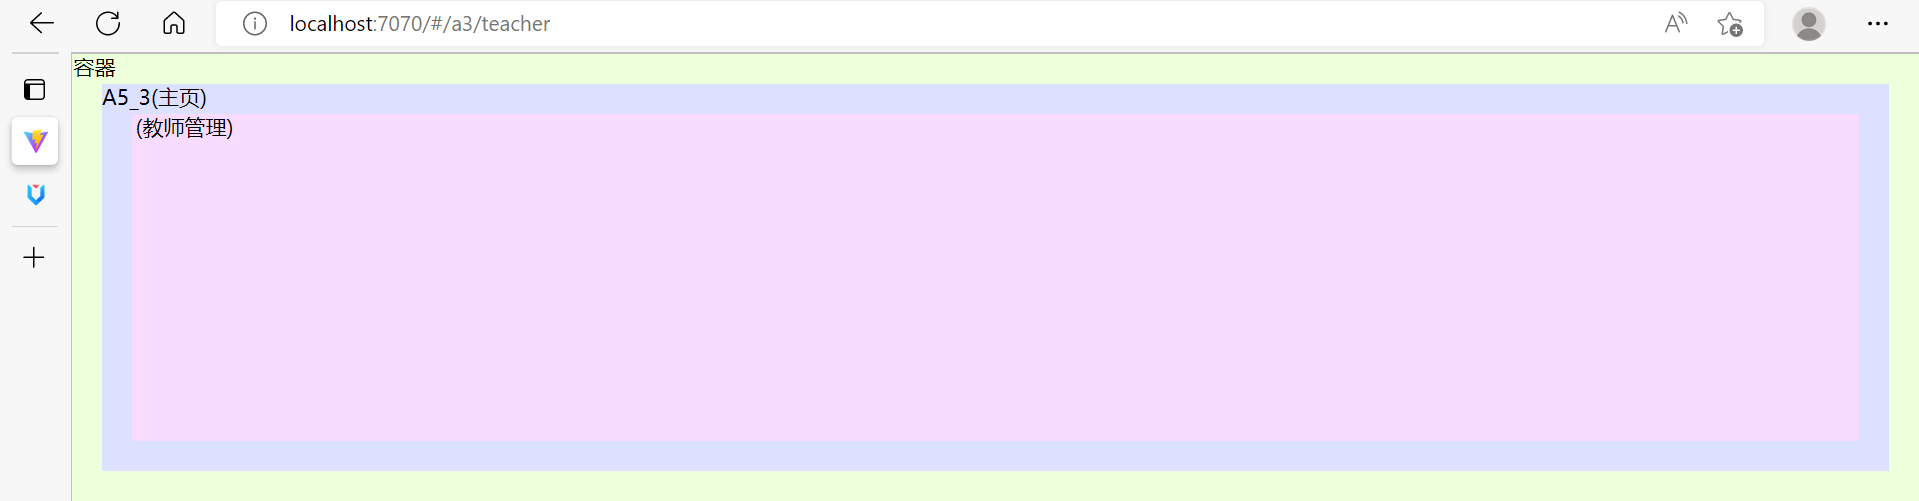
重定向
用法1
import {createRouter, createWebHashHistory} from 'vue-router'
import A51 from '../views/A51.vue'
import A52 from '../views/A52.vue'
const routes = [
// ...
{
path: '/a3',
component: () => import('../views/A53.vue'),
redirect: '/a3/student', // 重定向到另外路径
children: [
{
path: 'student',
component: () => import('../views/A531.vue')
},
{
path: 'teacher',
component: () => import('../views/A532.vue')
}
]
}
]
// ...
效果是,页面输入 /a3,紧接着会重定向跳转到 /a3/student
用法2
import {createRouter, createWebHashHistory} from 'vue-router'
import A51 from '../views/A51.vue'
import A52 from '../views/A52.vue'
const routes = [
{
path: '/a1',
component: A51
},
{
path: '/a2',
component: A52
},
// ...
{
path: '/:pathMatcher(.*)*', // 可以匹配剩余的路径
redirect: '/a2'
}
]
// ...
效果是,当页面输入一个不存在路径 /aaa 时,会被 path: '/:pathMatcher(.*)*' 匹配到,然后重定向跳转到 A52 组件去
主页布局
借助 antdv 的 layout 组件,可以实现主页【上】【左】【右】布局
<template>
<div class="a53">
<a-layout>
<a-layout-header></a-layout-header>
<a-layout>
<a-layout-sider></a-layout-sider>
<a-layout-content>
<router-view></router-view>
</a-layout-content>
</a-layout>
</a-layout>
</div>
</template>
<style scoped>
.a53 {
height: 100%;
background-color: rgb(220, 225, 255);
background-image: url("data:image/svg+xml,%3Csvg xmlns='http://www.w3.org/2000/svg'%3E%3Ctext x='35' y='10' font-size='14' font-family='system-ui, sans-serif' text-anchor='middle' dominant-baseline='middle'%3EA53(主页)%3C/text%3E%3C/svg%3E");
padding: 20px;
box-sizing: border-box;
}
.ant-layout-header {
height: 50px;
background-color:darkseagreen;
}
.ant-layout-sider {
background-color:lightsalmon;
}
.ant-layout-content {
background-color: aliceblue;
}
.ant-layout-footer {
background-color:darkslateblue;
height: 30px;
}
.ant-layout {
height: 100%;
}
.ant-layout-has-sider {
height: calc(100% - 50px);
}
</style>
侧边栏菜单
<template>
<div class="a53">
<a-layout>
<a-layout-header></a-layout-header>
<a-layout>
<a-layout-sider>
<a-menu theme="dark" mode="inline">
<a-menu-item :key="1">
<router-link to="/a3/student">菜单1</router-link>
</a-menu-item>
<a-menu-item :key="2">
<router-link to="/a3/teacher">菜单2</router-link>
</a-menu-item>
<a-menu-item :key="3">菜单3</a-menu-item>
<a-sub-menu :key="4" title="菜单4">
<a-menu-item :key="41">菜单41</a-menu-item>
<a-menu-item :key="42">菜单42</a-menu-item>
</a-sub-menu>
</a-menu>
</a-layout-sider>
<a-layout-content>
<router-view></router-view>
</a-layout-content>
</a-layout>
</a-layout>
</div>
</template>
- a-menu-item 与 a-sub-menu 都必须为 key 属性唯一赋值,否则会产生混乱
- router-link 标签用来切换路由,to 是目标路由的路径
- theme 属性定义菜单的主题(默认亮色主题,dark 为暗色主题)
- mode 属性定义子菜单的展示模式(默认弹出,inline 显示在下方)
菜单图标
安装图标依赖
npm install @ant-design/icons-vue
菜单中使用图标
<template>
<div class="a53">
<a-layout>
<a-layout-header></a-layout-header>
<a-layout>
<a-layout-sider>
<a-menu theme="dark" mode="inline">
<a-menu-item :key="1">
<template #icon>
<highlight-outlined />
</template>
<router-link to="/a3/student">菜单1</router-link>
</a-menu-item>
<a-menu-item :key="2">
<template #icon>
<align-center-outlined />
</template>
<router-link to="/a3/teacher">菜单2</router-link>
</a-menu-item>
<a-menu-item :key="3">
<template #icon>
<strikethrough-outlined />
</template>
菜单3</a-menu-item>
<a-sub-menu :key="4" title="菜单4">
<template #icon>
<sort-descending-outlined />
</template>
<a-menu-item :key="41">菜单41</a-menu-item>
<a-menu-item :key="42">菜单42</a-menu-item>
</a-sub-menu>
</a-menu>
</a-layout-sider>
<a-layout-content>
<router-view></router-view>
</a-layout-content>
</a-layout>
</a-layout>
</div>
</template>
<script setup lang="ts">
import {HighlightOutlined, AlignCenterOutlined, StrikethroughOutlined, SortDescendingOutlined} from '@ant-design/icons-vue'
</script>
- 图标组件没有全局绑定,需要 import 之后才能使用
- 用
<template #icon></template>插槽,才能确定图标展示的位置(菜单文字之前)
二次封装图标组件
最终希望用统一的图标组件去使用图标,图标名只是作为一个属性值传递进去,例如:
使用者
<template>
<a-icon icon="highlight-outlined"></a-icon>
<a-icon icon="align-center-outlined"></a-icon>
<a-icon icon="strikethrough-outlined"></a-icon>
<a-icon icon="sort-descending-outlined"></a-icon>
</template>
<script setup lang="ts">
import AIcon from '../components/AIcon1.vue'
</script>
方法1,使用 vue 组件
<script lang="ts" setup>
import {HighlightOutlined, AlignCenterOutlined, StrikethroughOutlined, SortDescendingOutlined} from '@ant-design/icons-vue'
const props = defineProps<{icon:string}>()
</script>
<template>
<highlight-outlined v-if="icon==='highlight-outlined'"></highlight-outlined>
<align-center-outlined v-else-if="icon==='align-center-outlined'"></align-center-outlined>
<strikethrough-outlined v-else-if="icon==='strikethrough-outlined'"></strikethrough-outlined>
<sort-descending-outlined v-else-if="icon==='sort-descending-outlined'"></sort-descending-outlined>
</template>
- 缺点:实现太笨
方法2,使用函数式组件
import { h } from "vue"
import * as Icons from '@ant-design/icons-vue'
interface Module {
[p:string]: any
}
// 参数1: 组件属性
const AIcon = (props:{icon:string}) => {
// console.log(props.icon)
// console.log(Icons)
// 参数1: 组件对象
const im: Module = Icons
return h(im[toCamelCase(props.icon)])
}
export default AIcon
// 将-分隔的单词转换为大驼峰命名的单词
function toCamelCase(str: string) { // highlight-outlined
return str.split('-') // ['highlight', 'outlined']
.map((e)=> e.charAt(0).toUpperCase() + e.slice(1) ) // ['Highlight', 'Outlined']
.join('')
}
/*
Icons 的结构如下
{
HighlightOutlined: HighlightOutlined组件对象,
MonitorOutlined: MonitorOutlined组件对象,
...
}
*/
- 需要动态生成标签的时候,可以考虑使用函数式组件
方法3,使用 jsx 组件
首先,安装
npm install @vitejs/plugin-vue-jsx -D
配置 vite.config.ts
import { defineConfig } from 'vite'
import vue from '@vitejs/plugin-vue'
import vueJsx from '@vitejs/plugin-vue-jsx'
// https://vitejs.dev/config/
export default defineConfig({
plugins: [vue(), vueJsx()]
})
编写一个 Hi.tsx 组件
export default {
props: {
msg: String
},
setup(props: { msg: string }) {
return () => <h5>{props.msg}</h5>
}
}
然后被其它组件使用
<script setup lang="ts">
import Hi from '../components/Hi'
</script>
<template>
<Hi msg="Hello,World"></Hi>
</template>
用 jsx 实现图标组件
import * as Icons from '@ant-design/icons-vue'
interface Module {
[p:string]: any
}
function toCamelCase(str: string) { // highlight-outlined
return str
.split("-") // ['highlight', 'outlined']
.map((e) => e.charAt(0).toUpperCase() + e.slice(1)) // ['Highlight', 'Outlined']
.join(""); // HighlightOutlined
}
export default {
props: {
icon: String
},
setup(props: {icon: string}) {
const im: Module = Icons
const tag = im[toCamelCase(props.icon)] // 图标组件
// HighlightOutlined
return ()=> <tag></tag> // 返回组件标签
}
}
动态路由与菜单
路由文件
a6router.js
import { createRouter, createWebHashHistory } from 'vue-router'
import { useStorage } from '@vueuse/core'
import { Route, Menu } from '../model/Model8080'
const clientRoutes = [
{
path: '/login',
name: 'login',
component: () => import('../views/A6Login.vue')
},
{
path: '/404',
name: '404',
component: () => import('../views/A6NotFound.vue')
},
{
path: '/',
name: 'main',
component: () => import('../views/A6Main.vue')
},
{
path: '/:pathMatcher(.*)*',
name: 'remaining',
redirect: '/404'
}
]
const router = createRouter({
history: createWebHashHistory(),
routes: clientRoutes
})
export const serverMenus = useStorage<Menu[]>('serverMenus', [])
const serverRoutes = useStorage<Route[]>('serverRoutes', [])
addServerRoutes(serverRoutes.value)
export function addServerRoutes(routeList: Route[]) {
for (const r of routeList) {
if (r.parentName) {
router.addRoute(r.parentName, {
path: r.path,
component: () => import(r.component),
name: r.name
})
}
}
serverRoutes.value = routeList
}
export function resetRoutes() {
for (const r of clientRoutes) {
router.addRoute(r)
}
serverRoutes.value = null
serverMenus.value = null
}
export default router
本文件重要的函数及变量
- addServerRoutes 函数向路由表中添加由服务器提供的路由,路由分成两部分
- clientRoutes 这是客户端固定的路由
- serverRoutes 这是服务器变化的路由,存储于 localStorage
- resetRoutes 函数用来将路由重置为 clientRoutes
- vue-router@4 中的 addRoute 方法会【覆盖】同名路由,这是这种实现的关键
- 因此,服务器返回的路由最好是 main 的子路由,这样重置时就会比较简单,用之前的 main 一覆盖就完事了
- serverMenus 变量记录服务器变化的菜单,存储于 localStorage
登录组件
动态路由应当在登录时生成,A6Login.vue
<template>
<div class="login">
<a-form :label-col="{ span: 6 }" autocomplete="off">
<a-form-item label="用户名" v-bind="validateInfos.username">
<a-input v-model:value="dto.username" />
</a-form-item>
<a-form-item label="密码" v-bind="validateInfos.password">
<a-input-password v-model:value="dto.password" />
</a-form-item>
<a-form-item :wrapper-col="{ offset: 6, span: 16 }">
<a-button type="primary" @click="onClick">Submit</a-button>
</a-form-item>
</a-form>
</div>
</template>
<script setup lang="ts">
import { ref, onMounted } from 'vue'
import { Form } from 'ant-design-vue'
import { useRouter } from 'vue-router'
import axios from '../api/request'
import { useRequest } from 'vue-request'
import { AxiosRespToken, LoginDto, AxiosRespMenuAndRoute } from '../model/Model8080'
import { resetRoutes, addServerRoutes, serverMenus } from '../router/a6router'
const dto = ref({username:'', password:''})
const rules = ref({
username: [
{required: true, message:'用户名必填'}
],
password:[
{required: true, message:'密码必填'}
]
})
const { validateInfos, validate } = Form.useForm(dto, rules)
const router = useRouter()
const { runAsync:login } = useRequest<AxiosRespToken, LoginDto[]>((dto)=> axios.post('/api/loginJwt', dto), {manual:true})
const { runAsync:menu } = useRequest<AxiosRespMenuAndRoute, string[]>((username)=> axios.get(`/api/menu/${username}`), {manual:true})
async function onClick() {
try {
await validate()
const loginResp = await login(dto.value
if(loginResp.data.code === 200) { // 登录成功
const token = loginResp.data.data.token
const menuResp = await menu(dto.value.username)
const routeList = menuResp.data.data.routeList
addServerRoutes(routeList)
serverMenus.value = menuResp.data.data.menuTree
router.push('/')
})
} catch (e) {
console.error(e)
}
}
onMounted(()=>{
resetRoutes()
})
</script>
<style scoped>
.login{
margin: 200px auto;
width: 25%;
padding: 20px;
height: 180px;
background-color: antiquewhite;
}
</style>
- 登录成功后去请求
/api/menu/{username}获取该用户的菜单和路由 - router.push 方法用来以编程方式跳转至主页路由
主页组件
A6Main.vue
<template>
<div class="a6main">
<a-layout>
<a-layout-header>
</a-layout-header>
<a-layout>
<a-layout-sider>
<a-menu mode="inline" theme="dark">
<template v-for="m1 of serverMenus">
<a-sub-menu v-if="m1.children" :key="m1.id" :title="m1.title">
<template #icon><a-icon :icon="m1.icon"></a-icon></template>
<a-menu-item v-for="m2 of m1.children" :key="m2.id">
<template #icon><a-icon :icon="m2.icon"></a-icon></template>
<router-link v-if="m2.routePath" :to="m2.routePath"></router-link>
<span v-else></span>
</a-menu-item>
</a-sub-menu>
<a-menu-item v-else :key="m1.id">
<template #icon><a-icon :icon="m1.icon"></a-icon></template>
<router-link v-if="m1.routePath" :to="m1.routePath"></router-link>
<span v-else></span>
</a-menu-item>
</template>
</a-menu>
</a-layout-sider>
<a-layout-content>
<router-view></router-view>
</a-layout-content>
</a-layout>
</a-layout>
</div>
</template>
<script setup lang="ts">
import AIcon from '../components/AIcon3' // jsx icon 组件
import { serverMenus } from '../router/a6router'
</script>
<style scoped>
.a6main {
height: 100%;
background-color: rgb(220, 225, 255);
box-sizing: border-box;
}
.ant-layout-header {
height: 50px;
background-color:darkseagreen;
}
.ant-layout-sider {
background-color:lightsalmon;
}
.ant-layout-content {
background-color: aliceblue;
}
.ant-layout-footer {
background-color:darkslateblue;
height: 30px;
}
.ant-layout {
height: 100%;
}
.ant-layout-has-sider {
height: calc(100% - 50px);
}
</style>
token 使用
- 获取用户信息,例如服务器端可以把用户名、该用户的路由、菜单信息都统一从 token 返回
- 前端路由跳转依据,例如跳转前检查 token,如果不存在,表示未登录,就避免跳转至某些路由
- 后端 api 访问依据,例如每次发请求携带 token,后端需要身份校验的 api 需要用到
3) pinia
需求:在组件 p1 里更新了数据,主页组件也同步更新显示
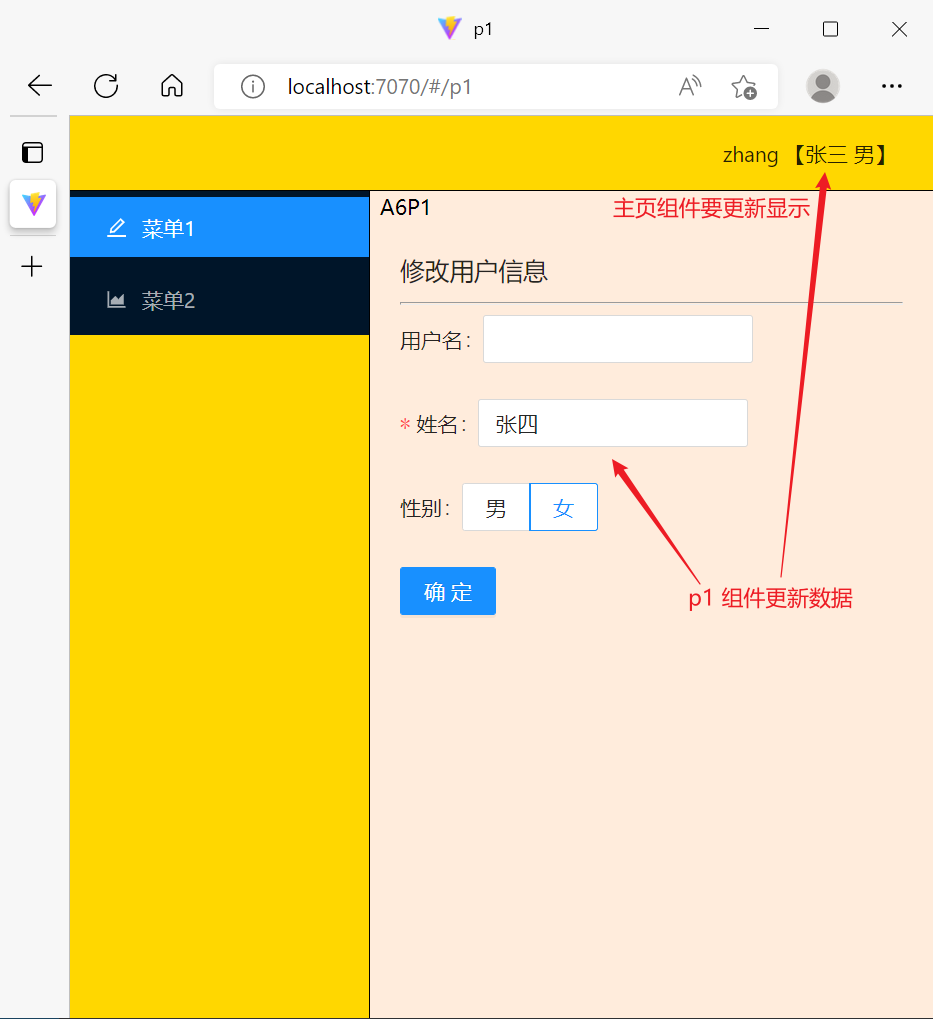
- storage 虽然可以实现多个组件的数据共享,但是需要【主动访问】才能获取更新后的数据
- 本例中由于没有涉及主页组件的 mounted 操作,因此并不会【主动】获取 storage 的数据
安装
npm install pinia
在 main.ts 中引入
import { createPinia } from 'pinia'
// ...
createApp(A6).use(antdv).use(router).use(createPinia()).mount('#app')
定义Store
再新建 store 目录来管理共享数据,下面是 /src/store/UserInfo.ts
import axios from '../api/request'
import { defineStore } from "pinia"
import { UserInfoDto } from '../model/Model8080'
export const useUserInfo = defineStore('userInfo', {
state: () => {
return { username: '', name: '', sex: '' }
},
actions: {
async get(username: string) {
const resp = await axios.get(`/api/info/${username}`)
Object.assign(this, resp.data.data)
},
async update(dto: UserInfoDto) {
await axios.post('/api/info', dto)
Object.assign(this, dto)
}
}
})
-
定义了 useUserInfo 函数,用来获取共享数据,它可能用于多个组件
- 命名习惯上,函数变量以 use 打头
-
state 定义数据格式
-
actions 定义操作数据的方法
-
get 方法用来获取用户信息
-
update 方法用来修改用户信息
-
-
由于 useRequest 必须放在 setup 函数内,这里简化起见,直接使用了 axios
获取用户信息
<template>
<div class="a6main">
<a-layout>
<a-layout-header>
<span> 【 - 】</span>
</a-layout-header>
<a-layout>
<!-- ... -->
</a-layout>
</a-layout>
</div>
</template>
<script setup lang="ts">
import { onMounted } from 'vue';
import AIcon from '../components/AIcon3' // jsx icon 组件
import { serverMenus, serverUsername } from '../router/a6router'
import { useUserInfo } from '../store/UserInfo'
const userInfo = useUserInfo()
onMounted(()=>{
userInfo.get(serverUsername.value)
})
</script>
修改用户信息
<template>
<div class="a6p1">
<h3>修改用户信息</h3>
<hr>
<a-form>
<a-form-item label="用户名">
<a-input readonly v-model:value="dto.username"></a-input>
</a-form-item>
<a-form-item label="姓名" v-bind="validateInfos.name">
<a-input v-model:value="dto.name"></a-input>
</a-form-item>
<a-form-item label="性别">
<a-radio-group v-model:value="dto.sex">
<a-radio-button value="男">男</a-radio-button>
<a-radio-button value="女">女</a-radio-button>
</a-radio-group>
</a-form-item>
</a-form>
<a-button type="primary" @click="onClick">确定</a-button>
</div>
</template>
<script setup lang="ts">
import { Form } from 'ant-design-vue'
import { onMounted, ref } from 'vue'
import { UserInfoDto } from '../model/Model8080'
import { useUserInfo } from '../store/UserInfo';
const dto = ref<UserInfoDto>({ username: '', name: '', sex: '' })
const userInfo = useUserInfo()
onMounted(()=>{
Object.assign(dto.value, userInfo)
})
const rules = ref({
name: [
{required: true, message:'姓名必填'}
]
})
const { validateInfos, validate } = Form.useForm(dto, rules)
async function onClick() {
try {
await validate()
await userInfo.update(dto.value)
} catch (e) {
console.error(e)
}
}
</script>
- 不能直接把 userInfo 绑定到表单,需要 dto 中转一下
- userInfo.update 和 useInfo.get 返回的都是 Promise 对象,可以配合 await 一起用
后记
vite + vue3 + vue-router + ts 还没有太多成熟的项目范例,可以参考 GitHub - sendya/preview-pro: Use pro-layout in vitejs. preview https://sendya.github.io/preview-pro/index.html,它提供了基本的布局和样例代码
第五章 React
1. React 基础
react 是前端三大框架之一
- 没有 vue 的基础更好,因为两者思想不太一样,不能用 vue 的习惯学习 react
- 需要有 js 基础,视频 19-58
- 需要有 ts 基础,视频 110-116
- 本教程采用更流行的【函数式组件 + hooks】方式进行讲解
1) 环境准备
创建项目
首先,通过 react 脚手架创建项目
npx create-react-app client --template typescript
- client 是项目名
- 目前 react 版本是 18.x
运行项目
cd client
npm start
- 会自动打开浏览器,默认监听 3000 端口

修改端口
在项目根目录下新建文件 .env.development,它可以定义开发环境下的环境变量
PORT=7070
重启项目,端口就变成了 7070
-
参考文档:[Advanced Configuration Create React App (create-react-app.dev)](https://create-react-app.dev/docs/advanced-configuration/)
浏览器插件
插件地址 New React Developer Tools – React Blog (reactjs.org)
VSCode
推荐安装 Prettier 代码格式化插件
2) 入门案例
Hello
编写一个 src/pages/Hello.tsx 组件
export default function Hello() {
return <h3>Hello, World!</h3>
}
- 组件中使用了 jsx 语法,即在 js 中直接使用 html 标签或组件标签
- 函数式组件必须返回标签片段
在 index.js 引入组件
import React from 'react'
import ReactDOM from 'react-dom/client'
import './index.css'
import reportWebVitals from './reportWebVitals'
// 1. 引入组件
import Hello from './pages/Hello'
const root = ReactDOM.createRoot(document.getElementById('root') as HTMLElement)
root.render(
<React.StrictMode>
{/* 2. 将原来的 <App/> 改为 <Hello></Hello> */}
<Hello></Hello>
</React.StrictMode>
)
// If you want to start measuring performance in your app, pass a function
// to log results (for example: reportWebVitals(console.log))
// or send to an analytics endpoint. Learn more: https://bit.ly/CRA-vitals
reportWebVitals()
将欢迎词作为属性传递给组件
<Hello msg='你好'></Hello>
- 字符串值,可以直接使用双引号赋值
- 其它类型的值,用
{值}
而组件修改为
export default function Hello(props: { msg: string }) {
return <h3>{props.msg}</h3>
}
jsx 原理
export default function Hello(props: { msg: string }) {
return <h3>{props.msg}</h3>
}
在 v17 之前,其实相当于
import { createElement } from "react";
export default function Hello(props: {msg: string}) {
return createElement('h3', null, `${props.msg}`)
}
3) 人物卡片案例
样式已经准备好 /src/css/P1.css
#root {
display: flex;
width: 100vw;
height: 100vh;
justify-content: center;
align-items: center;
}
div.student {
flex-shrink: 0;
flex-grow: 0;
position: relative;
width: 128px;
height: 330px;
/* font-family: '华文行楷'; */
font-size: 14px;
text-align: center;
margin: 20px;
display: flex;
justify-content: flex-start;
background-color: #7591AD;
align-items: center;
flex-direction: column;
border-radius: 5px;
box-shadow: 0 0 8px #2c2c2c;
color: #e8f6fd;
}
.photo {
position: absolute;
width: 100%;
height: 100%;
top: 0;
border-radius: 0%;
overflow: hidden;
transition: 0.3s;
border-radius: 5px;
}
.photo img {
width: 100%;
height: 100%;
/* object-fit: scale-down; */
object-fit: cover;
}
.photo::before {
position: absolute;
content: '';
width: 100%;
height: 100%;
background-image: linear-gradient(to top, #333, transparent);
}
div.student h2 {
position: absolute;
font-size: 20px;
width: 100%;
height: 68px;
font-weight: normal;
text-align: center;
margin: 0;
line-height: 68px;
visibility: hidden;
}
h2::before {
position: absolute;
top: 0;
left: 0;
content: '';
width: 100%;
height: 68px;
background-color: rgba(0, 0, 0, 0.3);
border-top-left-radius: 5px;
border-top-right-radius: 5px;
}
div.student h1 {
position: absolute;
top: 250px;
font-size: 22px;
margin: 0;
transition: 0.3s;
font-weight: normal;
}
div.student p {
margin-top: 300px;
width: 80%;
font-weight: normal;
text-align: center;
padding-bottom: 5px;
border-bottom: 1px solid #8ea2b8;
}
.student:hover .photo::before {
display: none;
}
.student:hover .photo {
width: 90px;
height: 90px;
top: 90px;
border-radius: 50%;
box-shadow: 0 0 15px #111;
}
.student:hover img {
object-position: 50% 0%;
}
.student:hover h1 {
position: absolute;
top: 190px;
width: 40px;
}
div.student:hover h2 {
visibility: visible;
}
类型 /src/model/Student.ts
export interface Student {
id: number,
name: string,
sex: string,
age: number,
photo: string
}
组件 /src/pages/P1.tsx
import { Student } from '../model/Student'
import '../css/P1.css'
export default function P1(props: { student: Student }) {
return (
<div className='student'>
<div className='photo'>
<img src={props.student.photo}/>
</div>
<h1>{props.student.name}</h1>
<h2>{props.student.id}</h2>
<p>性别 {props.student.sex} 年龄 {props.student.age}</p>
</div>
)
}
使用组件
const stu1 = { id: 1, name: '风清扬', sex: '男', age: 99, photo: '/imgs/1.png' }
const stu2 = { id: 2, name: '玮哥', sex: '男', age: 20, photo: '/imgs/2.png' }
const stu3 = { id: 3, name: '长宏', sex: '男', age: 30, photo: '/imgs/3.png'}
<P1 student={stu1}></P1>
<P1 student={stu2}></P1>
<P1 student={stu3}></P1>
路径
- src 下的资源,要用相对路径引入
- public 下的资源,记得 / 代表路径的起点
标签命名
- 组件标签必须用大驼峰命名
- 普通 html 标签必须用小写命名
事件处理
import { Student } from '../model/Student'
import '../css/P1.css'
export default function P1(props: { student: Student }) {
function handleClick(e : React.MouseEvent){
console.log(student)
console.log(e)
}
return (
<div className='student'>
<div className='photo' onClick={handleClick}>
<img src={props.student.photo}/>
</div>
<h1>{props.student.name}</h1>
<h2>{props.student.id}</h2>
<p>性别 {props.student.sex} 年龄 {props.student.age}</p>
</div>
)
}
- 事件以小驼峰命名
- 事件处理函数可以有一个事件对象参数,可以获取事件相关信息
列表 & Key
import { Student } from '../model/Student'
import P1 from './P1'
export default function P2(props: { students: Student[] }) {
return (
<>
{props.students.map((s) => ( <P1 student={s} key={s.id}></P1> ))}
</>
)
}
- key 在循环时是必须的,否则会有 warning
也可以这么做
import { Student } from '../model/Student'
import P1 from './P1'
export default function P2(props: { students: Student[] }) {
const list = props.students.map((s) => <P1 student={s} key={s.id}></P1>)
return <>{list}</>
}
使用组件
const stu1 = { id: 1, name: '风清扬', sex: '男', age: 99, photo: '/1.png' }
const stu2 = { id: 2, name: '玮哥', sex: '男', age: 45, photo: '/2.png' }
const stu3 = { id: 3, name: '长宏', sex: '男', age: 45, photo: '/3.png'}
<P2 students={[stu1,stu2,stu3]}></P2>
条件渲染
P1 修改为
import { Student } from '../model/Student'
import '../css/P1.css'
export default function P1(props: { student: Student; hideAge?: boolean }) {
function handleClick() {
console.log(props.student)
}
const ageFragment = !props.hideAge && <span>年龄 {props.student.age}</span>
return (
<div className='student'>
<div className='photo' onClick={handleClick}>
<img src={props.student.photo} />
</div>
<h1>{props.student.name}</h1>
<h2>{props.student.id}</h2>
<p>
性别 {props.student.sex} {ageFragment}
</p>
</div>
)
}
- 子元素如果是布尔值,nullish,不会渲染
P2 修改为
import { Student } from '../model/Student'
import P1 from './P1'
export default function P2(props: { students: Student[]; hideAge?: boolean }) {
const list = props.students.map((s) => (
<P1 student={s} hideAge={props.hideAge} key={s.id}></P1>
))
return <>{list}</>
}
使用组件
const stu1 = { id: 1, name: '风清扬', sex: '男', age: 99, photo: '/1.png' }
const stu2 = { id: 2, name: '玮哥', sex: '男', age: 45, photo: '/2.png' }
const stu3 = { id: 3, name: '长宏', sex: '男', age: 45, photo: '/3.png'}
<P2 students={[stu1,stu2,stu3]} hideAge={true}></P2>
参数解构
以 P1 组件为例
import { Student } from '../model/Student'
import '../css/P1.css'
export default function P1
({ student, hideAge = false }: { student: Student, hideAge?: boolean }) {
function handleClick() {
console.log(student)
}
const ageFragment = !hideAge && <span>年龄 {student.age}</span>
return (
<div className='student'>
<div className='photo' onClick={handleClick}>
<img src={student.photo} />
</div>
<h1>{student.name}</h1>
<h2>{student.id}</h2>
<p>
性别 {student.sex} {ageFragment}
</p>
</div>
)
}
- 可以利用解构赋值语句,让 props 的使用更为简单
- 对象解构赋值还有一个额外的好处,给属性赋默认值
使用组件
const stu1 = { id: 1, name: '风清扬', sex: '男', age: 99, photo: '/1.png' }
<P1 student={stu1}></P1>
4) 处理变化的数据
入门案例侧重的是数据展示,并未涉及到数据的变动,接下来我们开始学习 react 如何处理数据变化
axios
首先来学习 axios,作用是发送请求、接收响应,从服务器获取真实数据
安装
npm install axios
定义组件
import axios from 'axios'
export default function P4({ id }: { id: number }) {
async function updateStudent() {
const resp = await axios.get(`http://localhost:8080/api/students/${id}`)
console.log(resp.data.data)
}
updateStudent()
return <></>
}
- 其中 /api/students/${id} 是提前准备好的后端服务 api,会延迟 2s 返回结果
使用组件
<P4 id={1}></P4>
在控制台上打印
{
"id": 1,
"name": "宋远桥",
"sex": "男",
"age": 40
}
当属性变化时,会重新触发 P4 组件执行,例如将 id 从 1 修改为 2
执行流程
- 首次调用函数组件,返回的 jsx 代码会被渲染成【虚拟 dom 节点】(也称 Fiber 节点)
- 根据【虚拟 dom 节点】会生成【真实 dom 节点】,由浏览器显示出来
- 当函数组件的 props 或 state 发生变化时,才会重新调用函数组件,返回 jsx
- jsx 与上次的【虚拟 dom 节点】对比
- 如果没变化,复用上次的节点
- 有变化,创建新的【虚拟 dom 节点】替换掉上次的节点
- jsx 与上次的【虚拟 dom 节点】对比
- 由于严格模式会触发两次渲染,为了避免干扰,请先注释掉 index.tsx 中的
<React.StrictMode>
状态
先来看一个例子,能否把服务器返回的数据显示在页面上
import axios from 'axios'
let count = 0
export default function P5(props: { id: number }) {
function getTime() {
const d = new Date()
return d.getHours() + ':' + d.getMinutes() + ':' + d.getSeconds()
}
async function updateStudent() {
const resp = await axios.get(
`http://localhost:8080/api/students/${props.id}`
)
Object.assign(student, resp.data.data)
console.log(current, student, getTime())
}
const current = count++
let student = { name: 'xx' }
console.log(current, student, getTime())
updateStudent()
return <h3>姓名是:{student.name}</h3>
}
- count 是一个全局变量,记录 P5 函数第几次被调用
执行效果,控制台上
0 {name: 'xx'} '16:22:16'
0 {id: 1, name: '宋远桥', sex: '男', age: 40} '16:22:18'
此时页面仍显示 姓名是:xx
那么修改一下 props 的 id 呢?进入开发工具把 id 从 1 修改为 2,控制台上
1 {name: 'xx'} '16:24:0'
1 {id: 2, name: '俞莲舟', sex: '男', age: 38} '16:24:2'
此时页面仍显示 姓名是:xx
为什么页面没有显示两秒后更新的值?
- 第一次,页面显示的是 P5 函数的返回结果,这时 student.name 还未被更新成宋远桥,页面显示 xx
- 虽然 2s 后数据更新了,但此时并未触发函数执行,页面不变
- 第二次,虽然 props 修改触发了函数重新执行,但既然函数重新执行,函数内的 student 又被赋值为
{ name: 'xx' },页面还是显示 xx- 2s 后数据更新,跟第一次一样,并未重新触发函数执行,页面不变
结论:
- 函数是无状态的,执行完毕后,它内部用的数据都不会保存下来
- 要想让函数有状态,就需要使用 useState 把数据保存在函数之外的地方,这些数据,称之为状态
useState
import axios from 'axios'
import { useReducer, useState } from 'react'
import { Student } from '../model/Student'
let count = 0
export default function P5(props: { id: number }) {
// ...
async function updateStudent() {
const resp = await axios.get(
`http://localhost:8080/api/students/${props.id}`
)
Object.assign(student, resp.data.data)
console.log(current, student, getTime())
}
const current = count++
let [student] = useState<Student>({ name: 'xx' })
console.log(current, student, getTime())
updateStudent()
return <h3>姓名是:{student.name}</h3>
}
接下来使用 setXXX 方法更新 State
import axios from 'axios'
import { useState } from 'react'
import { Student } from '../model/Student'
export default
function P5(props: { id: number }) {
async function updateStudent() {
const resp = await axios.get(`/api/students/${props.id}`)
setStudent(resp.data.data)
}
let [student, setStudent] = useState<Student>({ name: 'xx' })
updateStudent()
return <h3>姓名是:{student.name}</h3>
}
工作流程如下
首次使用 useState,用它的参数初始化 State
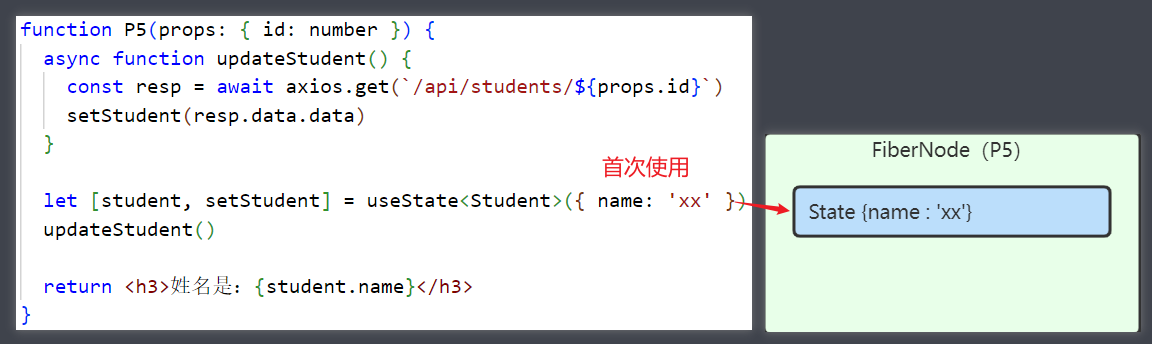
2s 后数据更新,setStudent 函数会更新 State 数据,并会触发下一次渲染(P5 的调用)
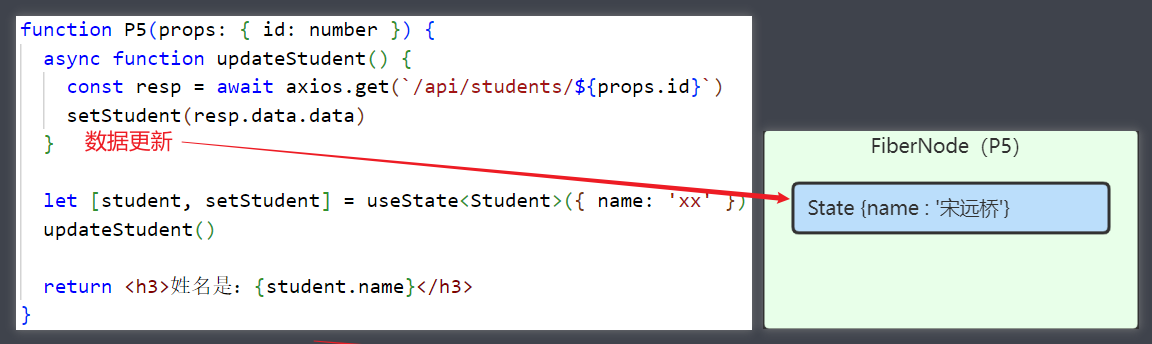
再次调用 useState,这时返回更新后的数据
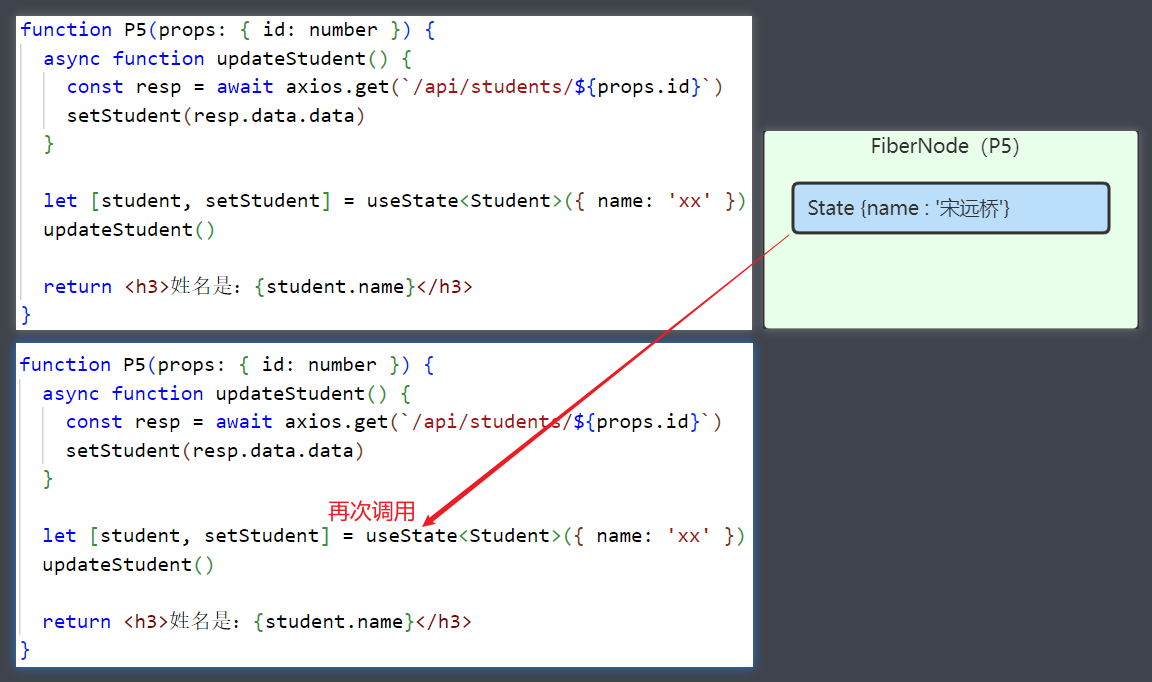
这时再返回 jsx,内容就是 姓名是:宋远桥 了
P.S.
使用了 useState 之后,会执行两次 xhr 请求,后一次请求是 react 开发工具发送的,不用理会
问题还未结束,第二次 P5 调用时,updateStudent 还会执行,结果会导致 2s 后响应返回继续调用 setStudent,这会导致每隔 2s 调用一次 P5 函数(渲染一次)
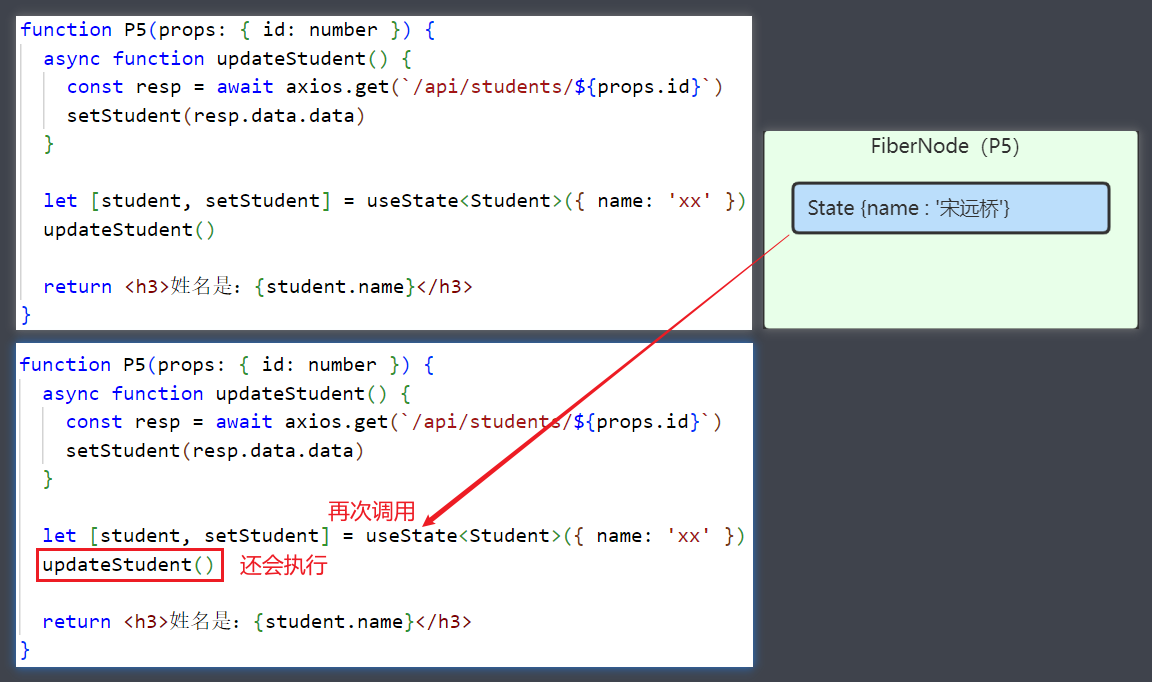
如何让 updateStudent 只执行一次呢?一种土办法是再设置一个布尔 State
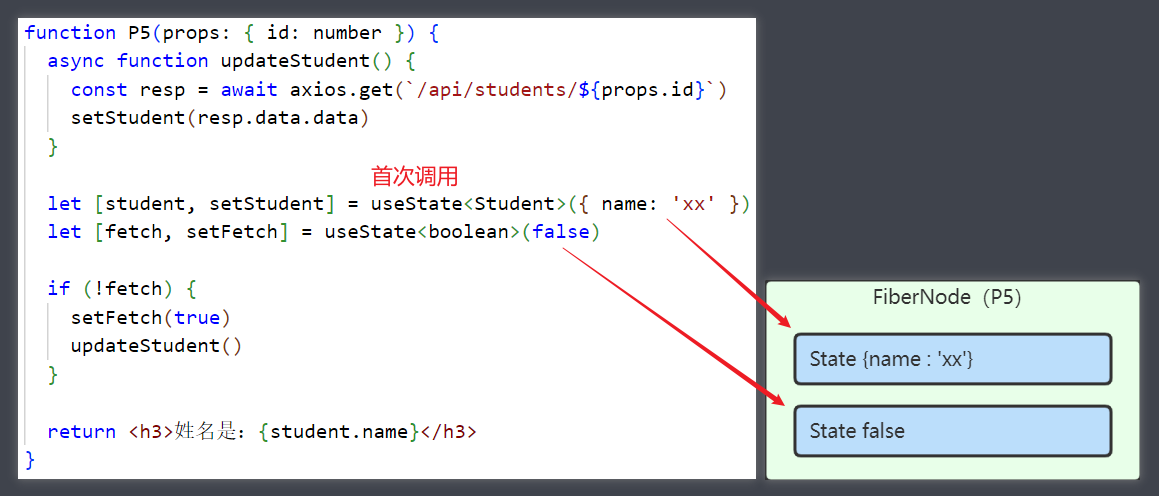
接下来数据更新
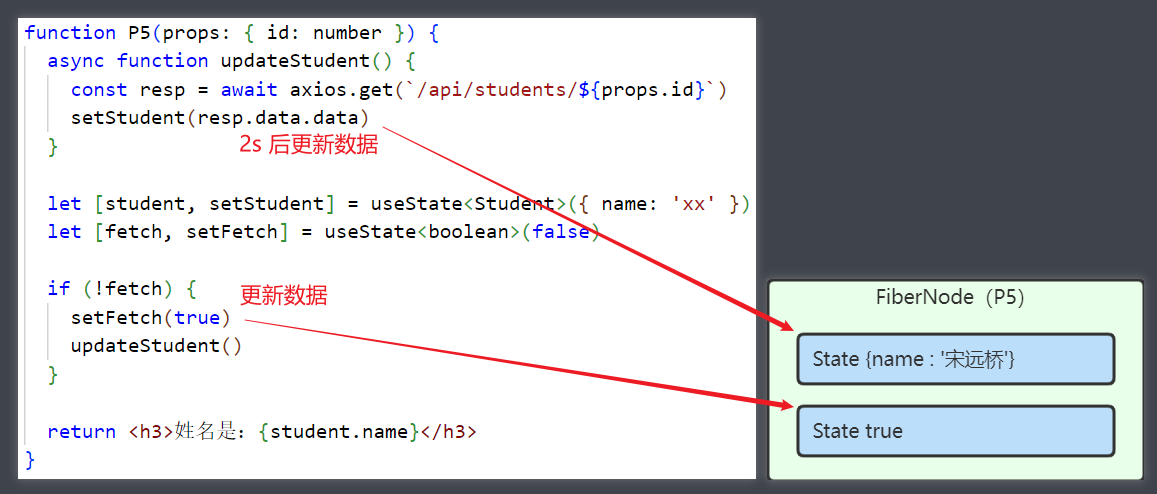
第二次进入 P5 函数时,由于 fetch 条件不成立,因此不会再执行两个 setXXX 方法
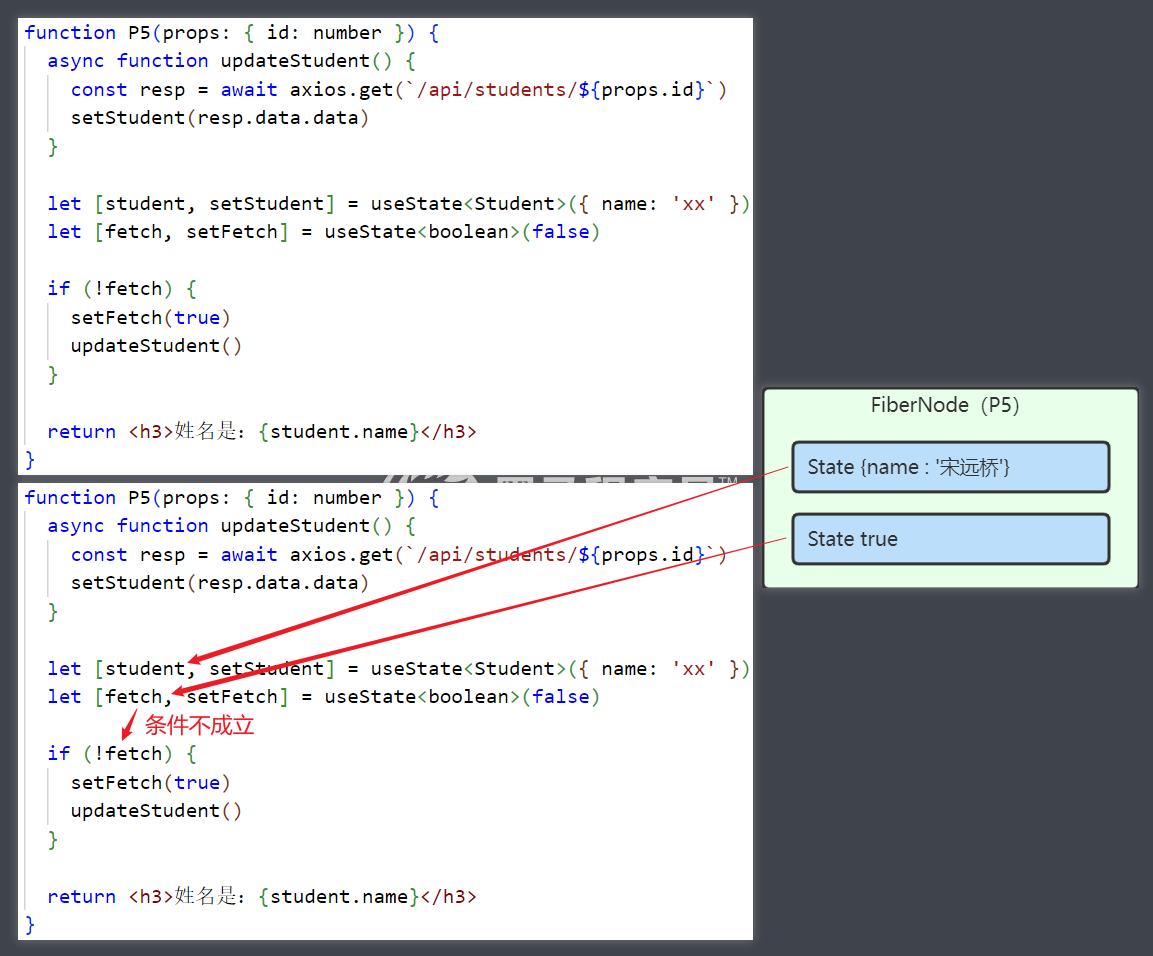
函数式组件的工作流程
- 首次调用函数组件,返回的 jsx 代码会被渲染成【虚拟 dom 节点】(也称 Fiber 节点)
- 此时使用 useState 会将组件工作过程中需要数据绑定到【虚拟 dom 节点】上
- 根据【虚拟 dom 节点】会生成【真实 dom 节点】,由浏览器显示出来
- 当函数组件的 props 或 state 发生变化时,才会重新调用函数组件,返回 jsx
- props 变化由父组件决定,state 变化由组件自身决定
- jsx 与上次的【虚拟 dom 节点】对比
- 如果没变化,复用上次的节点
- 有变化,创建新的【虚拟 dom 节点】替换掉上次的节点
useEffect
Effect 称之为副作用(没有贬义),函数组件的主要目的,是为了渲染生成 html 元素,除了这个主要功能以外,管理状态,fetch 数据 … 等等之外的功能,都可以称之为副作用。
useXXX 打头的一系列方法,都是为副作用而生的,在 react 中把它们称为 Hooks
useEffect 三种用法
import axios from "axios"
import { useEffect, useState } from "react"
/*
useEffect
参数1:箭头函数, 在真正渲染 html 之前会执行它
参数2:
情况1:没有, 代表每次执行组件函数时, 都会执行副作用函数
情况2:[], 代表副作用函数只会执行一次
情况3:[依赖项], 依赖项变化时,副作用函数会执行
*/
export default function P6({ id, age }: { id: number, age: number }) {
console.log('1.主要功能')
// useEffect(() => console.log('3.副作用功能'))
// useEffect(() => console.log('3.副作用功能'), [])
useEffect(() => console.log('3.副作用功能'), [id])
console.log('2.主要功能')
return <h3>{id}</h3>
}
用它改写 P5 案例
import axios from "axios"
import { useEffect, useState } from "react"
export default function P6({ id, age }: { id: number, age: number }) {
const [student, setStudent] = useState({name:'xx'})
useEffect(()=>{
async function updateStudent() {
const resp = await axios.get(`http://localhost:8080/api/students/${id}`)
setStudent(resp.data.data)
}
updateStudent()
}, [id])
return <h3>{student.name}</h3>
}
useContext
import axios from 'axios'
import { createContext, useContext, useEffect, useState } from 'react'
import { R, Student } from '../model/Student'
/*
createContext 创建上下文对象
useContext 读取上下文对象的值
<上下文对象.Provider> 修改上下文对象的值
*/
const HiddenContext = createContext(false)
// 给以下组件提供数据,控制年龄隐藏、显示
export default function P7() {
const [students, setStudents] = useState<Student[]>([])
const [hidden, setHidden] = useState(false)
useEffect(()=>{
async function updateStudents() {
const resp = await axios.get<R<Student[]>>("http://localhost:8080/api/students")
setStudents(resp.data.data)
}
updateStudents()
}, [])
function hideOrShow() {
// 参数:上一次状态值,旧值
// 返回值:要更新的新值
setHidden((old)=>{
return !old
})
}
return <HiddenContext.Provider value={hidden}>
<input type="button" value={hidden?'显示':'隐藏'} onClick={hideOrShow}/>
<P71 students={students}></P71>
</HiddenContext.Provider>
}
// 负责处理学生集合
function P71({ students }: { students: Student[] }) {
const list = students.map(s=><P72 student={s} key={s.id}></P72>)
return <>{list}</>
}
// 负责显示单个学生
function P72({ student }: { student: Student }) {
const hidden = useContext(HiddenContext)
const jsx = !hidden && <span>{student.age}</span>
return <div>{student.name} {jsx}</div>
}
- 如果组件分散在多个文件中,HiddenContext 应该 export 导出,用到它的组件 import 导入
- React 中因修改触发的组件重新渲染,都应当是自上而下的
- setHidden 方法如果更新的是对象,那么要返回一个新对象,而不是在旧对象上做修改
表单
import axios from 'axios'
import React, { useState } from 'react'
import '../css/P8.css'
export default function P8() {
const [student, setStudent] = useState({name:'', sex:'男', age:18})
const [message, setMessage] = useState('')
const options = ['男', '女']
const jsx = options.map(e => <option key={e}>{e}</option>)
// e 事件对象, e.target 事件源
function onChange(e : React.ChangeEvent<HTMLInputElement|HTMLSelectElement>) {
setStudent((old)=>{
// 返回的新值,不能与旧值是同一个对象
return {...old, [e.target.name]:e.target.value}
})
}
async function onClick() {
const resp = await axios.post('http://localhost:8080/api/students', student)
setMessage(resp.data.data)
}
const messageJsx = message && <div className='success'>{message}</div>
return (
<form>
<div>
<label>姓名</label>
<input type="text" value={student.name} onChange={onChange} name='name'/>
</div>
<div>
<label>性别</label>
<select value={student.sex} onChange={onChange} name='sex'>
{jsx}
</select>
</div>
<div>
<label>年龄</label>
<input type="text" value={student.age} onChange={onChange} name='age' />
</div>
<div>
<input type='button' value='新增' onClick={onClick}/>
</div>
{messageJsx}
</form>
)
}
2. React 进阶
1) Ant Design
react 组件库
-
官网地址:https://ant.design/
-
镜像地址1:https://ant-design.gitee.io/
-
镜像地址2:https://ant-design.antgroup.com/
入门
安装
npm install antd
- 目前版本是 4.x
引入样式,在 css 文件中加入
@import '~antd/dist/antd.css';
引入 antd 组件
import { Button } from "antd";
export default function A1() {
return <Button type='primary'>按钮</Button>
}
国际化
试试其它组件
import { Button, Modal } from "antd";
export default function A1() {
return <Modal open={true} title='对话框'>内容</Modal>
}
发现确定和取消按钮是英文的,这是因为 antd 支持多种语言,而默认语言是英文
要想改为中文,建议修改最外层的组件 index.tsx
// ...
import { ConfigProvider } from 'antd'
import zhCN from 'antd/es/locale/zh_CN'
root.render(
<ConfigProvider locale={zhCN}>
<A1></A1>
</ConfigProvider>
)
表格
import { Table } from 'antd'
import { ColumnsType } from 'antd/lib/table'
import axios from 'axios'
import { useEffect, useState } from 'react'
import { R, Student } from '../model/Student'
export default function A3() {
const [students, setStudents] = useState<Student[]>([])
const [loading, setLoading] = useState(true)
useEffect(() => {
async function getStudents() {
const resp = await axios.get<R<Student[]>>(
'http://localhost:8080/api/students'
)
setStudents(resp.data.data)
setLoading(false)
}
getStudents()
}, [])
// title: 列标题 dataIndex: 要关联的属性名
const columns: ColumnsType<Student> = [
{
title: '编号',
dataIndex: 'id',
},
{
title: '姓名',
dataIndex: 'name',
},
{
title: '性别',
dataIndex: 'sex',
},
{
title: '年龄',
dataIndex: 'age',
},
]
// columns: 列定义
// dataSource: 数据源,一般是数组包对象
// rowKey: 作为唯一标识的属性名
// loading: 显示加载图片
return (
<Table
columns={columns}
dataSource={students}
rowKey='id'
loading={loading}></Table>
)
}
客户端分页
import { Table } from 'antd'
import { ColumnsType, TablePaginationConfig } from 'antd/lib/table'
import axios from 'axios'
import { useEffect, useState } from 'react'
import { R, Student } from '../model/Student'
export default function A3() {
const [students, setStudents] = useState<Student[]>([])
const [loading, setLoading] = useState(true)
const [pagination, setPagination] = useState<TablePaginationConfig>(
{current:1, pageSize:5}
)
// 参数: 新的分页数据
function onTableChange(newPagination: TablePaginationConfig) {
setPagination(newPagination)
}
useEffect(() => {
async function getStudents() {
const resp = await axios.get<R<Student[]>>(
'http://localhost:8080/api/students'
)
setStudents(resp.data.data)
setLoading(false)
}
getStudents()
}, [])
// ... 省略
// pagination: 分页数据
// onChange: 当页号,页大小改变时触发
return (
<Table
columns={columns}
dataSource={students}
rowKey='id'
loading={loading}
pagination={pagination}
onChange={onTableChange}></Table>
)
}
- 本例还是查询所有数据,分页是客户端 Table 组件自己实现的
服务端分页
import { Table } from 'antd'
import { ColumnsType, TablePaginationConfig } from 'antd/lib/table'
import axios from 'axios'
import { useEffect, useState } from 'react'
import { PageResp, R, Student } from '../model/Student'
export default function A4() {
const [students, setStudents] = useState<Student[]>([])
const [loading, setLoading] = useState(true)
const [pagination, setPagination] = useState<TablePaginationConfig>({
current: 1,
pageSize: 5,
})
function onTableChange(newPagination: TablePaginationConfig) {
setPagination(newPagination)
}
useEffect(() => {
async function getStudents() {
// params 用来给请求添加 url 后的 ? 参数
const resp = await axios.get<R<PageResp<Student>>>(
'http://localhost:8080/api/students/q',
{
params: {
page: pagination.current,
size: pagination.pageSize,
},
}
)
// 返回结果中:list 代表当前页集合, total 代表总记录数
setStudents(resp.data.data.list)
setPagination((old) => {
return { ...old, total: resp.data.data.total }
})
setLoading(false)
}
getStudents()
}, [pagination.current, pagination.pageSize])
// useEffect 需要在依赖项( current 和 pageSize ) 改变时重新执行
const columns: ColumnsType<Student> = [
{
title: '编号',
dataIndex: 'id',
},
{
title: '姓名',
dataIndex: 'name',
},
{
title: '性别',
dataIndex: 'sex',
},
{
title: '年龄',
dataIndex: 'age',
},
]
return (
<Table
columns={columns}
dataSource={students}
rowKey='id'
loading={loading}
pagination={pagination}
onChange={onTableChange}></Table>
)
}
- 本例需要服务端配合来实现分页,参见代码中新加的注释
其中 PageResp 类型定义为
export interface PageResp<T> {
list: T[],
total: number
}
条件查询
import { Input, Select, Table } from 'antd'
import { ColumnsType, TablePaginationConfig } from 'antd/lib/table'
import axios from 'axios'
import React, { useEffect, useState } from 'react'
import { PageResp, R, Student, StudentQueryForm } from '../model/Student'
const { Option } = Select
export default function A5() {
const [students, setStudents] = useState<Student[]>([])
const [loading, setLoading] = useState(true)
const [pagination, setPagination] = useState<TablePaginationConfig>({
current: 1,
pageSize: 5,
})
// 代表查询条件的状态数据
const [form, setForm] = useState<StudentQueryForm>({})
function onTableChange(newPagination: TablePaginationConfig) {
setPagination(newPagination)
}
useEffect(() => {
async function getStudents() {
const resp = await axios.get<R<PageResp<Student>>>(
'http://localhost:8080/api/students/q',
{
params: {
page: pagination.current,
size: pagination.pageSize,
...form // 补充查询参数
},
}
)
setStudents(resp.data.data.list)
setPagination((old) => {
return { ...old, total: resp.data.data.total }
})
setLoading(false)
}
getStudents()
}, [pagination.current, pagination.pageSize, form.name, form.sex, form.age])
// 依赖项除了分页条件外,新加了查询条件依赖
const columns: ColumnsType<Student> = [
{
title: '编号',
dataIndex: 'id',
},
{
title: '姓名',
dataIndex: 'name',
},
{
title: '性别',
dataIndex: 'sex',
},
{
title: '年龄',
dataIndex: 'age',
},
]
// name 条件改变时处理函数
function onNameChange(e: React.ChangeEvent<HTMLInputElement>) {
setForm((old)=>{
return {...old, name: e.target.value}
})
}
// sex 条件改变时处理函数
function onSexChange(value: string) {
setForm((old)=>{
return {...old, sex: value}
})
}
// age 条件改变时处理函数
function onAgeChange(value: string) {
setForm((old)=>{
return {...old, age: value}
})
}
return (
<div>
<div>
<Input
style=
placeholder='请输入姓名'
value={form.name}
onChange={onNameChange}></Input>
<Select
style=
placeholder='请选择性别'
allowClear={true}
value={form.sex}
onChange={onSexChange}>
<Option value='男'>男</Option>
<Option value='女'>女</Option>
</Select>
<Select
style=
placeholder='请选择年龄'
allowClear={true}
value={form.age}
onChange={onAgeChange}>
<Option value='1,19'>20以下</Option>
<Option value='20,29'>20左右</Option>
<Option value='30,39'>30左右</Option>
<Option value='40,120'>40以上</Option>
</Select>
</div>
<Table
columns={columns}
dataSource={students}
rowKey='id'
loading={loading}
pagination={pagination}
onChange={onTableChange}></Table>
</div>
)
}
- 建议 axios 发请求是用 params 而不要自己拼字符串,因为自己拼串需要去掉值为 undefined 的属性
其中 StudentQueryForm 为
export interface StudentQueryForm {
name?: string,
sex?: string,
age?: string,
[key: string]: any
}
删除
import { Button, message, Popconfirm } from 'antd'
import axios from 'axios'
import { R } from '../model/Student'
export default function A6Delete({ id, onSuccess }: { id: number, onSuccess:()=>void }) {
async function onConfirm() {
const resp = await axios.delete<R<string>>(
`http://localhost:8080/api/students/${id}`
)
message.success(resp.data.data)
// 改变 form 依赖项
onSuccess()
}
return (
<Popconfirm title='确定要删除学生吗?' onConfirm={onConfirm}>
<Button danger size='small'>
删除
</Button>
</Popconfirm>
)
}
使用删除组件
import { Button, Input, Select, Space, Table } from 'antd'
import { ColumnsType, TablePaginationConfig } from 'antd/lib/table'
import axios from 'axios'
import React, { useEffect, useState } from 'react'
import { PageResp, R, Student, StudentQueryForm } from '../model/Student'
import A6Delete from './A6Delete'
const { Option } = Select
export default function A6() {
// ... 省略
function onDeleteSuccess() {
setForm((old)=>{
return {...old}
})
}
const columns: ColumnsType<Student> = [
// ... 省略
{
title: '操作',
dataIndex: 'operation',
// value: 属性值, student
render: (_, student)=>{
return <>
<Space>
<A6Delete id={student.id} onSuccess={onDeleteSuccess}></A6Delete>
<Button type='default' size='small'>修改</Button>
</Space>
</>
}
}
]
// ... 省略
}
修改
import { Form, Input, InputNumber, message, Modal, Radio } from 'antd'
import { Rule } from 'antd/lib/form'
import axios from 'axios'
import { useEffect } from 'react'
import { R, Student } from '../model/Student'
export default function A6Update({
open,
student,
onSuccess,
onCancel,
}: {
open: boolean
student: Student
onSuccess?: () => void
onCancel?: () => void
}) {
const { Item } = Form
const { Group } = Radio
const options = [
{ label: '男', value: '男' },
{ label: '女', value: '女' },
]
const [form] = Form.useForm() // 代表了表单对象
const nameRules: Rule[] = [
{ required: true, message: '姓名必须' },
{ min: 2, type: 'string', message: '至少两个字符' },
]
const ageRules: Rule[] = [
{ required: true, message: '年龄必须' },
{ min: 1, type: 'number', message: '最小1岁' },
{ max: 120, type: 'number', message: '最大120岁' },
]
async function onOk() {
// 验证并获取表单数据
try {
const values = await form.validateFields()
console.log(values)
const resp = await axios.put<R<string>>(
`http://localhost:8080/api/students/${values.id}`,
values
)
message.success(resp.data.data)
onSuccess && onSuccess()
} catch (e) {
console.error(e)
}
}
useEffect(() => {
// 修改表单数据
form.setFieldsValue(student) // id, name, sex, age
}, [student])
return (
<Modal
open={open}
title='修改学生'
onOk={onOk}
onCancel={onCancel}
forceRender={true}>
<Form form={form}>
<Item label='编号' name='id'>
<Input readOnly></Input>
</Item>
<Item label='姓名' name='name' rules={nameRules}>
<Input></Input>
</Item>
<Item label='性别' name='sex'>
<Group
options={options}
optionType='button'
buttonStyle='solid'></Group>
</Item>
<Item label='年龄' name='age' rules={ageRules}>
<InputNumber></InputNumber>
</Item>
</Form>
</Modal>
)
}
- forceRender 是避免因为使用 useForm 后,表单套在 Modal 中会出现的警告错误
使用组件
import { Button, Input, Select, Space, Table } from 'antd'
import { ColumnsType, TablePaginationConfig } from 'antd/lib/table'
import axios from 'axios'
import React, { useEffect, useState } from 'react'
import { PageResp, R, Student, StudentQueryForm } from '../model/Student'
import A6Delete from './A6Delete'
import A6Update from './A6Update'
const { Option } = Select
export default function A6() {
// ... 省略
const columns: ColumnsType<Student> = [
// ... 省略
{
title: '操作',
dataIndex: 'operation',
// value: 属性值, student
render: (_, student) => {
return (
<>
<Space>
<A6Delete id={student.id} onSuccess={onDeleteSuccess}></A6Delete>
<Button
type='default'
size='small'
onClick={() => {
onUpdateClick(student)
}}>
修改
</Button>
</Space>
</>
)
},
},
]
// -------------- 修改功能开始 -------------
function onUpdateClick(student: Student) {
setUpdateOpen(true)
setUpdateForm(student)
}
function onUpdateCancel() {
setUpdateOpen(false)
}
function onUpdateSuccess() {
setUpdateOpen(false)
setForm((old) => {
return { ...old }
})
}
const [updateOpen, setUpdateOpen] = useState(false)
const [updateForm, setUpdateForm] = useState<Student>({
id: 0,
name: '',
sex: '男',
age: 18,
})
// -------------- 修改功能结束 -------------
return (
<div>
<A6Update
open={updateOpen}
student={updateForm}
onSuccess={onUpdateSuccess}
onCancel={onUpdateCancel}></A6Update>
<!-- ... 省略 -->
</div>
)
}
新增
import { Form, Input, InputNumber, message, Modal, Radio } from 'antd'
import { Rule } from 'antd/lib/form'
import axios from 'axios'
import { useEffect } from 'react'
import { R, Student } from '../model/Student'
export default function A6Insert({
open,
student,
onSuccess,
onCancel,
}: {
open: boolean
student: Student
onSuccess?: () => void
onCancel?: () => void
}) {
const { Item } = Form
const { Group } = Radio
const options = [
{ label: '男', value: '男' },
{ label: '女', value: '女' },
]
const [form] = Form.useForm() // 代表了表单对象
const nameRules: Rule[] = [
{ required: true, message: '姓名必须' },
{ min: 2, type: 'string', message: '至少两个字符' },
]
const ageRules: Rule[] = [
{ required: true, message: '年龄必须' },
{ min: 1, type: 'number', message: '最小1岁' },
{ max: 120, type: 'number', message: '最大120岁' },
]
async function onOk() {
// 验证并获取表单数据
try {
const values = await form.validateFields()
console.log(values)
const resp = await axios.post<R<string>>(
`http://localhost:8080/api/students`,
values
)
message.success(resp.data.data)
onSuccess && onSuccess()
form.resetFields() // 重置表单
} catch (e) {
console.error(e)
}
}
return (
<Modal
open={open}
title='新增学生'
onOk={onOk}
onCancel={onCancel}
forceRender={true}>
<Form form={form} initialValues={student}>
<Item label='姓名' name='name' rules={nameRules}>
<Input></Input>
</Item>
<Item label='性别' name='sex'>
<Group
options={options}
optionType='button'
buttonStyle='solid'></Group>
</Item>
<Item label='年龄' name='age' rules={ageRules}>
<InputNumber></InputNumber>
</Item>
</Form>
</Modal>
)
}
- initialValues 只会触发一次表单赋初值
- form.resetFields() 会将表单重置为 initialValues 时的状态
使用组件
import { Button, Input, Select, Space, Table } from 'antd'
import { ColumnsType, TablePaginationConfig } from 'antd/lib/table'
import axios from 'axios'
import React, { useEffect, useState } from 'react'
import { PageResp, R, Student, StudentQueryForm } from '../model/Student'
import A6Delete from './A6Delete'
import A6Insert from './A6Insert'
import A6SelectedDelete from './A6SelectedDelete'
import A6Update from './A6Update'
const { Option } = Select
export default function A6() {
// ... 省略
// -------------- 新增功能开始 -------------
function onInsertClick() {
setInsertOpen(true)
}
function onInsertCancel() {
setInsertOpen(false)
}
function onInsertSuccess() {
setInsertOpen(false)
setForm((old) => {
return { ...old }
})
}
const [insertOpen, setInsertOpen] = useState(false)
const [insertForm, setInsertForm] = useState<Student>({
id: 0,
name: '',
sex: '男',
age: 18,
})
// -------------- 新增功能结束 -------------
return (
<div>
<A6Insert
open={insertOpen}
student={insertForm}
onSuccess={onInsertSuccess}
onCancel={onInsertCancel}></A6Insert>
<A6Update
open={updateOpen}
student={updateForm}
onSuccess={onUpdateSuccess}
onCancel={onUpdateCancel}></A6Update>
<div>
<Space>
<Input
style=
placeholder='请输入姓名'
value={form.name}
onChange={onNameChange}></Input>
<Select
style=
placeholder='请选择性别'
allowClear={true}
value={form.sex}
onChange={onSexChange}>
<Option value='男'>男</Option>
<Option value='女'>女</Option>
</Select>
<Select
style=
placeholder='请选择年龄'
allowClear={true}
value={form.age}
onChange={onAgeChange}>
<Option value='1,19'>20以下</Option>
<Option value='20,29'>20左右</Option>
<Option value='30,39'>30左右</Option>
<Option value='40,120'>40以上</Option>
</Select>
<Button type='primary' onClick={onInsertClick}>新增</Button>
</Space>
</div>
<Table
columns={columns}
dataSource={students}
rowKey='id'
loading={loading}
pagination={pagination}
onChange={onTableChange}></Table>
</div>
)
}
删除选中
import { Button, message, Popconfirm } from "antd";
import axios from "axios";
import React from "react";
import { R } from "../model/Student";
export default function A6DeleteSelected(
{ids, onSuccess}: {ids:React.Key[], onSuccess?:()=>void} // Key[] 是 number 或 string 的数组
){
const disabled = ids.length === 0
async function onConfirm() {
const resp = await axios.delete<R<string>>('http://localhost:8080/api/students', {
data: ids
})
message.success(resp.data.data)
onSuccess && onSuccess()
}
return (
<Popconfirm title='真的要删除选中的学生吗?' onConfirm={onConfirm} disabled={disabled}>
<Button danger type='primary' disabled={disabled}>
删除选中
</Button>
</Popconfirm>
)
}
与 A6 结合
import { Button, Input, Select, Space, Table } from 'antd'
import { ColumnsType, TablePaginationConfig } from 'antd/lib/table'
import axios from 'axios'
import React, { useEffect, useState } from 'react'
import { PageResp, R, Student, StudentQueryForm } from '../model/Student'
import A6Delete from './A6Delete'
import A6Insert from './A6Insert'
import A6SelectedDelete from './A6SelectedDelete'
import A6Update from './A6Update'
const { Option } = Select
export default function A6() {
// ... 省略
// -------------- 删除选中功能开始 -------------
const [ids, setIds] = useState<React.Key[]>([])
function onIdsChange(ids:React.Key[]) {
// console.log(ids)
setIds(ids)
}
function onDeleteSelectedSuccess() {
setForm((old)=>{
return {...old}
})
setIds([])
}
// -------------- 删除选中功能结束 -------------
return (
<div>
<A6Insert
open={insertOpen}
student={insertForm}
onSuccess={onInsertSuccess}
onCancel={onInsertCancel}></A6Insert>
<A6Update
open={updateOpen}
student={updateForm}
onSuccess={onUpdateSuccess}
onCancel={onUpdateCancel}></A6Update>
<div>
<Space>
<!-- ... 省略 -->
<A6SelectedDelete ids={ids} onSuccess={onDeleteSelectedSuccess}></A6SelectedDelete>
</Space>
</div>
<Table
rowSelection=
columns={columns}
dataSource={students}
rowKey='id'
loading={loading}
pagination={pagination}
onChange={onTableChange}></Table>
</div>
)
}
useRequest
安装
npm install ahooks
使用
import { useRequest } from 'ahooks'
import { Table } from 'antd'
import { ColumnsType } from 'antd/lib/table'
import axios from 'axios'
import { Student, R } from '../model/Student'
export default function A3() {
function getStudents() {
return axios.get<R<Student[]>>('http://localhost:8080/api/students')
}
const { loading, data } = useRequest(getStudents)
const columns: ColumnsType<Student> = [
{
title: '编号',
dataIndex: 'id',
},
{
title: '姓名',
dataIndex: 'name',
},
{
title: '性别',
dataIndex: 'sex',
},
{
title: '年龄',
dataIndex: 'age',
},
]
return (
<Table
dataSource={data?.data.data}
columns={columns}
rowKey='id'
loading={loading}
pagination=></Table>
)
}
useAndtTable
import { useAntdTable } from 'ahooks'
import { Table } from 'antd'
import { ColumnsType } from 'antd/lib/table'
import axios from 'axios'
import { Student, R } from '../model/Student'
interface PageResp<T> {
total: number
list: T[]
}
interface PageReq {
current: number
pageSize: number
sorter?: any
filter?: any
}
export default function A3() {
async function getStudents({ current, pageSize }: PageReq) {
const resp = await axios.get<R<PageResp<Student>>>(
`http://localhost:8080/api/students/q?page=${current}&size=${pageSize}`
)
return resp.data.data
}
const { tableProps } = useAntdTable(getStudents, {
defaultParams: [{ current: 1, pageSize: 5 }],
})
console.log(tableProps)
const columns: ColumnsType<Student> = [
{
title: '编号',
dataIndex: 'id',
},
{
title: '姓名',
dataIndex: 'name',
},
{
title: '性别',
dataIndex: 'sex',
},
{
title: '年龄',
dataIndex: 'age',
},
]
return <Table {...tableProps} columns={columns} rowKey='id'></Table>
}
2) MobX
介绍
需求,组件0 改变了数据,其它组件也想获得改变后的数据,如图所示

这种多个组件之间要共享状态数据,useState 就不够用了,useContext 也不好用了
能够和 react 配合使用的状态管理库有
- MobX
- Redux
其中 Redux API 非常难以使用,这里选择了更加符合人类习惯的 MobX,它虽然采用了面向对象的语法,但也能和函数式的代码很好地结合
文档
安装
npm install mobx mobx-react-lite
- mobx 目前版本是 6.x
- mobx-react-lite 目前版本是 3.x
名词

- Actions 用来修改状态数据的方法
- Observable state 状态数据,可观察
- Derived values 派生值,也叫 Computed values 计算值,会根据状态数据的改变而改变,具有缓存功能
- Reactions 状态数据发生变化后要执行的操作,如 react 函数组件被重新渲染
使用
首先,定义一个在函数之外存储状态数据的 store,它与 useState 不同:
- useState 里的状态数据是存储在每个组件节点上,不同组件之间没法共享
- 而 MobX 的 store 就是一个普通 js 对象,只要保证多个组件都访问此对象即可
import axios from 'axios'
import { makeAutoObservable } from 'mobx'
import { R, Student } from '../model/Student'
class StudentStore {
student: Student = { name: '' }
constructor() {
makeAutoObservable(this)
}
async fetch(id: number) {
const resp = await axios.get<R<Student>>(
`http://localhost:8080/api/students/${id}`
)
runInAction(() => {
this.student = resp.data.data
})
}
get print() {
const first = this.student.name.charAt(0)
if (this.student.sex === '男') {
return first.concat('大侠')
} else if (this.student.sex === '女') {
return first.concat('女侠')
} else {
return ''
}
}
}
export default new StudentStore()
其中 makeAutoObservable 会
- 将对象的属性 student 变成 Observable state,即状态数据
- 将对象的方法 fetch 变成 Action,即修改数据的方法
- 将 get 方法变成 Computed values
在异步操作里为状态属性赋值,需要放在 runInAction 里,否则会有警告错误
使用 store,所有使用 store 的组件,为了感知状态数据的变化,需要用 observer 包装,对应着图中 reactions
import Search from 'antd/lib/input/Search'
import { observer } from 'mobx-react-lite'
import studentStore from '../store/StudentStore'
import A71 from './A71'
import Test2 from './Test2'
const A7 = () => {
return (
<div>
<Search
placeholder='input search text'
onSearch={(v) => studentStore.fetch(Number(v))}
style=
/>
<h3>组件0 {studentStore.student.name}</h3>
<A71></A71>
<A72></A72>
</div>
)
}
export default observer(A7)
其它组件
import { observer } from 'mobx-react-lite'
import studentStore from '../store/StudentStore'
const A71 = () =>{
return <h3 style=>组件1 {studentStore.student.name}</h3>
}
export default observer(A71)
import { observer } from 'mobx-react-lite'
import studentStore from '../store/StudentStore'
const A72 = () =>{
return <h3 style=>组件1 {studentStore.student.name}</h3>
}
export default observer(A72)
注解方式
import { R, Student } from "../model/Student";
import { action, computed, makeAutoObservable, makeObservable, observable, runInAction } from 'mobx'
import axios from "axios";
class StudentStore {
// 属性 - 对应状态数据 observable state
@observable student: Student = { id: 0, name: '' }
// 方法 - 对应 action 方法
@action setName(name: string) {
this.student.name = name
}
@action async fetch(id: number) {
const resp = await axios.get<R<Student>>(`http://localhost:8080/api/students/${id}`)
runInAction(() => {
this.student = resp.data.data
})
}
// get 方法 - 对应 derived value
@computed get displayName() {
const first = this.student.name.charAt(0)
if (this.student.sex === '男') {
return first + '大侠'
} else if (this.student.sex === '女') {
return first + '女侠'
} else {
return ''
}
}
// 构造器
constructor() {
makeObservable(this)
}
}
export default new StudentStore()
需要在 tsconifg.json 中加入配置
{
"compilerOptions": {
// ...
"experimentalDecorators": true
}
}
3) React Router
安装
npm install react-router-dom
- 目前版本是 6.x
使用
新建文件 src/router/router.tsx
import { lazy } from 'react'
import { Navigate, RouteObject, useRoutes } from 'react-router-dom'
export function load(name: string) {
const Page = lazy(() => import(`../pages/${name}`))
return <Page></Page>
}
const staticRoutes: RouteObject[] = [
{ path: '/login', element: load('A8Login') },
{
path: '/',
element: load('A8Main'),
children: [
{ path: 'student', element: load('A8MainStudent') },
{ path: 'teacher', element: load('A8MainTeacher') },
{ path: 'user', element: load('A8MainUser') }
],
},
{ path: '/404', element: load('A8Notfound') },
{ path: '/*', element: <Navigate to={'/404'}></Navigate> },
]
export default function Router() {
return useRoutes(staticRoutes)
}
index.tsx 修改为
import ReactDOM from 'react-dom/client';
import './index.css';
import { ConfigProvider } from 'antd';
import zhCN from 'antd/es/locale/zh_CN'
import { BrowserRouter } from 'react-router-dom';
import Router from './router/router';
const root = ReactDOM.createRoot(
document.getElementById('root') as HTMLElement
);
root.render(
<ConfigProvider locale={zhCN}>
<BrowserRouter>
<Router></Router>
</BrowserRouter>
</ConfigProvider>
)
A8Main 的代码
import { Layout } from "antd";
import { Link, Outlet } from "react-router-dom";
export default function A8Main () {
return <Layout>
<Layout.Header>头部导航</Layout.Header>
<Layout>
<Layout.Sider>侧边导航
<Link to='/student'>学生管理</Link>
<Link to='/teacher'>教师管理</Link>
<Link to='/user'>用户管理</Link>
</Layout.Sider>
<Layout.Content>
<Outlet></Outlet>
</Layout.Content>
</Layout>
</Layout>
}
- Navigate 的作用是重定向
- load 方法的作用是懒加载组件,更重要的是根据字符串找到真正的组件,这是动态路由所需要的
- children 来进行嵌套路由映射,嵌套路由在跳转后,并不是替换整个页面,而是用新页面替换父页面的 Outlet 部分
动态路由
路由分成两部分:
- 静态路由,固定的部分,如主页、404、login 这几个页面
- 动态路由,变化的部分,经常是主页内的嵌套路由,比如 Student、Teacher 这些
动态路由应该是根据用户登录后,根据角色的不同,从后端服务获取,因为这些数据是变化的,所以用 mobx 来管理
import axios from 'axios'
import { makeAutoObservable, runInAction } from 'mobx'
import { Navigate, RouteObject } from 'react-router-dom'
import { MenuAndRoute, R, Route } from '../model/Student'
import { load } from '../router/MyRouter'
class RoutesStore {
dynamicRoutes: Route[]
async fetch(username: string) {
const resp = await axios.get<R<MenuAndRoute>>(
`http://localhost:8080/api/menu/${username}`
)
runInAction(() => {
this.dynamicRoutes = resp.data.data.routeList
localStorage.setItem('dynamicRoutes', JSON.stringify(this.dynamicRoutes))
})
}
constructor() {
makeAutoObservable(this)
const r = localStorage.getItem('dynamicRoutes')
this.dynamicRoutes = r ? JSON.parse(r) : []
}
reset() {
this.dynamicRoutes = []
localStorage.removeItem('dynamicRoutes')
}
get routes() {
const staticRoutes: RouteObject[] = [
{ path: '/login', element: load('A8Login') },
{ path: '/', element: load('A8Main') },
{ path: '/404', element: load('A8Notfound') },
{ path: '/*', element: <Navigate to={'/404'}></Navigate> },
]
const main = staticRoutes[1]
main.children = this.dynamicRoutes.map((r) => {
console.log(r.path, r.element)
return {
path: r.path,
element: load(r.element),
}
})
return staticRoutes
}
}
export default new RoutesStore()
- 其中用 localStorage 进行了数据的持久化,避免刷新后丢失数据
MyRouter 文件修改为
import { observer } from 'mobx-react-lite'
import { lazy } from 'react'
import { Navigate, RouteObject, useRoutes } from 'react-router-dom'
import RoutesStore from '../store/RoutesStore'
// 把字符串组件 => 组件标签
export function load(name: string) {
// A8Login
const Page = lazy(() => import(`../pages/${name}`))
return <Page></Page>
}
// 路由对象
function MyRouter() {
const router = useRoutes(RoutesStore.routes)
return router
}
export default observer(MyRouter)
注意导入 router 对象时,用 observer 做了包装,这样能够在 store 发生变化时重建 router 对象
动态菜单
图标要独立安装依赖
npm install @ant-design/icons
图标组件,用来将字符串图标转换为标签图标
import * as icons from '@ant-design/icons'
interface Module {
[p: string]: any
}
const all: Module = icons
export default function Icon({ name }: { name: string }) {
const Icon = all[name]
return <Icon></Icon>
}
修改 RoutesStore.tsx
import axios from 'axios'
import { makeAutoObservable, runInAction } from 'mobx'
import { Link, Navigate, RouteObject } from 'react-router-dom'
import { Menu, MenuAndRoute, R, Route } from '../model/Student'
import { load } from '../router/MyRouter'
import Icon from './Icon'
function convertMenu(m: Menu): any {
const Label = m.routePath ? <Link to={m.routePath}>{m.label}</Link> : m.label
return {
label: Label,
key: m.key,
icon: <Icon name={m.icon}></Icon>,
children: m.children && m.children.map(convertMenu)
}
}
class RoutesStore {
// 动态部分
dynamicRoutes: Route[] = []
dynamicMenus: Menu[] = []
async fetch(username: string) {
const resp = await axios.get<R<MenuAndRoute>>(
`http://localhost:8080/api/menu/${username}`
)
runInAction(() => {
this.dynamicRoutes = resp.data.data.routeList
localStorage.setItem('dynamicRoutes', JSON.stringify(this.dynamicRoutes))
this.dynamicMenus = resp.data.data.menuTree
localStorage.setItem('dynamicMenus', JSON.stringify(this.dynamicMenus))
})
}
get menus() {
return this.dynamicMenus.map(convertMenu)
}
get routes() {
const staticRoutes: RouteObject[] = [
{ path: '/login', element: load('A8Login') },
{ path: '/', element: load('A8Main'), children: [] },
{ path: '/404', element: load('A8Notfound') },
{ path: '/*', element: <Navigate to={'/404'}></Navigate> },
]
staticRoutes[1].children = this.dynamicRoutes.map((r) => {
return {
path: r.path,
element: load(r.element),
}
})
return staticRoutes
}
constructor() {
makeAutoObservable(this)
const json = localStorage.getItem('dynamicRoutes')
this.dynamicRoutes = json ? JSON.parse(json) : []
const json2 = localStorage.getItem('dynamicMenus')
this.dynamicMenus = json2 ? JSON.parse(json2) : []
}
reset() {
localStorage.removeItem('dynamicRoutes')
this.dynamicRoutes = []
localStorage.removeItem('dynamicMenus')
this.dynamicMenus = []
}
}
export default new RoutesStore()
其中 convertMenu 为核心方法,负责将服务器返回的 Menu 转换成 antd Menu 组件需要的 Menu
使用
<Menu items={RoutesStore.menus} mode='inline' theme="dark"></Menu>
跳转若发生错误,可能是因为组件懒加载引起的,需要用 Suspense 解决
root.render(
<ConfigProvider locale={zhCN}>
<BrowserRouter>
<Suspense fallback={<h3>加载中...</h3>}>
<MyRouter></MyRouter>
</Suspense>
</BrowserRouter>
</ConfigProvider>
)
登录
import { ItemType } from 'antd/lib/menu/hooks/useItems'
import axios from 'axios'
import { makeAutoObservable, runInAction } from 'mobx'
import { Link, Navigate, RouteObject } from 'react-router-dom'
import { LoginReq, LoginResp, Menu, MenuAndRoute, R, Route } from '../model/Student'
import { load } from '../router/MyRouter'
import Icon from './Icon'
function convertMenu(m: Menu): ItemType {
const Label = m.routePath? <Link to={m.routePath}>{m.label}</Link> : m.label
return {
key: m.key,
label: Label,
icon: <Icon name={m.icon}></Icon>,
children: m.children && m.children.map(convertMenu)
}
}
class RoutesStore {
// 动态部分
dynamicRoutes: Route[] = []
dynamicMenus: Menu[] = []
token: string = ''
state: string = 'pending' // 取值 pending done error
message: string = '' // 取值: 1. 空串 正常 2. 非空串 错误消息
async login(loginReq: LoginReq) {
this.state = 'pending'
this.message = ''
const resp1 = await axios.post<R<LoginResp>>(
'http://localhost:8080/api/loginJwt',
loginReq
)
if(resp1.data.code === 999) {
const resp2 = await axios.get<R<MenuAndRoute>>(
`http://localhost:8080/api/menu/${loginReq.username}`
)
runInAction(()=>{
this.token = resp1.data.data.token
localStorage.setItem('token', this.token)
this.dynamicRoutes = resp2.data.data.routeList
localStorage.setItem('dynamicRoutes', JSON.stringify(this.dynamicRoutes))
this.dynamicMenus = resp2.data.data.menuTree
localStorage.setItem('dynamicMenus', JSON.stringify(this.dynamicMenus))
this.state = 'done'
})
} else {
runInAction(()=>{
this.message = resp1.data.message || '未知错误'
this.state = 'error'
})
}
}
async fetch(username: string) {
const resp = await axios.get<R<MenuAndRoute>>(
`http://localhost:8080/api/menu/${username}`
)
runInAction(() => {
this.dynamicRoutes = resp.data.data.routeList
localStorage.setItem('dynamicRoutes', JSON.stringify(this.dynamicRoutes))
this.dynamicMenus = resp.data.data.menuTree
localStorage.setItem('dynamicMenus', JSON.stringify(this.dynamicMenus))
})
}
get routes() {
const staticRoutes: RouteObject[] = [
{ path: '/login', element: load('A8Login') },
{ path: '/', element: load('A8Main'), children: [] },
{ path: '/404', element: load('A8Notfound') },
{ path: '/*', element: <Navigate to={'/404'}></Navigate> },
]
staticRoutes[1].children = this.dynamicRoutes.map((r) => {
return {
path: r.path,
element: load(r.element),
}
})
return staticRoutes
}
get menus() {
return this.dynamicMenus.map(convertMenu)
}
constructor() {
makeAutoObservable(this)
const json = localStorage.getItem('dynamicRoutes')
this.dynamicRoutes = json ? JSON.parse(json) : []
const json1 = localStorage.getItem('dynamicMenus')
this.dynamicMenus = json1 ? JSON.parse(json1) : []
const token = localStorage.getItem('token')
this.token = token ?? ''
this.message = ''
this.state = 'pending'
}
reset() {
localStorage.removeItem('dynamicRoutes')
this.dynamicRoutes = []
localStorage.removeItem('dynamicMenus')
this.dynamicMenus = []
localStorage.removeItem('token')
this.token = ''
this.message = ''
this.state = 'pending'
}
}
export default new RoutesStore()
登录页面
function A8Login() {
function onFinish(values: { username: string; password: string }) {
RoutesStore.login(values)
}
const nav = useNavigate()
useEffect(() => {
if (RoutesStore.state === 'done') {
nav('/')
} else if (RoutesStore.state === 'error') {
message.error(RoutesStore.message)
}
}, [RoutesStore.state])
// ...
}
export default observer(A8Login)
- 用 useNavigate() 返回的函数跳转的代码不能包含在函数式组件的主逻辑中,只能放在
- 其它事件处理函数中
- 写在副作用函数 useEffect 之中
注销、欢迎词、登录检查
Store 中增加 get username 方法
class RoutesStore {
// ...
// eyJhbGciOiJIUzI1NiJ9.eyJzdWIiOiJhZG1pbiJ9.-l-MjMPGJVOf3zoIJgoqpV3LWoqvCCgcaI1ga86ismU
get username() {
if(this.token.length === 0) {
return ''
}
const json = atob(this.token.split('.')[1])
return JSON.parse(json).sub
}
// ...
}
- token 的前两部分都可以解码出来,其中 [1] 就是 token 的内容部分
主页组件改为
import { Button, Layout, Menu } from 'antd'
import { observer } from 'mobx-react-lite'
import { useEffect } from 'react'
import { Navigate, Outlet, useNavigate } from 'react-router-dom'
import RoutesStore from '../store/RoutesStore'
function A8Main() {
const nav = useNavigate()
function onClick() {
RoutesStore.reset()
nav('/login')
}
/* useEffect(()=>{
if(RoutesStore.username === '') {
nav('/login')
}
}, []) */
if(RoutesStore.username === '') {
return <Navigate to='/login'></Navigate>
}
return (
<Layout>
<Layout.Header>
<span>欢迎您【{RoutesStore.username}】</span>
<Button size='small' onClick={onClick}>注销</Button>
</Layout.Header>
<Layout>
<Layout.Sider>
<Menu items={RoutesStore.menus} theme='dark' mode='inline'></Menu>
</Layout.Sider>
<Layout.Content>
<Outlet></Outlet>
</Layout.Content>
</Layout>
</Layout>
)
}
export default observer(A8Main)
- 这个例子中推荐用 Navigate 来完成跳转
- /student,/teacher 等路由不需要检查,因为登录成功后才有
附录
代码片段
ctrl+shift+p 输入关键词代码

定义 fun.code-snippets
{
"函数组件": {
"scope": "javascript,typescript,typescriptreact",
"prefix": "fun",
"body": [
"export default function ${1:函数名} () {",
" $0",
" return <></>",
"}"
],
"description": "快速生成react函数式组件"
}
}
定义 ofun.code-snippets
{
"mobx函数组件": {
"scope": "javascript,typescript,typescriptreact",
"prefix": "ofun",
"body": [
"import { observer } from \"mobx-react-lite\"",
"",
"function ${1:函数名} () {",
" $0",
" return <></>",
"}",
"export default observer($1)",
],
"description": "快速生成mobx react函数式组件"
}
}
这样可以在 tsx 中用快捷键 fun 以及 ofun 创建相应的代码片段